In this blog post, we’ll post a very simple tutorial about gathering some simple data from a Sense Hat on a Raspberry Pi, post this data to Azure IoT Hub, parse them though Azure Stream Analytics and insert them into a simple Azure SQL Database table. This blog post helps as a tutorial for Azure IoT Hackathon we organized in Athens, on 18/3/2016.
This is the second part of an infinite 3D runner game tutorial. If you haven’t read the first part, you’re highly encouraged to do it by clicking here. As always, you can find the source code here on GitHub and play the game here on a WebGL enabled browser.
The levels
In the second and last part of the tutorial, we’ll see how the two game levels were built. We’ll begin with the “straight paths” level.
Straight Paths Level
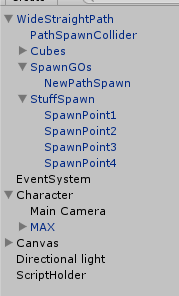
Let’s take a look at the objects contained in our game hierarchy.
GameObject hierarchy in the straight paths level.
First, there is the straight path game object which, by nature, is wider than the one in the “rotated paths” level. The path is a prefab (as designated by its blue color) and all subsequent paths will be clones of this one. Scene also contains some cubical shaped 3D objects (named Cubes), which act as floor of our path. It also contains the NewPathSpawn game object (a simple location in the 3D space), and some other locations called SpawnPoints. The SpawnPoints are positions in which new stuff will be generated. This stuff can be either a candy, or obstacle, or nothing at all.
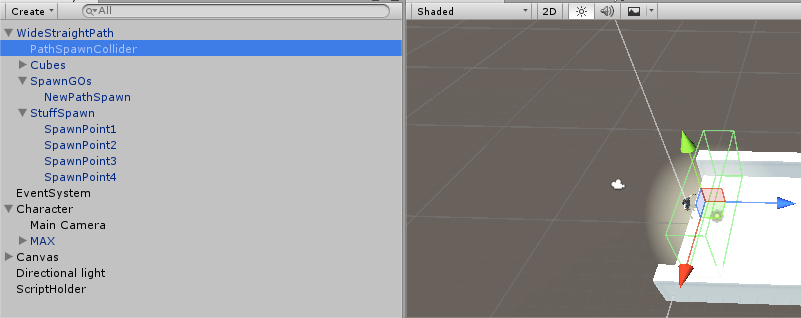
Recall that Max runs from path to path. As we are not generating all paths at the beginning of the game (because we want to save on memory and mainly because we do not know how far in the game the player will proceed, i.e. how many paths to generate), we need a mechanism to generate the N+1 path, where N is the path that Max currently steps on. We’ve used a simple trigger BoxCollider to implement this. When Max collides with it, a new path is generated via the PathSpawnCollider script (described in a while). In the straight paths level, the new path is instantiated in the “NewPathSpawn” position, which conveniently happens to be positioned at the far end of the current path.
When the player collides with the PathSpawnCollider, a new path is generated on the NewPathSpawn position.The NewPathSpawnPosition, where a new straight path will be instantiated.
The Character game object holds our Camera and the Max model. It also has a Character Controller component (which allows us to easily move our object) and a CharacterSidewaysMovement script (described below). Making the Character game object move will move both Camera and Max (since they are child game objects). This is the classic way of making 3rd person games, since in this way, camera will always be at the same position during the game, behind and a bit higher than Max.
The Canvas game object holds our simple UI (two Text objects) whereas the Directional Light is a simple light and the ScriptHolder game object holds our GameManager singleton script, which was described in the first part of the tutorial.
PathSpawnColliderScript
This script is used on both levels in order to generate the next path, following the one Max is currently running on.
public class PathSpawnCollider : MonoBehaviour {

    public float positionY = 0.81f;
    public Transform[] PathSpawnPoints;
    public GameObject Path;
    public GameObject DangerousBorder;
Script begins by declaring some public variables, to be set outside the script in the Unity editor.
– PositionY is used to properly place the redBorder on the Y axis
– The PathSpawnPoints array is used to host the locations that the next path and borders will be instantiated. In the “straight paths” level the array will have only one member (since we’ll only instantiate the next path) whereas in the “rotated paths” level the array will hold three locations, in one of which there will be the new path and in the rest two there will be the red borders that will kill Max upon collision
– The Path object holds the path prefab
– The DangerousBorder array holds the RedBorder prefab in the “rotated paths” level whereas it is null in the “straight path” level (where we do not need it)
  void OnTriggerEnter(Collider hit)
    {
        //player has hit the collider
        if (hit.gameObject.tag == Constants.PlayerTag)
        {
            //find whether the next path will be straight, left or right
            int randomSpawnPoint = Random.Range(0, PathSpawnPoints.Length);
            for (int i = 0; i < PathSpawnPoints.Length; i++)
            {
                //instantiate the path, on the set rotation
                if (i == randomSpawnPoint)
                    Instantiate(Path, PathSpawnPoints[i].position, PathSpawnPoints[i].rotation);
                else
                {
                    //instantiate the border, but rotate it 90 degrees first
                    Vector3 rotation = PathSpawnPoints[i].rotation.eulerAngles;
                    rotation.y += 90;
                    Vector3 position = PathSpawnPoints[i].position;
                    position.y += positionY;
                    Instantiate(SpawnBorder, position, Quaternion.Euler(rotation));
                }
            }

        }
    }
When Max collides with the PathSpawnCollider game object, game engine randomly chooses whether the next path will be straight, left or right. In the case of the “straight paths” level, we have only one entry in the PathSpawnPoints array (which corresponds to the straight location), so randomSpawnPoint will be 0 and the next path will be instatiated at the straight location. In the “rotated paths” level, we instatiate the next path on the chosen location and we also instantiate the RedBorder prefabs on the other two locations, while we are rotating them by 90 degrees to make them fit properly.
tl;dr: check the code here on GitHub and play the game here on a WebGL enabled browser
This is another blog post/tutorial in my Unity game development tutorials series, the first one being about a 3D game. Here, we’ll explore how to make a very special kind of game, an infinite 3D runner game. Since this post became somewhat big, it is split in two parts (check the second part here).
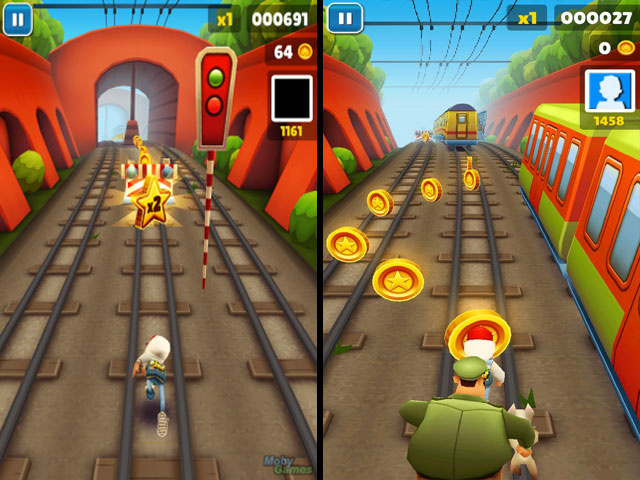
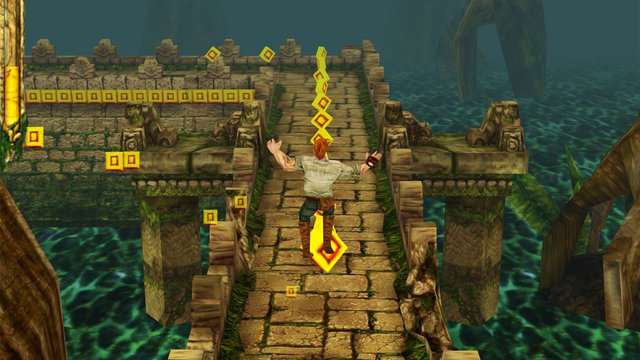
Chances are high that you have played an infinite 3D runner game at least once in the past years, when this genre became known and successful. These games have a 3rd person camera pointing at the main character who is running towards one direction in a 3D environment, while he tries to avoid various hazardous objects popping around that can kill him upon collision. This environment can be either a big path in which the character can change lanes like in normal traffic (such as in the game Subway Surfers) or can swipe left or right in various points to correctly follow the designated path (like in Temple Run).
Subway Surfers gameTemple Run game
This tutorial we’ve made contains two levels that feature both game mechanics. As you’ll see, these levels share some similarities but also have some notable differences. As usual, you can find the code here on GitHub and play the game here on a WebGL enabled browser.
Assets credits
Since this tutorial is a 3D game, I wouldn’t have something great to show without any 3D assets. Since I have no experience in 3D assets creation, I needed to find some premade ones. What other place to look for that than Unity’s Asset Store? The Asset Store is a wonderful place, where you can easily find low cost (even free) assets for your game. This tutorial would not be made possible if not for these great assets we used:
Upon game launch, player can see a screen with two simple buttons. He can choose one of the two game levels, either the “rotated paths” level or the “straight paths” level.
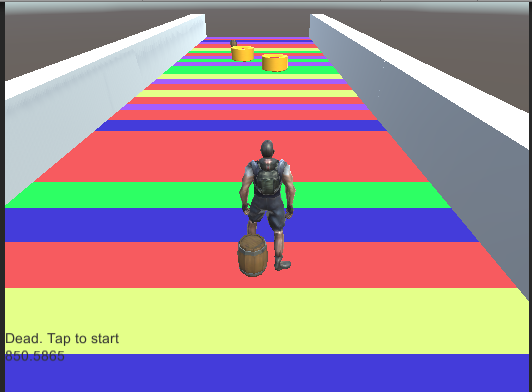
In the “rotated paths” level, Max follows a narrow platform (“path”) till he reaches its end. At some point before this happens, the game engine randomly chooses where to place the next platform, either left, right, or straight ahead. The point where this next path will be placed is at the end of the current path. When Max reaches the current path’s end, player has to swipe in order to go left or right, or just continue on the main path. If player does not swipe in time, then Max may collide with the wall and die (the red walls, depicted in the picture below). When walking on the path, Max can pick the candy that appears in front of him to get some points to increase his score, he can (must!) jump to avoid obstacles and, of course, he can swipe left or right when the platform is about to rotate in order to follow the new path.
Rotated paths level
Important: You’ll see me refer to player’s input as ‘swipe’. As you’ll see below, this game has two input methods (either arrow keys or swipe in a touch screen). So, when we say ‘swipe’, this implies either arrow keys usage or regular swipe usage on a touch screen.
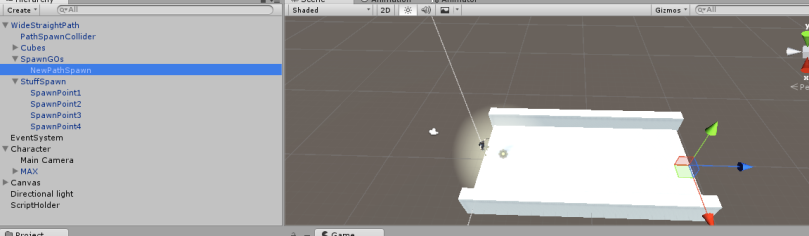
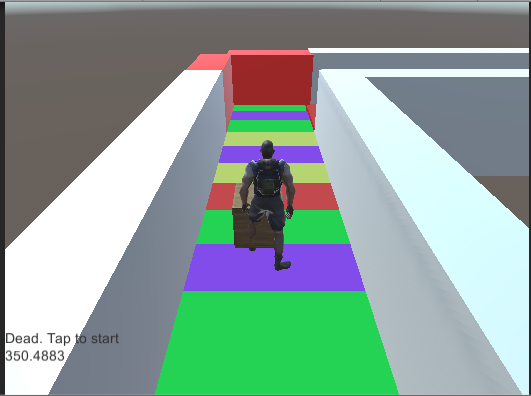
In the “straight paths” level, Max follows a wide platform and continuously moves at a straight direction. Player can swipe left or right to move sideways along imaginary lanes (like in normal traffic), while he can pick candy to increase his score. He also must avoid randomly popping obstacles either by moving on a different lane or by jumping over them. If Max falls into an obstacle, he dies and the game is over.
Straight paths level
In both cases/levels, the game can theoretically continue indefinitely. Game is over when Max falls onto a red wall (rotated paths level) or collides with an obstacle (both levels). When this happens, player can tap the screen to restart the game. Finally, as you can easily see, score is increasing as Max continues to be alive and keep running.
Today, something somewhat weird occured to me. If you build a game in Unity engine, you can easily publish it for Windows Phone, even in old and very low-end devices like the Lumia 520. This phone has a Qualcomm Snapdragon S4 MSM8227 with ISA ARMv7 supported. The Raspberry Pi 2 Model B device also has an ARM v7 processor and can be loaded with Windows 10, that support the Universal Windows Plarform, which Unity supports. You can imagine the question, can a game built with Unity be published into a Raspberry Pi 2?
tl;dr – me n33dz the codez => check here on the SenseHatGames folder
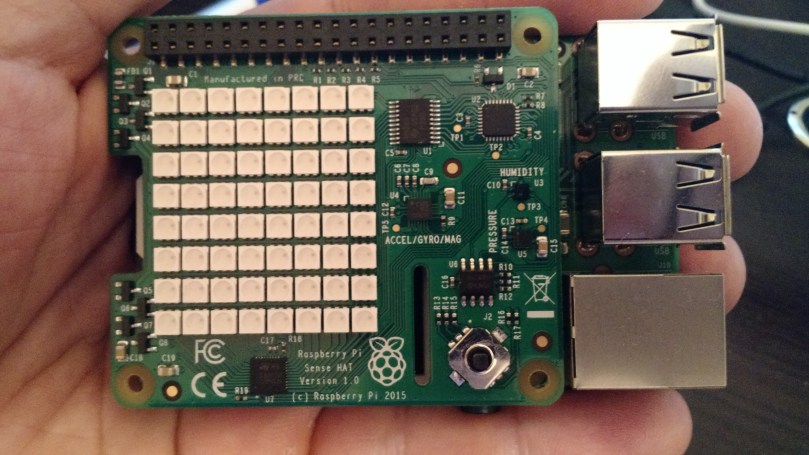
The Sense HAT is a small and inexpensive board for Raspberry Pi. It sits on top of it and offers a variety of sensors and (most importantly), a 8×8 RGB LED matrix and a 5-direction joystick. More specifically, it offers access to these sensors
Gyroscope
Accelerometer
Magnetometer
Temperature
Barometric pressure
Humidity
Sense HAT on top of a Raspberry Pi 2. You can clearly see the 8×8 RGB LED matrix whereas the joystick is on the bottom right of the HAT.
Absolutely worth mentioning, this board has also gone to space in the Astro Pi mission as part of a competition in the UK! I recently purchased one and, apart from the fun I had interacting with the sensors, I really liked the LED matrix and the joystick. So, I thought, why don’t I try and create a couple of games on it?
2048 is a very cool game that can make you spend hours playing it. Goal is to ‘merge’ tiles of identical values together, in order to have their value duplicated. When player swipes in her desired direction, items are moved towards there and a new item is created. If the player reaches the number 2048, then she has won the game. In this blog post, we’ll discuss how we can create it in Unity via C# and Visual Studio 2015.
As always, you can find the source code here on GitHub and test the game here via WebGL.
Screenshot showing the game in the Unity editor. On the left we can see the score and a restart button, on the middle the main game screen and on the right a visualization of the game’s 2 dimensional array contents, for debugging purposes.
Input methods
We have implemented two methods to get user input in the game. First one is via keyboard’s arrow keys, the other is via swipe in a touch screen (or mouse). We have implemented an enumeration to get user’s input and an interface which must be implemented by each input method we want to use. Moreover, if we need to add another input method in the future, e.g. input from an XBOX controller, we could simply implement the IInputDetector interface.
public enum InputDirection
{
    Left, Right, Top, Bottom
}

public interface IInputDetector
{
    InputDirection? DetectInputDirection();
}
Suppose that you are creating a game in which your character obtains some awards out of some predefined one, as the game goes by. Or, you’re creating software in which you want your user to select some entries/items (imagine something like a checked list box). In both cases, you could try and use these two approaches
Create or use a data structure (e.g. Dictionary<K,V>) in which you store a reference to all possible items along with the relevant Boolean value. Easy right? In order to answer the question if user has obtained item X, you just check the value of the relevant key in the dictionary.
Create or use a data structure (e.g. List<T>) in which you store references to the items the user has obtained/picked. So, you can use the List.Contains method to check for an item’s existence.
Both described methods are efficient, easy to grasp and use. However, there is another method in which you do not need to use nothing more advanced than a simple integer. We’ll be using binary system arithmetic and logic to accomplish this purpose.
Each number can be written in binary format in a sequence of 1s and 0s. For instance, 15 is binary 1111 and 2 is binary 0010. Most importantly, all numbers that are a power of two start with 1 and finish with some 0s. Check the below list
So, if you assign e.g. “valueA”to 1, “valueB” to 2, “valueC” to 4 etc., you can easily assign multiple values into an integer. How? You just add the relevant base 10 value to this integer, let’s call it storage. For instance, the integer 13 contains 3 values: a)1, b)4, c)8. In binary form, it is written as 1101. The way to check for a value’s existence is a logical bitwise AND between the storage and the respective value. In C#, we use the & for this purpose. If the result of the operation is equal to the value, then storage contains this value. Simple, right? Check the below C# code for the value 19.
int storage = 19; //10011
int a = 1; //1
int b = 2; //10
int c = 4; //100
int d = 8;//1000
int e = 16;//10000
Console.WriteLine("--------------------------------");
Console.WriteLine("Check for the value 19 - 10011");
Console.WriteLine($"Does {storage} contain \"a\" with the value of 1? " + ((storage & a) == a)); //true
Console.WriteLine($"Does {storage} contain \"b\" with the value of 2? " + ((storage & b) == b)); //true
Console.WriteLine($"Does {storage} contain \"c\" with the value of 4? " + ((storage & c) == c)); //false
Console.WriteLine($"Does {storage} contain \"d\" with the value of 6? " + ((storage & d) == d)); //false
Console.WriteLine($"Does {storage} contain \"e\" with the value of 8? " + ((storage & e) == e)); //true
Recently, I uploaded on GitHub a lot of .NET and C# samples I have created over the years, as part of my presentations and trainings. You can find them here and download them. All the samples are comprised of few lines of code that do a specific thing, relevant to the sample’s name. Some of the samples are pretty old and have been superceded by new language/framework advancements (e.g. Linq To XML vs XmlReader) but I’ve decided to keep them in case they prove useful to someone. Small description follows for each sample below:
C# Arguments – demonstrates usage of arguments in C# methods
Chat with TCP – a chat server and client using the TCP protocol
Collections – usage of .NET collections
Complex – usage of operator overloading
Default Arguments – demo of Parallel.ForEach
Delegates – usage of delegates in C#
DirectorySearcher – search directories using the DirectoryInfo class
DownloadString – WebClient demo
Events – simple Button.Click event handling
Exceptions – demo of Thread.Abort
Extension Methods – C# extension methods
Fibonacci – recursively calculating the Fibonacci sequence in C# using Func delegate
FileReaderWriter – FileStream, StreamReader and StreamWriter demo on how to read and write to a file using C#
FileSystemWatcher – get notified of file system events (file created, deleted etc.)
Generics and IO – demo of a generic Dictionary being written and read from a file
Globalization – using globalization classes to display currencies and date/time information in a variety of countries
HttpWebRequest – HttpWebRequest demo to connect to an HTTP server
MD5 Hashing – MD5 hashing using C#
MultiplyMatrices – multiply two matrices
Object Serialization – serialize an object using XmlSerializer class
Processes enumeration – get processes that are currently running on your machine
Reflection – use reflection in C# to discover information about unknown types and classes
Regex and pattern matching – use of regular expressions in C#
SendMail – how to send e-mail using C#
StopWatch – using a stopwatch in C# to count passing time
StringBuilder – an efficient class for heavy string manipulation
Threading – how to use threads in C# using classes in the System.Threading namespace
Recently I became the happy owner of a brand new Raspberry Pi 2. In case you don’t know about it, Raspberry is a pretty powerful computing device in a form factor of a credit card. You can install Windows 10 IoT Core on the Raspberry and code against it using the Universal Windows Platform (UWP_, aka write programs for this small device using C# and XAML. So, I embarked on a new self-education journey and, after some reading, I had to pick a pre-made hands-on sample and replicate it. I picked this one, since the only extra hardware it requires is a shield (Sparkfun Weather Shield) and some cables to connect it with the Raspberry. The sample instructions on hackster.io are pretty straight forward and the source code provided for the Weather Shield + UWP integration is pretty self-explanatory. Only modification I made was to add a timer to pull humidity and temperature from the shield at a fixed time interval.
However, I wanted to take this project one step further. Connect the device to Azure IoT Hub, send data to it, pass the data via a simple Azure Stream Analytics job and store it to Azure Table Storage, expose it via a Web API web service and consume it from an ASP.NET MVC web application. Well, it’s not as difficult as it sounds! I’ll briefly describe the steps I used
Azure IoT Hub
The Azure IoT Hub (in preview, at the time of writing) is a service in which millions of devices can connect and exchange messages. The IoT Hub enables bidirectional communication to and from each device, can manage each device separately and provides a high level of security. To create a new IoT Hub, login into the new Azure management portal and create it. There is also a free tier to support app development, which you can use. If you do not have an active Azure subscription, you can easily create a trial account. Even though it requires a credit card, you will not be charged at all, provided you stay within your spending limits.
It’s been some time since I posted something about my Universal Helpers library. The biggest news is that the library has been updated to support the Universal Windows Platform, allowing its usage on projects for Windows desktops, laptops, tablets, mobile devices and more! Apart from that, I’ve updated the library to include some additional behaviors and helpful classes. Let’s take a walkthrough. All this was made possible due to the release (open source!) of XAML Behaviors for UWP.
Behaviors
DragElementBehavior
Allows you to make a UIElement draggable, either by mouse or touch. It has options for
– allow the user to rotate, via multitouch
– allow the user to scale, via multitouch. User can select the maximum scale and the minimum scale.
– you can assign a container so that the draggable element can never leave the container’s bounds
– option whether the draggable element has inertia (i.e. will continue movement by decelerating when the user drags it and lets it go)
TapStoryboardBehavior
The TapStoryboardbehavior is useful for scenarios where we want to tap an element, start a storyboard and execute a method when the storyboard finishes running. It also has an option to specify whether the method is on the code-behind file or in the VM (i.e. in the DataContext of the page, for MVVM scenarios).
FeedbackBehavior
The FeedbackBehavior allows the user to implement a feedback functionality when an element is tapped and “pointer over”, specifically a scale animation on pointer over and an opacity change when tapped. This is used to notify the end user that she has indeed tapped the specified element.
SelectAllTextOnFocusBehavior
This simple behavior makes all text on a TextBox selected when the user taps on the TextBox.
 Sense HAT on top of a Raspberry Pi 2. You can clearly see the 8×8 RGB LED matrix whereas the joystick is on the bottom right of the HAT.


