tl;dr: check the code here on GitHub and play the game here on a WebGL enabled browser
This is another blog post/tutorial in my Unity game development tutorials series, the first one being about a 3D game. Here, we’ll explore how to make a very special kind of game, an infinite 3D runner game. Since this post became somewhat big, it is split in two parts (check the second part here).
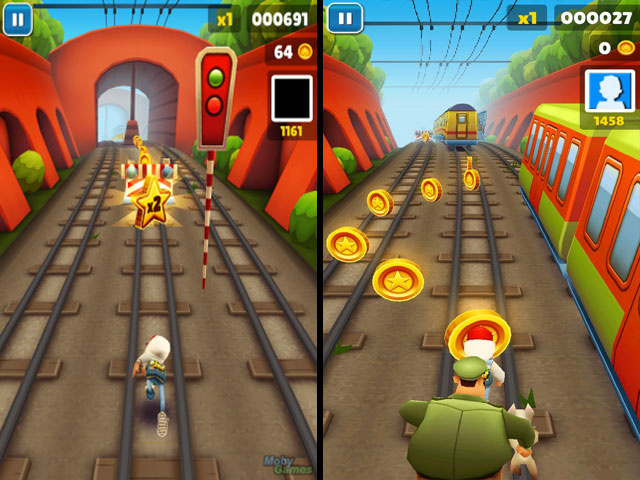
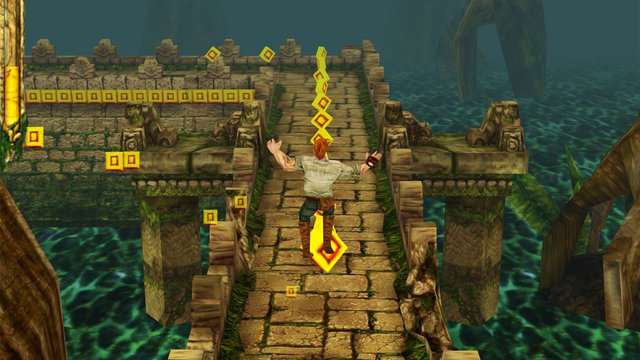
Chances are high that you have played an infinite 3D runner game at least once in the past years, when this genre became known and successful. These games have a 3rd person camera pointing at the main character who is running towards one direction in a 3D environment, while he tries to avoid various hazardous objects popping around that can kill him upon collision. This environment can be either a big path in which the character can change lanes like in normal traffic (such as in the game Subway Surfers) or can swipe left or right in various points to correctly follow the designated path (like in Temple Run).
This tutorial we’ve made contains two levels that feature both game mechanics. As you’ll see, these levels share some similarities but also have some notable differences. As usual, you can find the code here on GitHub and play the game here on a WebGL enabled browser.
Assets credits
Since this tutorial is a 3D game, I wouldn’t have something great to show without any 3D assets. Since I have no experience in 3D assets creation, I needed to find some premade ones. What other place to look for that than Unity’s Asset Store? The Asset Store is a wonderful place, where you can easily find low cost (even free) assets for your game. This tutorial would not be made possible if not for these great assets we used:
- All Sorts Candy https://www.assetstore.unity3d.com/en/#!/content/12512 Player will collect the candy to increase his score.
- Max Adventure Model https://www.assetstore.unity3d.com/en/#!/content/3012 The main character of our game. You’ll see us referring to the main game character as “Max”, because of this asset’s name.
- Campfire Pack https://www.assetstore.unity3d.com/en/#!/content/11256 We borrowed two models from this pack to create some obstacles for our player.
Game overview
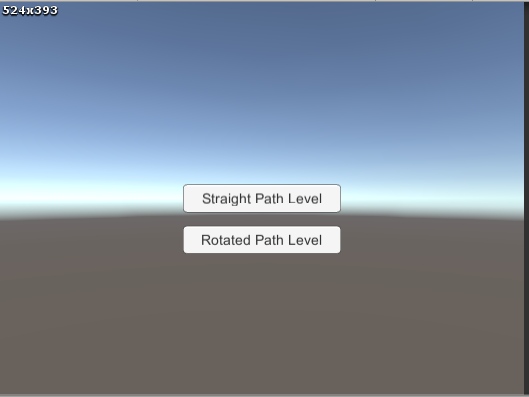
Upon game launch, player can see a screen with two simple buttons. He can choose one of the two game levels, either the “rotated paths” level or the “straight paths” level.
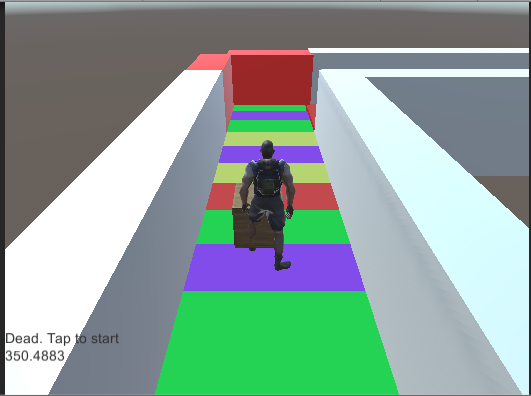
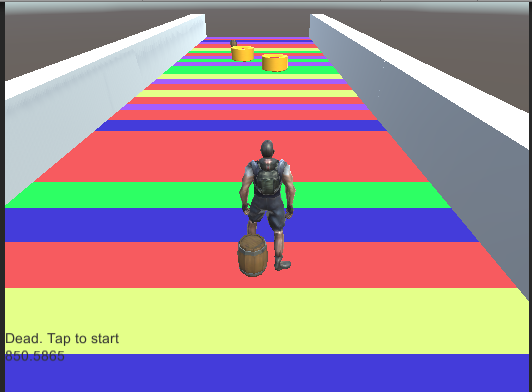
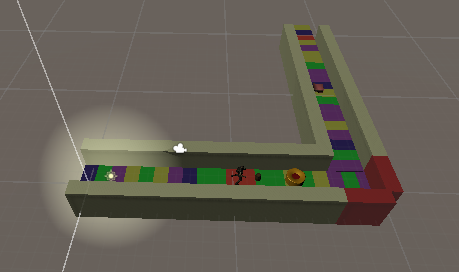
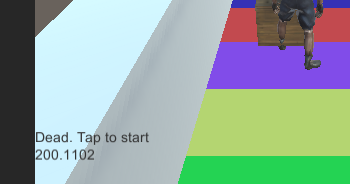
In the “rotated paths” level, Max follows a narrow platform (“path”) till he reaches its end. At some point before this happens, the game engine randomly chooses where to place the next platform, either left, right, or straight ahead. The point where this next path will be placed is at the end of the current path. When Max reaches the current path’s end, player has to swipe in order to go left or right, or just continue on the main path. If player does not swipe in time, then Max may collide with the wall and die (the red walls, depicted in the picture below). When walking on the path, Max can pick the candy that appears in front of him to get some points to increase his score, he can (must!) jump to avoid obstacles and, of course, he can swipe left or right when the platform is about to rotate in order to follow the new path.
Important: You’ll see me refer to player’s input as ‘swipe’. As you’ll see below, this game has two input methods (either arrow keys or swipe in a touch screen). So, when we say ‘swipe’, this implies either arrow keys usage or regular swipe usage on a touch screen.
In the “straight paths” level, Max follows a wide platform and continuously moves at a straight direction. Player can swipe left or right to move sideways along imaginary lanes (like in normal traffic), while he can pick candy to increase his score. He also must avoid randomly popping obstacles either by moving on a different lane or by jumping over them. If Max falls into an obstacle, he dies and the game is over.
In both cases/levels, the game can theoretically continue indefinitely. Game is over when Max falls onto a red wall (rotated paths level) or collides with an obstacle (both levels). When this happens, player can tap the screen to restart the game. Finally, as you can easily see, score is increasing as Max continues to be alive and keep running.
Diving deep into the game
Onto our game code and Unity scene construction! We’ll start by explaining the code for the common classes used in the two levels and we’ll finish by examining each level in detail. During the following sections we’ll describe the classes used in the creation of the game.
Regarding the game Input
The developer can easily alternate between two input methods for the player to use. He can either activate input by mouse/keyboard (left, right and up arrow keys) or touch input, i.e. player dragging his finger on the screen and swiping left, right or up. Both input methods have been created as classes that implement a specific interface so the main game just checks for the input method result, without having knowledge of how the input is accomplished (a very simple example of the Inversion of Control principle). Since we’ve used the same (more or less) code in our 2048 game tutorial, we will not get into details here, but rather encourage you to check that blog post for more information.
Intro Level
Intro level is the first screen our player we’ll see upon launching the game.
Intro level uses Unity UI controls, specifically two Buttons, to let the player pick the level he desires to play.
public class IntroLevel : MonoBehaviour {

    public void StraightLevelClick()
    {
        SceneManager.LoadScene("straightPathsLevel");
    }

    public void RotatedLevelClick()
    {
        SceneManager.LoadScene("rotatedPathsLevel");
    }
}
This level has only one script that contains two methods. Each one corresponds to one button click and transfers the player to the next level, utilizing Unity’s SceneManager API.
Constants.cs file
If you’ve read any of my other tutorials, you’ll definitely know that I love having a Constants.cs file in my project. This class usually contains static variables (variables I want to be visible in my entire project). Apart from the visibility part, this file saves us from hardcoding integers and (most importantly!) strings in our game scripts.
public static class Constants
{
    public static readonly string PlayerTag = "Player";
    public static readonly string AnimationStarted = "started";
    public static readonly string AnimationJump = "jump";
    public static readonly string WidePathBorderTag = "WidePathBorder";

    public static readonly string StatusTapToStart = "Tap to start";
    public static readonly string StatusDeadTapToStart = "Dead. Tap to start";
}
As you can easily see, this class contains some static helpful variables for our game.
GameState enum
As all games that respect themselves must do, we have to have a simple enumeration called GameState.
public enum GameState
{
    Start,
    Playing,
    Dead
}
Our game state enumeration is a simple one, containing three states for our game, i.e. when the game has not started, when the game is being played and when Max has died.
TimeDestroyer
We need some game objects to be destroyed after a certain amount of time, in order to take some weight out of our RAM and CPU. For instance, there is no need for a path to be ‘alive’ on the game after Max has walked past it and it is no more visible on the player’s screen. A simple solution to this problem is to have this object destroyed after a certain amount of time, which is exactly what this class accomplishes.
public class TimeDestroyer : MonoBehaviour
{

    void Start()
    {
        Invoke("DestroyObject", LifeTime);
    }

    void DestroyObject()
    {
        if (GameManager.Instance.GameState != GameState.Dead)
            Destroy(gameObject);
    }

    public float LifeTime = 10f;
}
The TimeDestroyer script is attached to various prefabs in our game, specifically to the candy, to the obstacles and to the paths. It will make the game object disappear after a certain period of time, provided Max is not dead. This, because we do not want the player to see items disappearing from the screen when Max has died, as this would be somewhat awkward for the player to see. Last but not least, the LifeTime public field determines how many seconds this game object will be alive for.
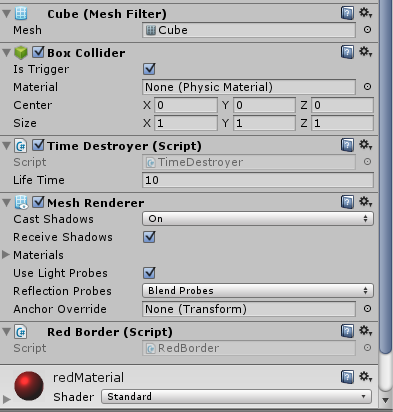
Obstacle
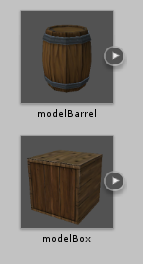
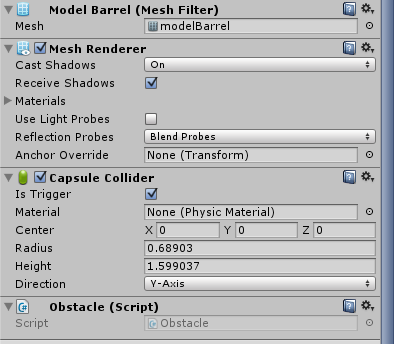
In order to make our game tough to beat, we place some obstacles on the path. Max has either to walk past by them (both levels) or jump over them (rotated paths level) at a precise timeframe in order to avoid them. If Max falls onto one of them, game is over. On the pictures below you can see the two models we use as obstacles as well as their components.
public class Obstacle : MonoBehaviour {

    void OnTriggerEnter(Collider col)
    {
        //if the player hits one obstacle, it's game over
        if(col.gameObject.tag == Constants.PlayerTag)
        {
            GameManager.Instance.Die();
        }
    }
}
As you can see in the component pictures, each obstacle game object is a triggered rigidbody. Code is very simple, just one method that activates when Max collides with the obstacle. As already said, when this happens, Max dies and the game is over for our player.
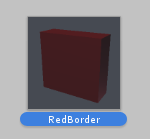
RedBorder
The RedBorder is used in the “rotated paths” level. It is red because it is hot (yeah, we could find a better excuse :P) and will kill Max if he falls onto it. Max has to avoid them and follow the correct route to the next path (either left, right or straight ahead).
public class RedBorder : MonoBehaviour
{

    void OnTriggerEnter(Collider col)
    {
        if (col.gameObject.tag == Constants.PlayerTag)
            GameManager.Instance.Die();
    }
}
The RedBorder script is attached to the RedBorder game object. As already mentioned, when Max touches the red border, he is dead and the game is over.
Game Manager
GameManager script is a script that holds some basic properties, such as the game state and the, unfortunate for our player, “Die” method. Check the script code below:
public class GameManager : MonoBehaviour
{
    void Awake()
    {
        if (instance == null)
        {
            instance = this;
        }
        else
        {
            DestroyImmediate(this);
        }
    }

    private static GameManager instance;
    public static GameManager Instance
    {
        get
        {
            if (instance == null)
            {
                instance = new GameManager();
            }
            return instance;
        }
    }
GameManager script is a Singleton, which makes only one instance of it alive during the course of the game. This single instance is accessible by the static property called Instance. If you’re looking for a more detailed Singleton description, check here on Unity’s wiki.
protected GameManager()
    {
        GameState = GameState.Start;
        CanSwipe = false;
    }

    public GameState GameState { get; set; }

    public bool CanSwipe { get; set; }

    public void Die()
    {
            UIManager.Instance.SetStatus(Constants.StatusDeadTapToStart);
            this.GameState = GameState.Dead;
    }

}
Constuctor is declared protected, so that outer classes cannot instantiate a new GameManager (necessary for the Singleton implementation). GameManager has a GameState enumeration, a bool CanSwipe property that allows the game to accept swipes from the player (used only in the “rotated paths” level) and a public Die method that runs when Max falls into a red border, an obstacle or off the path. It changes the game state and makes the UI show relevant messages to Max’s death.
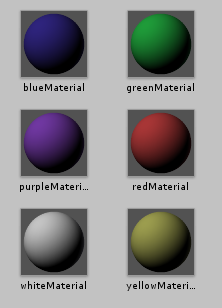
Random Material
My artistic skills are mediocre, at best. So, when I needed to give some color to my paths, I decided to select some random colors for the rectangle shapes on the path’s floor. This is what this class is used for.
These materials are located in the Resources folder of our solution, so we use the following code to load them:
public class RandomMaterial : MonoBehaviour {

	// Use this for initialization
	void Awake () {
        GetComponent().material = GetRandomMaterial();
    }

    public Material GetRandomMaterial()
    {
        int x = Random.Range(0, 5);
        if (x == 0)
            return Resources.Load("Materials/redMaterial") as Material;
        else if (x == 1)
            return Resources.Load("Materials/greenMaterial") as Material;
        else if (x == 2)
            return Resources.Load("Materials/blueMaterial") as Material;
        else if (x == 3)
            return Resources.Load("Materials/yellowMaterial") as Material;
        else if (x == 4)
            return Resources.Load("Materials/purpleMaterial") as Material;
        else
            return Resources.Load("Materials/redMaterial") as Material;
    }

}
During Awake, it assigns a random material to the game object, making it have a random color.
Candy
Most games have a way to increase a player’s score in order to make the player happier, allow him to compete with others and enhance the game’s value with some “replayability”. In our game, we’ve selected to use some beautiful candy 3D objects (you love candy, don’t you?) that increase player’s score when Max runs onto them. Imagine that they work like bonus points.
Listed below are the candy models/prefabs and the components of candy_01 (which are similar to the other three).
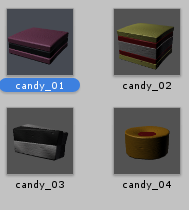
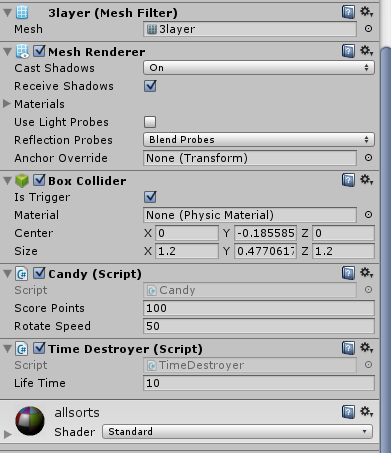
public class Candy : MonoBehaviour
{
    // Update is called once per frame
    void Update()
    {
        transform.Rotate(Vector3.up, Time.deltaTime * rotateSpeed);
    }

    void OnTriggerEnter(Collider col)
    {
        UIManager.Instance.IncreaseScore(ScorePoints);
        Destroy(this.gameObject);
    }

    public int ScorePoints = 100;
    public float rotateSpeed = 50f;
}
The Candy script continuously rotates the candy on the Y axis on to make it more visible to the user. It has a public ScorePoints variable that holds the points that this bonus is worth and is a triggered rigidbody. Upon collision with Max, the candy game object is destroyed and player is awarded with respective points, having the game’s score increased.
UIManager
Almost all games have a HUD (Heads-Up Display), i.e. some 2D text and/or images that is used to give some information about the game to the player. Here, we want to display some trivial information to the user, so we used something really simple (two text objects) with the help of Unity’s UI system.
Code for the UI script is pretty trivial:
public class UIManager : MonoBehaviour
{
    void Awake()
    {
        if (instance == null)
        {
            instance = this;
        }
        else
        {
            DestroyImmediate(this);
        }
    }

    //singleton implementation
    private static UIManager instance;
    public static UIManager Instance
    {
        get
        {
            if (instance == null)
                instance = new UIManager();

            return instance;
        }
    }

    protected UIManager()
    {
    }

    private float score = 0;

    public void ResetScore()
    {
        score = 0;
        UpdateScoreText();
    }

    public void SetScore(float value)
    {
        score = value;
        UpdateScoreText();
    }

    public void IncreaseScore(float value)
    {
        score += value;
        UpdateScoreText();
    }

    private void UpdateScoreText()
    {
        ScoreText.text = score.ToString();
    }

    public void SetStatus(string text)
    {
        StatusText.text = text;
    }

    public Text ScoreText, StatusText;

}
The UIManager script has placeholders for two UI Text game objects. First one is the text object displaying the score, whereas the second one displays game status. The class itself is a singleton and has some public methods to set the score and status text objects. It also has a private integer variable that holds player’s score which is modified by the respective public methods. Needless to say that the same script is used by both game levels.
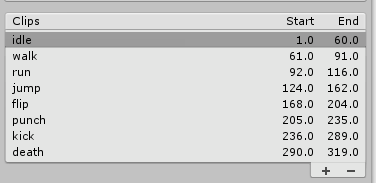
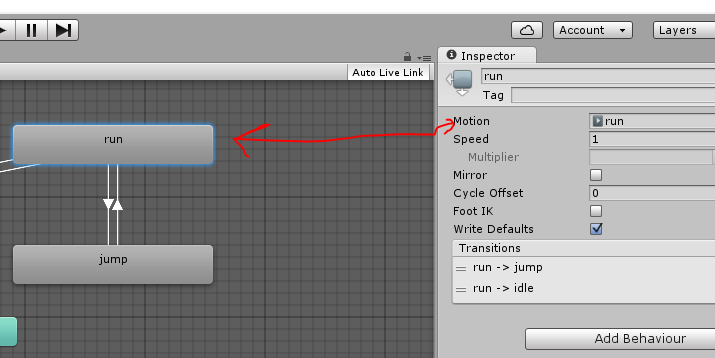
Max is animated!
The Max model has some animations embedded (luckily for us!). You can see these when the model is imported into Unity, check below. From these animations we’ll use the idle, the run and the jump animations for our purposes.
We use Unity’s Mecanim animation system to animate Max. Mecanim allows us to create a state machine in which
- all necessary states of Max model are depicted
- each state is related to an animation
- the transitions between states as well the circumstances that these occur are described
In our game, we use two boolean variables to help us transition between animation states. Actually, it’s pretty simple: in the beginning of the game, Max is in the idle state. When game starts, Max begins to run, so we transition to the run state. When player swipes up on the screen (or presses the up arrow key) Max jumps, so we transition to the jump state. When Max touches the path again after the jump, he continues to run (you guessed correct, back to the run state). Below you can see some relevant images taken inside Unity editor.
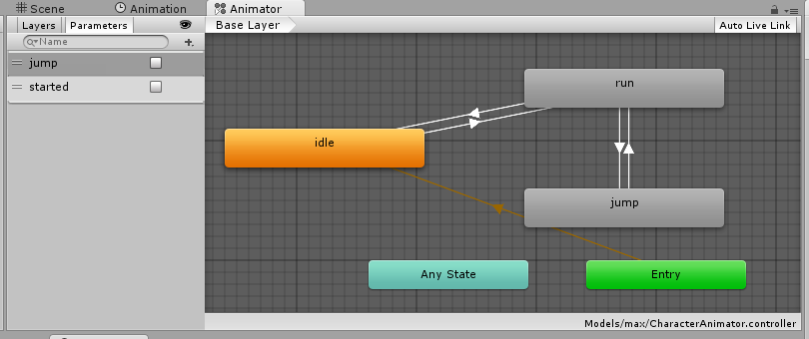

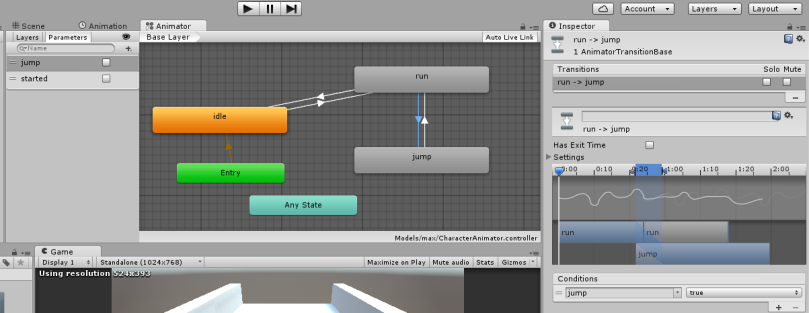
OK, states are all good, but how are the two variables modified? This happens by getting a reference to Max’s animator controller object, more on later, when we discuss the movement scripts.
End of part 1
We finished part 1 of the tutorial, check part 2 here! As a reminder, you can find the code here on GitHub and play the game here on a WebGL enabled browser. Thanks for reading!

this is not a tut duda its indications for experts who knows most of the game options to getting through . but scripts and code are might be helpfull somehow
LikeLike
Thanks, let me know if you need any assistance.
LikeLike
So when combining the two scripts so that I can swipe to turn/rotate or swipe to move left and right, I run into a problem (mentioned below) and I think I realized why, I move left and right with the x axis but when I rotate the player I’m now needing to move left and right along the z axis.
Can you help me out? I’ve asked on Unity answers and the question hasn’t gone through and I’m impatient.
LikeLike
Great guide! if you are looking for some more tips about creating a game I highly recommend this guys blog: blog.theknightsofunity.com
LikeLike
the script isn’t working for me
LikeLike
What’s the problem and what’s the Unity version you’re using?
LikeLike
It’s not the version of unity that’s the problem. The guy who made this quote on quote “tutorial” leaves out the major detail that he’s changed a few things when posting the scripts GitHub. They say minor changes but those minor changes are the difference in a working script (and a useful tutorial) and whatever you want to call the two (useless) unchanged pages.
This “tutorial” also fails to mention that he uses much more advanced code like when you need to do the InputDirection bit and it doesnt work. All of that is on GitHub as well.
You’d think someone who boasts about all the tutorials they do or someone who says: “As all games that respect themselves must do, we have to have a simple enumeration called GameState.”
— You’d think someone who thinks so highly of their work would say “Oh by the way, this tutorial is no where near complete, check out my github for everything else because I won’t be talking about it, mentioning it, or showing pictures that include detail on my hierarchy gameobjects because that’s too much work for me. I’ve got many more half-assed “tutorials” to do.”
Don’t worry though, George. I’ll clean up his mess.
You’re better off getting everything off of github and learning how it all works together rather than reading through garbage 20 times a day trying to figure out why a tutorial — a tutorial where new people are gonna go — would be so full of holes and errors that it was seemingly made by Dory from finding Nemo. “Oh forgot what that object 4 lines of code up was called let’s call it something new”
It’s even funnier that this idiot turns around and moderates the comments before theyre posted. probably because he doesnt want anyone pointing out his idiocy.
LikeLike
And yes i know you say “you can find the code on github” but like i point out, you dont bother to mention that these two pages are useless unless you get the full and updated versions of the code.
Maybe you were wearing those dumbass sunglasses while writing this indoors like a kewl guy does and couldnt tell what you were writing.
LikeLike
Hey, it’s the idiot, thanks for the great feedback! Well, comments moderation is on for spam related reasons, as you can imagine. Moreover, if the script depicted on the blog has changes compared to the one found in GitHub, then accept my apologies, I’ll get it checked and fixed ASAP, if I find any discrepancies.
LikeLike
Hey man, so I’ve got everything working and it’s going great! Thanks for the tutorial, it’s helped me learn a lot of new things. I’m stumped on one thing though.. How can I combine the two movement scripts?? I want my Player to be able to move side to side (later I’ll implement motion controls for the phone but for now arrow keys or mouse/swipe is fine). I’ve been at this all day, rewording, adding booleans and trying what I know in terms of movement to make this happen but I cant seem to get it.
Right now I have both scripts, Rotated and Sideways placed on the Player along with the Swipe && Key Detectors but it breaks the jump, the Player’s rotation is messed up.
Right now, using both scripts separately is my last resort. Having them combined had about the same results in terms of rotation issues. The only difference is that as one script, I could jump whereas now I cannot.
I feel like I’ve had it at one point but messed it up and I can’t for the life of me recall what I had that made it work..
Sorry for the long message, I’d really appreciate the help! Thank you in advance :)
LikeLike
Hey, thanks for the comments. Basically, you need to combine the code in the CharacterSidewaysMovement and the CharactedRotateMovement scripts. As you can see in the scripts, the trick is to carefully modify the moveDirection variable according you the input you’re getting. Did you manage to get it to work?
LikeLike
how to manage moveDirection variable Can you help me out?
LikeLike
Thanks for the comment. What are you trying to accomplish?
LikeLike
I combine two scripts CharacterSidewaysMovement and CharactedRotateMovement when i turn left or right on SwipeCollider its not move forward on z axis
plz help me out
LikeLike
These two scripts are quite different in the way that are implemented, I would advise against combining them. What are you trying to accomplish?
LikeLike
i want to move character left and right with rotate script as in sideways script
character move left and right (change lane on path)
LikeLiked by 1 person
Great guide
LikeLike
Thanks for letting me know this, but to get through the walls you are not easy at all, can you give me little advice? When I play or touch the wall then die.
LikeLike
What do you mean ‘get through the walls’? You are not supposed to pass through them
LikeLike
Can you help me guys?
LikeLike
Sure
LikeLike
I think it is really a good album for me. Thank you!
LikeLiked by 1 person
[…] Creating an infinite 3D runner game in Unity (like Temple Run, Subway Surfers), part 1 […]
LikeLike
Wow, thanks!
LikeLike
[…] Creating an infinite 3D runner game in Unity (like Temple Run, Subway Surfers), part 1 […]
LikeLike
Whenever i run it it says all compiler Errors will Have to be fixed what will i do
LikeLike
Please make sure you have downloaded all files into your Unity project.
LikeLike
thanks. please upload youtube videos..
LikeLike
i cant find campfire pack and max adventure in unity stores anymore…..can u give any other alternative for these two
LikeLike