This article will dive into the necessary steps that you need to do in order to use SSL/TLS for a service of yours that is hosted on a Kubernetes cluster, making it accessible via https. We will use one Microsoft Bot Framework app to demonstrate this. This framework allows you to easily built chatbots that are hosted on the provider of your choice. Its Bot Connector service allows your bot to open “conversation channels” with Messenger, Skype, Slack and other providers. For this purpose, it requires the chatbot’s endpoint to be accessible via SSL/HTTPS, so that makes for a nice proof of concept apt for this article. So, how would you host a chatbot app on a Kubernetes cluster, taking into account the SSL requirement? One option, of course, would be to have the app itself handle the certificate process, like this example. The other option, which you’ll see in this article, is to use the Kubernetes ingress controller to handle all the SSL setup and usage. The only prerequisites from your side is to have a domain name that the certificate will be issued for and, of course, access to a Kubernetes cluster.
Writing the chatbot code
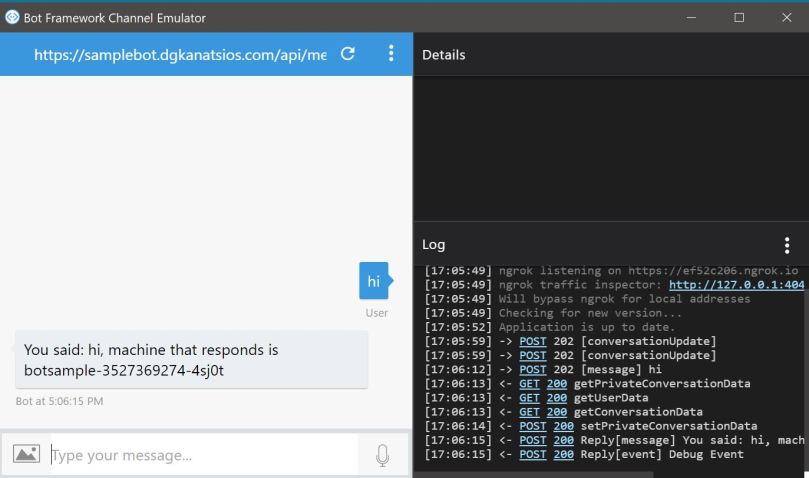
First, you will have to create a simple chatbot. You can use the below Node.js code for a simple ‘echo’ bot that also returns the hostname of the machine that responded (you’ll see later in this article how the hostname is used).
This file contains hidden or bidirectional Unicode text that may be interpreted or compiled differently than what appears below. To review, open the file in an editor that reveals hidden Unicode characters.
Learn more about bidirectional Unicode characters
| const restify = require('restify'); | |
| const builder = require('botbuilder'); | |
| const os = require('os'); | |
| const server = restify.createServer(); | |
| server.listen(process.env.port || process.env.PORT || 3978, function () { | |
| console.log('%s listening to %s', server.name, server.url); | |
| }); | |
| var connector = new builder.ChatConnector({ | |
| appId: process.env.MICROSOFT_APP_ID, | |
| appPassword: process.env.MICROSOFT_APP_PASSWORD | |
| }); | |
| server.post('/api/messages', connector.listen()); | |
| const bot = new builder.UniversalBot(connector, function (session) { | |
| session.send("You said: %s, machine that responds is %s", session.message.text, os.hostname); | |
| }); |
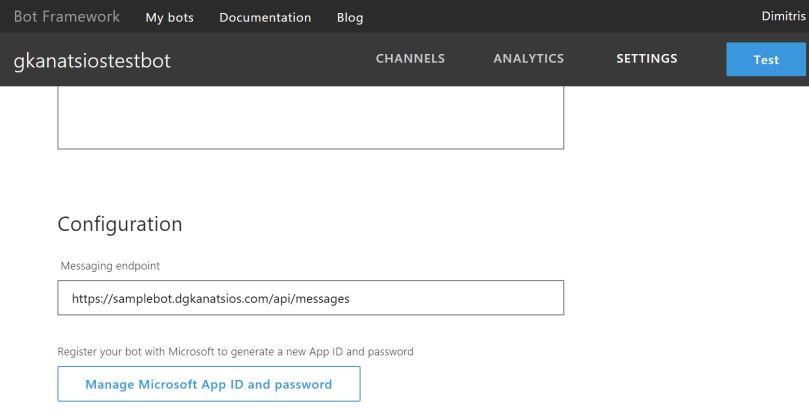
In this code you can see that the bot will authenticate with Bot Framework connector using a Microsoft Application ID and its corresponding password. Both values come as environmental variables. To get these values, you need to register your bot in the Bot Framework portal (free, at the time of writing). Keep the ID/password combination handy because we will use them later.
Creating a Docker image from the bot code
Then, you need to ‘dockerize‘ your Node.js bot code. Here’s a Dockerfile you can use, but feel free to use your own.
This file contains hidden or bidirectional Unicode text that may be interpreted or compiled differently than what appears below. To review, open the file in an editor that reveals hidden Unicode characters.
Learn more about bidirectional Unicode characters
| FROM node:boron | |
| RUN mkdir -p /usr/src/app | |
| WORKDIR /usr/src/app | |
| COPY package.json /usr/src/app/ | |
| RUN npm install | |
| COPY samplebot.js /usr/src/app | |
| EXPOSE 3978 | |
| CMD [ "node", "samplebot" ] |
Next step would be to build the image and push it to Docker Hub. If you are using Azure, you could publish it to Azure Container Registry service.
docker build -t dgkanatsios/samplebot .

docker push dgkanatsios/samplebot
Deploying the bot Docker image to Kubernetes
I assume that you have already set up a Kubernetes cluster. If not, check here for instructions on how to set one up on Azure Container Service. Once you’ve done it, you can deploy your bot to the cluster. Here’s a Kubernetes deployment file that you can use.
This file contains hidden or bidirectional Unicode text that may be interpreted or compiled differently than what appears below. To review, open the file in an editor that reveals hidden Unicode characters.
Learn more about bidirectional Unicode characters
| apiVersion: apps/v1beta1 | |
| kind: Deployment | |
| metadata: | |
| name: samplebot | |
| labels: | |
| name: samplebot | |
| app: demo | |
| spec: | |
| replicas: 1 | |
| template: | |
| metadata: | |
| labels: | |
| name: samplebot | |
| app: demo | |
| spec: | |
| containers: | |
| – name: samplebot | |
| image: dgkanatsios/samplebot:latest | |
| ports: | |
| – containerPort: 3978 | |
| protocol: TCP | |
| env: | |
| – name: MICROSOFT_APP_ID | |
| value: "YOUR_MICROSOFT_APP_ID" | |
| – name: MICROSOFT_APP_PASSWORD | |
| value: "YOUR_MICROSOFT_APP_PASSWORD" |
With this deployment file, you’re instructing the Kubernetes cluster to perform the following things:
- Create a Kubernetes deployment
- This deployment contains 1 replica of the dgkanatsios/samplebot Docker image (which you pushed to the Docker Hub a while ago)
- You are explicitly mentioning that your running Docker image will open and listen on port 3978/TCP
- You are setting two environmental variables for your image with Application ID and password from the Bot Framework portal (don’t forget to insert your values). Best practice, though, would be to use Kubernetes secrets to pass these variables so they are not visible in the deployment file
Run this deployment file you created with kubectl command line tool.
kubectl create -f deploy.yaml
After a while, your new pod will be up and running.
kubectl get pods

NAME READY STATUS RESTARTS AGE
samplebot-3527369274-4sj0t 1/1 Running 0 1m
Now, let’s expose the 3978 port of your deployment by creating the relevant Kubernetes service.
kubectl expose deployments/samplebot --port=3978
You can check that it has been indeed exposed internally in the cluster using the ‘kubectl get svs’ command.
kubect get svc

NAME CLUSTER-IP EXTERNAL-IP PORT(S) AGE
samplebot 10.0.82.233 <none> 3978/TCP 18s
kubernetes 10.0.0.1 <none> 443/TCP 8m
Installing NGINX Ingress Controller
Then, you need to install helm on your local computer. Helm is a package manager for Kubernetes, think of it like apt-get/yum/homebrew/chocolatey but built for Kubernetes. Once you install helm, you need to install tiller on your cluster.
helm init --upgrade
Feel free to check here for more details about helm and Azure Container Service.
Then, you will install the NGINX ingress controller chart.
helm install stable/nginx-ingress
Run helm list to see that the chart has been successfully installed.
helm list

NAME REVISION UPDATED STATUS CHART NAMESPACE
cantankerous-narwhal 1 Thu Jul 6 15:57:42 2017 DEPLOYED nginx-ingress-0.4.2 default
Configuring SSL
For the purposes of this article, you will use Let’s Encrypt to get a free certificate for your (sub)domain. To do this, you will use kube-lego chart which automatically requests certificates for Kubernetes ingress resources from Let’s Encrypt. Don’t forget to substitute ‘you@domain.tld; with your real e-mail address!
helm install --set config.LEGO_EMAIL=you@domain.tld --set config.LEGO_URL=https://acme-v01.api.letsencrypt.org/directory stable/kube-lego
Now you need to configure the Kubernetes service for the ingress. You can use this file as base:
This file contains hidden or bidirectional Unicode text that may be interpreted or compiled differently than what appears below. To review, open the file in an editor that reveals hidden Unicode characters.
Learn more about bidirectional Unicode characters
| apiVersion: extensions/v1beta1 | |
| kind: Ingress | |
| metadata: | |
| annotations: | |
| kubernetes.io/ingress.class: nginx | |
| kubernetes.io/tls-acme: "true" | |
| name: ingress | |
| spec: | |
| rules: | |
| – host: samplebot.dgkanatsios.com | |
| http: | |
| paths: | |
| – backend: | |
| serviceName: samplebot | |
| servicePort: 3978 | |
| path: / | |
| tls: | |
| – hosts: | |
| – samplebot.dgkanatsios.com | |
| secretName: example-tls |
You should modify the host domain name (here I’m using a subdomain of my ‘dgkanatsios.com’ domain), the serviceName (use the name of your Kubernetes service where you exposed your chatbot’s container port) and the servicePort (if you’re using something other than 3978).
Once you finish creating the file, run kubectl with it.
kubectl create -f ingress-ssl.yaml
Once you do that, you should check if the ingress has been correctly deployed. Run ‘kubectl get ing’.
kubectl get ing

NAME HOSTS ADDRESS PORTS AGE
ingress samplebot.dgkanatsios.com 80, 443 5m
kube-lego-nginx samplebot.dgkanatsios.com 80 5m
Then, you should get the external IP of your NGINX ingress controller. If it comes as <pending>, this means that it is still being created in the Azure backend, so wait for a few minutes.
kubectl get svc

NAME CLUSTER-IP EXTERNAL-IP PORT(S) AGE
samplebot 10.0.82.233 <none> 3978/TCP 23m
jaundiced-manatee-nginx-ingress-controller 10.0.143.24 <strong>13.95.230.243</strong> 80:31280/TCP,443:31501/TCP 16m
jaundiced-manatee-nginx-ingress-default-backend 10.0.97.68 <none> 80/TCP 16m
kube-lego-nginx 10.0.185.132 <none> 8080/TCP 44s
kubernetes 10.0.0.1 <none> 443/TCP 32m
and then configure your DNS server with an A record of your (sub)domain pointing to this external IP.
Testing that it actually works!
It make take some time for the DNS propagation to take place, so be patient. After a while, when this is up, you can use the Bot Framework emulator to test your bot code.
Optionally, you could return to the Bot Framework portal and configure your bot to be accessible at your new URL.
Next steps
- If you want to enable TLS authentication through your NGINX controller, check here
- Brendan Burns from Azure Container Service team demos the SSL steps we described in his BUILD talk here (on 47′ and onwards)
Bonus – scaling the bot
Remember that we returned the machine name from the bot’s response code? We could scale our bot easily and see this in action:
kubectl scale deploy samplebot --replicas=3

kubectl get pods

NAME READY STATUS RESTARTS AGE
samplebot-3527369274-4sj0t 1/1 Running 0 3h
samplebot-3527369274-8vjml 1/1 Running 0 18s
samplebot-3527369274-r4z0m 1/1 Running 0 18s
early-pig-kube-lego-610068836-psq8z 1/1 Running 0 1h
ironic-owl-nginx-ingress-controller-423399762-pz558 1/1 Running 0 1h
ironic-owl-nginx-ingress-default-backend-3925919273-qssbh 1/1 Running 0 1h
If you try talking to the bot using the emulator, you’ll see that each request will handled by a different pod based on the rules of the Replica Set.


Thhanks for posting this
LikeLike