We recorded and published an intro video about using Azure PlayFab Multiplayer Servers service with game servers built as Linux Docker containers. Feel free to check out the recording and let us know if you have any questions!
Azure Services for Unity is a small library (currently in beta) that provides you an easy way you to access an Azure database and/or APIs (hosted on Azure App Service) via the Unity game engine. You can use it to save highscores, status messages, send messages between players and much more. As there are no plugins involved, library is cross-platform and can run everywhere that Unity runs (editor, standalone players, iOS, Android, Windows Phone and Windows Store Apps). Of course, it is completely open source and free to use. It was last tested on Unity 5.3.4f1. Current version 0.0.13.
Update: for some additions and fixes to the library check out my newer blog post here Update2: check this blog post for an addition to the library that allows you to access Azure Table Storage Service or CosmosDB with Table Storage API.
Intro
Azure App Service is quite an interesting cloud platform to develop web and mobile apps. One can easily create web apps that scale, create mobile apps backend and integrate with existing services either on the cloud or on-premise. App Service also has a very simple mechanism to store data and use various APIs, called Easy Tables and Easy APIs, respectively. Those can be rather helpful to game developers that want to create a backend for their game. In this blog post, we’ll describe a small library that allows a game written in Unity to access them.
Creating an Azure App Service and database
We assume you have an active Azure subscription. If not, refer to the last paragraph on this blog post to find out easy ways to get one. First, you’ll need to visit the new Azure portal at http://portal.azure.com.
This is the second part of an infinite 3D runner game tutorial. If you haven’t read the first part, you’re highly encouraged to do it by clicking here. As always, you can find the source code here on GitHub and play the game here on a WebGL enabled browser.
The levels
In the second and last part of the tutorial, we’ll see how the two game levels were built. We’ll begin with the “straight paths” level.
Straight Paths Level
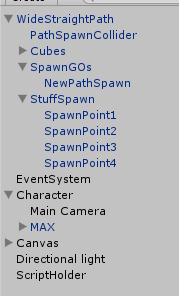
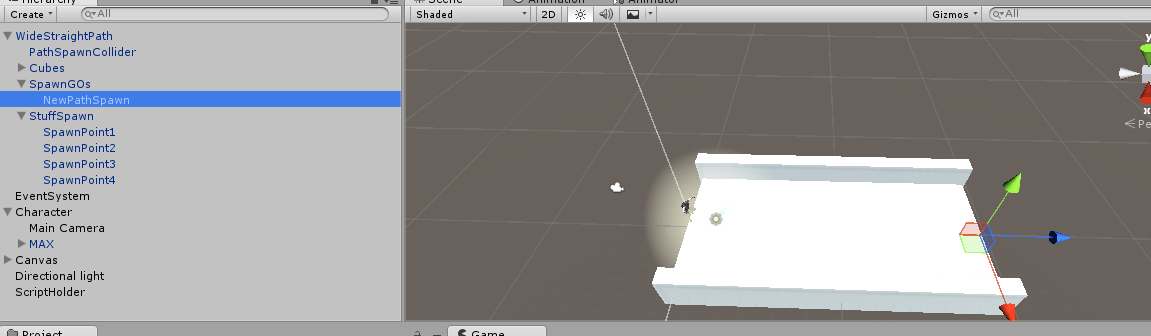
Let’s take a look at the objects contained in our game hierarchy.
GameObject hierarchy in the straight paths level.
First, there is the straight path game object which, by nature, is wider than the one in the “rotated paths” level. The path is a prefab (as designated by its blue color) and all subsequent paths will be clones of this one. Scene also contains some cubical shaped 3D objects (named Cubes), which act as floor of our path. It also contains the NewPathSpawn game object (a simple location in the 3D space), and some other locations called SpawnPoints. The SpawnPoints are positions in which new stuff will be generated. This stuff can be either a candy, or obstacle, or nothing at all.
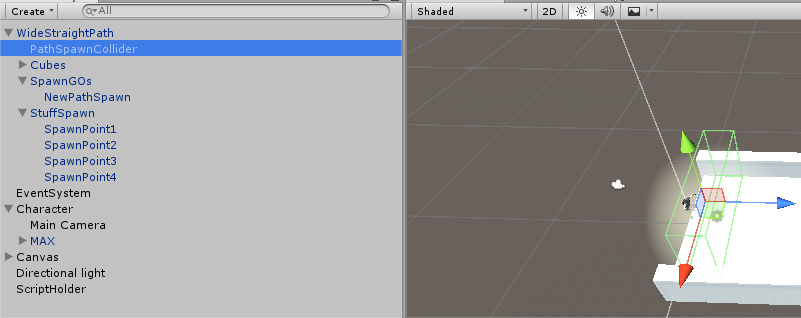
Recall that Max runs from path to path. As we are not generating all paths at the beginning of the game (because we want to save on memory and mainly because we do not know how far in the game the player will proceed, i.e. how many paths to generate), we need a mechanism to generate the N+1 path, where N is the path that Max currently steps on. We’ve used a simple trigger BoxCollider to implement this. When Max collides with it, a new path is generated via the PathSpawnCollider script (described in a while). In the straight paths level, the new path is instantiated in the “NewPathSpawn” position, which conveniently happens to be positioned at the far end of the current path.
When the player collides with the PathSpawnCollider, a new path is generated on the NewPathSpawn position.
The NewPathSpawnPosition, where a new straight path will be instantiated.
The Character game object holds our Camera and the Max model. It also has a Character Controller component (which allows us to easily move our object) and a CharacterSidewaysMovement script (described below). Making the Character game object move will move both Camera and Max (since they are child game objects). This is the classic way of making 3rd person games, since in this way, camera will always be at the same position during the game, behind and a bit higher than Max.
The Canvas game object holds our simple UI (two Text objects) whereas the Directional Light is a simple light and the ScriptHolder game object holds our GameManager singleton script, which was described in the first part of the tutorial.
PathSpawnColliderScript
This script is used on both levels in order to generate the next path, following the one Max is currently running on.
public class PathSpawnCollider : MonoBehaviour {

    public float positionY = 0.81f;
    public Transform[] PathSpawnPoints;
    public GameObject Path;
    public GameObject DangerousBorder;
Script begins by declaring some public variables, to be set outside the script in the Unity editor.
– PositionY is used to properly place the redBorder on the Y axis
– The PathSpawnPoints array is used to host the locations that the next path and borders will be instantiated. In the “straight paths” level the array will have only one member (since we’ll only instantiate the next path) whereas in the “rotated paths” level the array will hold three locations, in one of which there will be the new path and in the rest two there will be the red borders that will kill Max upon collision
– The Path object holds the path prefab
– The DangerousBorder array holds the RedBorder prefab in the “rotated paths” level whereas it is null in the “straight path” level (where we do not need it)
  void OnTriggerEnter(Collider hit)
    {
        //player has hit the collider
        if (hit.gameObject.tag == Constants.PlayerTag)
        {
            //find whether the next path will be straight, left or right
            int randomSpawnPoint = Random.Range(0, PathSpawnPoints.Length);
            for (int i = 0; i < PathSpawnPoints.Length; i++)
            {
                //instantiate the path, on the set rotation
                if (i == randomSpawnPoint)
                    Instantiate(Path, PathSpawnPoints[i].position, PathSpawnPoints[i].rotation);
                else
                {
                    //instantiate the border, but rotate it 90 degrees first
                    Vector3 rotation = PathSpawnPoints[i].rotation.eulerAngles;
                    rotation.y += 90;
                    Vector3 position = PathSpawnPoints[i].position;
                    position.y += positionY;
                    Instantiate(SpawnBorder, position, Quaternion.Euler(rotation));
                }
            }

        }
    }
When Max collides with the PathSpawnCollider game object, game engine randomly chooses whether the next path will be straight, left or right. In the case of the “straight paths” level, we have only one entry in the PathSpawnPoints array (which corresponds to the straight location), so randomSpawnPoint will be 0 and the next path will be instatiated at the straight location. In the “rotated paths” level, we instatiate the next path on the chosen location and we also instantiate the RedBorder prefabs on the other two locations, while we are rotating them by 90 degrees to make them fit properly.
tl;dr: check the code here on GitHub and play the game here on a WebGL enabled browser
This is another blog post/tutorial in my Unity game development tutorials series, the first one being about a 3D game. Here, we’ll explore how to make a very special kind of game, an infinite 3D runner game. Since this post became somewhat big, it is split in two parts (check the second part here).
Chances are high that you have played an infinite 3D runner game at least once in the past years, when this genre became known and successful. These games have a 3rd person camera pointing at the main character who is running towards one direction in a 3D environment, while he tries to avoid various hazardous objects popping around that can kill him upon collision. This environment can be either a big path in which the character can change lanes like in normal traffic (such as in the game Subway Surfers) or can swipe left or right in various points to correctly follow the designated path (like in Temple Run).
Subway Surfers game
Temple Run game
This tutorial we’ve made contains two levels that feature both game mechanics. As you’ll see, these levels share some similarities but also have some notable differences. As usual, you can find the code here on GitHub and play the game here on a WebGL enabled browser.
Assets credits
Since this tutorial is a 3D game, I wouldn’t have something great to show without any 3D assets. Since I have no experience in 3D assets creation, I needed to find some premade ones. What other place to look for that than Unity’s Asset Store? The Asset Store is a wonderful place, where you can easily find low cost (even free) assets for your game. This tutorial would not be made possible if not for these great assets we used:
Upon game launch, player can see a screen with two simple buttons. He can choose one of the two game levels, either the “rotated paths” level or the “straight paths” level.
In the “rotated paths” level, Max follows a narrow platform (“path”) till he reaches its end. At some point before this happens, the game engine randomly chooses where to place the next platform, either left, right, or straight ahead. The point where this next path will be placed is at the end of the current path. When Max reaches the current path’s end, player has to swipe in order to go left or right, or just continue on the main path. If player does not swipe in time, then Max may collide with the wall and die (the red walls, depicted in the picture below). When walking on the path, Max can pick the candy that appears in front of him to get some points to increase his score, he can (must!) jump to avoid obstacles and, of course, he can swipe left or right when the platform is about to rotate in order to follow the new path.
Rotated paths level
Important: You’ll see me refer to player’s input as ‘swipe’. As you’ll see below, this game has two input methods (either arrow keys or swipe in a touch screen). So, when we say ‘swipe’, this implies either arrow keys usage or regular swipe usage on a touch screen.
In the “straight paths” level, Max follows a wide platform and continuously moves at a straight direction. Player can swipe left or right to move sideways along imaginary lanes (like in normal traffic), while he can pick candy to increase his score. He also must avoid randomly popping obstacles either by moving on a different lane or by jumping over them. If Max falls into an obstacle, he dies and the game is over.
Straight paths level
In both cases/levels, the game can theoretically continue indefinitely. Game is over when Max falls onto a red wall (rotated paths level) or collides with an obstacle (both levels). When this happens, player can tap the screen to restart the game. Finally, as you can easily see, score is increasing as Max continues to be alive and keep running.
tl;dr – me n33dz the codez => check here on the SenseHatGames folder
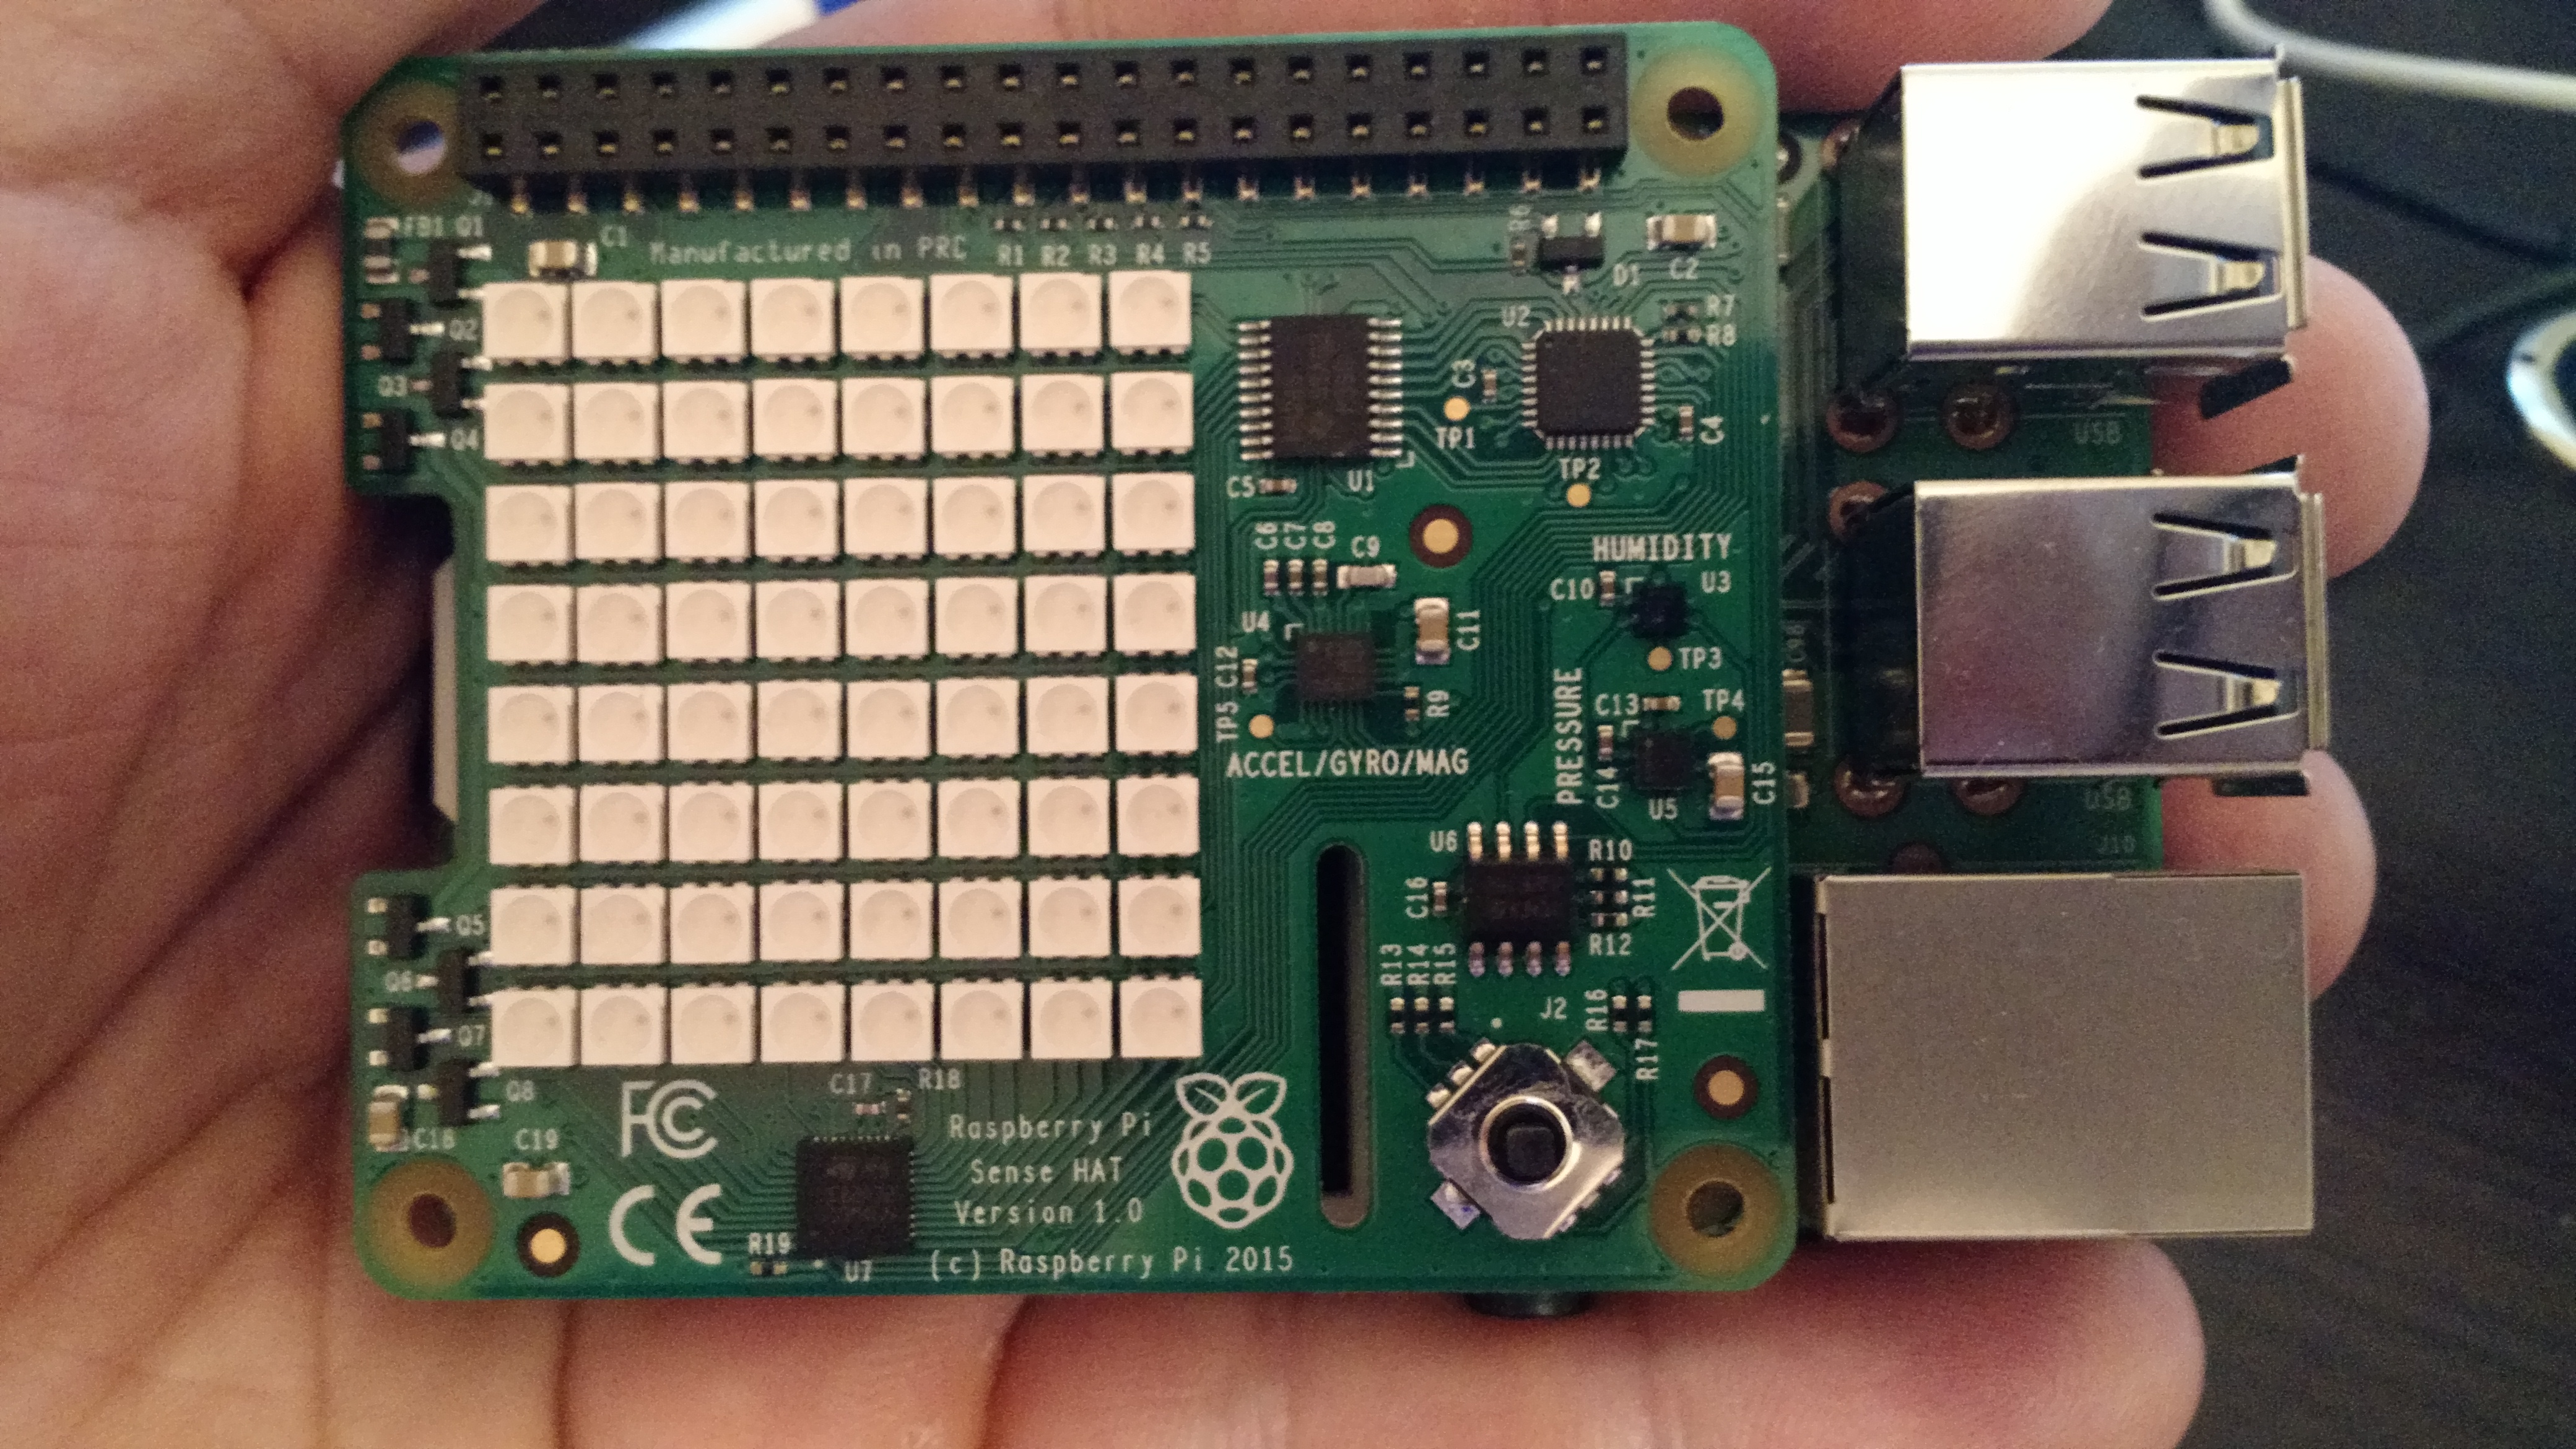
The Sense HAT is a small and inexpensive board for Raspberry Pi. It sits on top of it and offers a variety of sensors and (most importantly), a 8×8 RGB LED matrix and a 5-direction joystick. More specifically, it offers access to these sensors
Gyroscope
Accelerometer
Magnetometer
Temperature
Barometric pressure
Humidity
Sense HAT on top of a Raspberry Pi 2. You can clearly see the 8×8 RGB LED matrix whereas the joystick is on the bottom right of the HAT.
Absolutely worth mentioning, this board has also gone to space in the Astro Pi mission as part of a competition in the UK! I recently purchased one and, apart from the fun I had interacting with the sensors, I really liked the LED matrix and the joystick. So, I thought, why don’t I try and create a couple of games on it?
2048 is a very cool game that can make you spend hours playing it. Goal is to ‘merge’ tiles of identical values together, in order to have their value duplicated. When player swipes in her desired direction, items are moved towards there and a new item is created. If the player reaches the number 2048, then she has won the game. In this blog post, we’ll discuss how we can create it in Unity via C# and Visual Studio 2015.
As always, you can find the source code here on GitHub and test the game here via WebGL.
Screenshot showing the game in the Unity editor. On the left we can see the score and a restart button, on the middle the main game screen and on the right a visualization of the game’s 2 dimensional array contents, for debugging purposes.
Input methods
We have implemented two methods to get user input in the game. First one is via keyboard’s arrow keys, the other is via swipe in a touch screen (or mouse). We have implemented an enumeration to get user’s input and an interface which must be implemented by each input method we want to use. Moreover, if we need to add another input method in the future, e.g. input from an XBOX controller, we could simply implement the IInputDetector interface.
public enum InputDirection
{
    Left, Right, Top, Bottom
}

public interface IInputDetector
{
    InputDirection? DetectInputDirection();
}
So, this summer I had my 15’ of fame as Microsoft sponsored some articles/tutorials on the well known game development website Gamasutra. Some of my Unity development blog posts were selected, specifically
This tutorial is meant for educational purposes only to showcase how to build certain types of games. Please respect the copyrights/trademarks of others!
If you are in a hurry, you can try the game here and find the source code here.
Match three games are pretty famous these days. From the original Bejeweled to Candy Crush Saga and even Evolve: Hunters Quest, many games are based on the match 3 mechanism while giving specialized bonuses to the user. Such an example is giving a special item if she matches more than three items. If the user creates a match that includes this bonus, then the whole row or column is destroyed.
In this blog post, we’ll try to dissect in what is needed to build such a game, using Unity 3D, Visual Studio and the C# programming language. Game code was written in Visual Studio (check the free Community edition here). For debugging purposes, don’t forget to check the Visual Studio tools for Unity here.
Let’s start with a screenshot of the game running in the Unity Editor
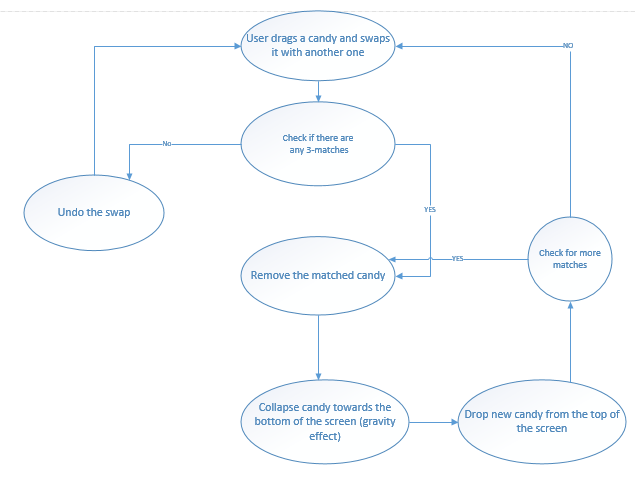
Only external assets we’re using are some candy graphics (Public Domain, found on OpenGameArt here) and a very cool sound (found on FreeSound here) to build our game. User can drag (in an attempt to swap) one candy either horizontally or vertically. When the swap happens, the game checks for a match. As soon as a vertical or horizontal match of three (or more!) is encountered, the matched candies disappear. Remaining candies collapse, new candies get created to replace them which collapse, too (imagine gravity acting upon them). The game checks if another match of three is encountered (without any user intervention). If this happens, the matched ones disappear again, remaining candies collapse, new candies fall and so on and so forth. This goes on until no match of three exist and user intervention is required for the game to go on. If the user does not touch the screen for a while, potential matches (candies that if one of them gets swapped will form a match of three) start animating, to give the user a small hint in order to continue the game.
The described game flow can be visualized in the below diagram
It is recommended that you read part 1 before proceeding on reading the rest of this tutorial. On the first part, we explained the way game levels are saved/loaded from XML files, as well as the Object Pooling technique. In this part, we will deal with the core Tower Defense game mechanics.
This is the second post in 2 post tutorial regarding making a tower defense in Unity. In the first post we described the game scenario and gameplay and we also mentioned the level editor, the XML file and structure that holds level information and the object pooler methodology we use. Again, if you haven’t read it, I strongly encourage you to do it ASAP, this post will be much clearer after that!
We’ll start by exploring the prefabs we have in our game.
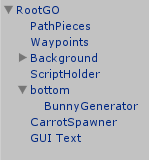
The RootGO gameobject
In the instructions we gave at the previous post about making a new level, we mentioned dragging a prefab called “RootGO” to the scene. Let’s see this object’s children in detail.


 Sense HAT on top of a Raspberry Pi 2. You can clearly see the 8×8 RGB LED matrix whereas the joystick is on the bottom right of the HAT.