Update (2/1/2018): Blog post and GitHub code has been updated with instructions on how to connect to CosmosDB using Table Storage API.
Azure Table Storage Service is an inexpensive, highly available NoSQL key-value store. It can store petabytes of structured data, supports a flexible data schema and Azure team provides a REST API. Furthermore, Azure CosmosDB has a Table Storage API, so the same code can also be used here. So, I thought, why not extending my Azure Services for Unity library with support for access to Azure Table Storage Service from any Unity game? Well, here we are, our latest commit to the repository contains access methods for the service.
Azure Services for Unity is a small library (currently in beta) that provides you an easy way you to access an Azure database and/or APIs (hosted on Azure App Service) via the Unity game engine. You can use it to save highscores, status messages, send messages between players and much more. As there are no plugins involved, library is cross-platform and can run everywhere that Unity runs (editor, standalone players, iOS, Android, Windows Phone and Windows Store Apps). Of course, it is completely open source and free to use. It was last tested on Unity 5.3.4f1. Current version 0.0.13.
Update: for some additions and fixes to the library check out my newer blog post here Update2: check this blog post for an addition to the library that allows you to access Azure Table Storage Service or CosmosDB with Table Storage API.
Intro
Azure App Service is quite an interesting cloud platform to develop web and mobile apps. One can easily create web apps that scale, create mobile apps backend and integrate with existing services either on the cloud or on-premise. App Service also has a very simple mechanism to store data and use various APIs, called Easy Tables and Easy APIs, respectively. Those can be rather helpful to game developers that want to create a backend for their game. In this blog post, we’ll describe a small library that allows a game written in Unity to access them.
Creating an Azure App Service and database
We assume you have an active Azure subscription. If not, refer to the last paragraph on this blog post to find out easy ways to get one. First, you’ll need to visit the new Azure portal at http://portal.azure.com.
tl;dr: check the code here on GitHub and play the game here on a WebGL enabled browser
This is another blog post/tutorial in my Unity game development tutorials series, the first one being about a 3D game. Here, we’ll explore how to make a very special kind of game, an infinite 3D runner game. Since this post became somewhat big, it is split in two parts (check the second part here).
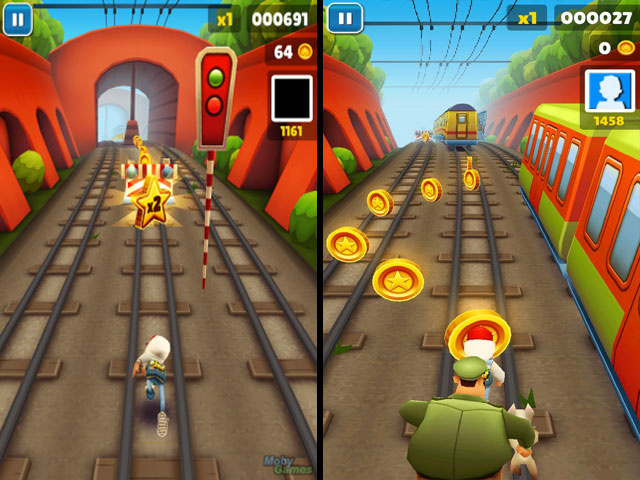
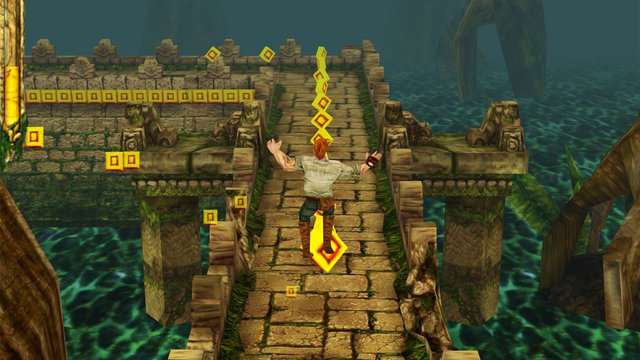
Chances are high that you have played an infinite 3D runner game at least once in the past years, when this genre became known and successful. These games have a 3rd person camera pointing at the main character who is running towards one direction in a 3D environment, while he tries to avoid various hazardous objects popping around that can kill him upon collision. This environment can be either a big path in which the character can change lanes like in normal traffic (such as in the game Subway Surfers) or can swipe left or right in various points to correctly follow the designated path (like in Temple Run).
Subway Surfers gameTemple Run game
This tutorial we’ve made contains two levels that feature both game mechanics. As you’ll see, these levels share some similarities but also have some notable differences. As usual, you can find the code here on GitHub and play the game here on a WebGL enabled browser.
Assets credits
Since this tutorial is a 3D game, I wouldn’t have something great to show without any 3D assets. Since I have no experience in 3D assets creation, I needed to find some premade ones. What other place to look for that than Unity’s Asset Store? The Asset Store is a wonderful place, where you can easily find low cost (even free) assets for your game. This tutorial would not be made possible if not for these great assets we used:
Upon game launch, player can see a screen with two simple buttons. He can choose one of the two game levels, either the “rotated paths” level or the “straight paths” level.
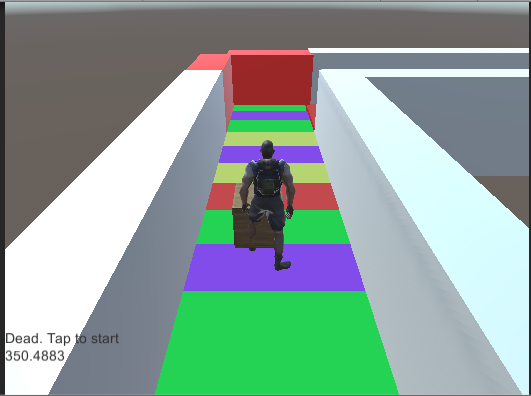
In the “rotated paths” level, Max follows a narrow platform (“path”) till he reaches its end. At some point before this happens, the game engine randomly chooses where to place the next platform, either left, right, or straight ahead. The point where this next path will be placed is at the end of the current path. When Max reaches the current path’s end, player has to swipe in order to go left or right, or just continue on the main path. If player does not swipe in time, then Max may collide with the wall and die (the red walls, depicted in the picture below). When walking on the path, Max can pick the candy that appears in front of him to get some points to increase his score, he can (must!) jump to avoid obstacles and, of course, he can swipe left or right when the platform is about to rotate in order to follow the new path.
Rotated paths level
Important: You’ll see me refer to player’s input as ‘swipe’. As you’ll see below, this game has two input methods (either arrow keys or swipe in a touch screen). So, when we say ‘swipe’, this implies either arrow keys usage or regular swipe usage on a touch screen.
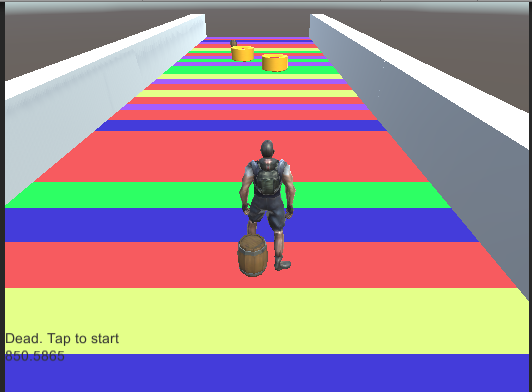
In the “straight paths” level, Max follows a wide platform and continuously moves at a straight direction. Player can swipe left or right to move sideways along imaginary lanes (like in normal traffic), while he can pick candy to increase his score. He also must avoid randomly popping obstacles either by moving on a different lane or by jumping over them. If Max falls into an obstacle, he dies and the game is over.
Straight paths level
In both cases/levels, the game can theoretically continue indefinitely. Game is over when Max falls onto a red wall (rotated paths level) or collides with an obstacle (both levels). When this happens, player can tap the screen to restart the game. Finally, as you can easily see, score is increasing as Max continues to be alive and keep running.
2048 is a very cool game that can make you spend hours playing it. Goal is to ‘merge’ tiles of identical values together, in order to have their value duplicated. When player swipes in her desired direction, items are moved towards there and a new item is created. If the player reaches the number 2048, then she has won the game. In this blog post, we’ll discuss how we can create it in Unity via C# and Visual Studio 2015.
As always, you can find the source code here on GitHub and test the game here via WebGL.
Screenshot showing the game in the Unity editor. On the left we can see the score and a restart button, on the middle the main game screen and on the right a visualization of the game’s 2 dimensional array contents, for debugging purposes.
Input methods
We have implemented two methods to get user input in the game. First one is via keyboard’s arrow keys, the other is via swipe in a touch screen (or mouse). We have implemented an enumeration to get user’s input and an interface which must be implemented by each input method we want to use. Moreover, if we need to add another input method in the future, e.g. input from an XBOX controller, we could simply implement the IInputDetector interface.
public enum InputDirection
{
    Left, Right, Top, Bottom
}

public interface IInputDetector
{
    InputDirection? DetectInputDirection();
}
Suppose that you are creating a game in which your character obtains some awards out of some predefined one, as the game goes by. Or, you’re creating software in which you want your user to select some entries/items (imagine something like a checked list box). In both cases, you could try and use these two approaches
Create or use a data structure (e.g. Dictionary<K,V>) in which you store a reference to all possible items along with the relevant Boolean value. Easy right? In order to answer the question if user has obtained item X, you just check the value of the relevant key in the dictionary.
Create or use a data structure (e.g. List<T>) in which you store references to the items the user has obtained/picked. So, you can use the List.Contains method to check for an item’s existence.
Both described methods are efficient, easy to grasp and use. However, there is another method in which you do not need to use nothing more advanced than a simple integer. We’ll be using binary system arithmetic and logic to accomplish this purpose.
Each number can be written in binary format in a sequence of 1s and 0s. For instance, 15 is binary 1111 and 2 is binary 0010. Most importantly, all numbers that are a power of two start with 1 and finish with some 0s. Check the below list
So, if you assign e.g. “valueA”to 1, “valueB” to 2, “valueC” to 4 etc., you can easily assign multiple values into an integer. How? You just add the relevant base 10 value to this integer, let’s call it storage. For instance, the integer 13 contains 3 values: a)1, b)4, c)8. In binary form, it is written as 1101. The way to check for a value’s existence is a logical bitwise AND between the storage and the respective value. In C#, we use the & for this purpose. If the result of the operation is equal to the value, then storage contains this value. Simple, right? Check the below C# code for the value 19.
int storage = 19; //10011
int a = 1; //1
int b = 2; //10
int c = 4; //100
int d = 8;//1000
int e = 16;//10000
Console.WriteLine("--------------------------------");
Console.WriteLine("Check for the value 19 - 10011");
Console.WriteLine($"Does {storage} contain \"a\" with the value of 1? " + ((storage & a) == a)); //true
Console.WriteLine($"Does {storage} contain \"b\" with the value of 2? " + ((storage & b) == b)); //true
Console.WriteLine($"Does {storage} contain \"c\" with the value of 4? " + ((storage & c) == c)); //false
Console.WriteLine($"Does {storage} contain \"d\" with the value of 6? " + ((storage & d) == d)); //false
Console.WriteLine($"Does {storage} contain \"e\" with the value of 8? " + ((storage & e) == e)); //true