Yeah, title is long but nevertheless you get the point of what I’m going to describe. So, to cut a long story short, last weekend I attended a hackathon where my teammates and I built a PoC of a movie quiz chat bot. At the end of the hackathon, we attempted to “dockerize” it and host it on App Service on Linux (currently on preview). This blog post documents the process.
Some prerequisites
- Great video intro (+demo!) of chat bots and Microsoft’s Bot Framework, an easy and flexible way to create an awesome chat bot
- You can develop a chat bot in many ways, check here for the Bot Builder Node.js SDK
- Check out my blog post about building a chat bot for Greek startup ParkAround
- App Service is Azure’s PaaS (Platform as a Service) offering, it supports Windows and Linux (preview). Check here for App Service on Linux documentation
- You can deploy apps as files into App Service, if you want to deploy a Docker container check here for Docker containers on App Service on Linux
Creating a bot
First of all, you should create and register your bot in Bot Framework website to get a Microsoft App ID and a password (no need to publish your bot). Keep these credentials in a safe and secure place. In order to create the small “Hello world” bot that we’ll use in our example using Node.js SDK, check the code here. However, feel free to experiment with your bot and make it as powerful as you wish. By the way, if you’re wondering why we aren’t using the .NET SDK, this is because App Service on Linux runs, well, on Linux. Thus, Node.js is our only viable option (for now!).
Here are the source code files for the chat bot, these must reside in the same directory.
index.js
var restify = require('restify');
var builder = require('botbuilder');

//=========================================================
// Bot Setup
//=========================================================

// Setup Restify Server
var server = restify.createServer();
server.listen(process.env.port || process.env.PORT || 3978, function () {
   console.log('%s listening to %s', server.name, server.url);
});

// Create chat bot
var connector = new builder.ChatConnector({
    appId: process.env.MICROSOFT_APP_ID,
    appPassword: process.env.MICROSOFT_APP_PASSWORD
});
var bot = new builder.UniversalBot(connector);
server.post('/api/messages', connector.listen());

//=========================================================
// Bots Dialogs
//=========================================================

bot.dialog('/', function (session) {
    session.send("Hello World");
});
The environmental variables PORT, MICROSOFT_APP_ID and MICROSOFT_APP_PASSWORD that are used in the bot’s code will be declared in App Service settings panel on the Azure portal.
package.json
{
  "name": "testbotnodejs",
  "version": "1.0.0",
  "description": "",
  "main": "index.js",
  "scripts": {
    "start": "node index.js"
  },
  "author": "",
  "license": "ISC",
  "dependencies": {
    "botbuilder": "^3.6.0",
    "restify": "^4.3.0"
  }
}
and here is the Dockerfile (based on Node.js relevant documentation on how to dockerize a node.js app)
FROM mhart/alpine-node:latest
MAINTAINER Dimitris Gkanatsios
# Create app directory
RUN mkdir -p /usr/src/app
WORKDIR /usr/src/app# Install app dependencies
COPY package.json /usr/src/app/
RUN npm install# Bundle app source
COPY . /usr/src/app# Expose a random port
EXPOSE 3978CMD [ “node”, “index” ]
As a base, we use a node image based on the relatively small alpine Linux docker image. Then, we create a directory called “app” to host our application files and copy package.json there so that we can run npm install to pull npm packages for our app. Afterwards, we copy our application files, expose port 3978 and run “npm start” to start our node app. You may wonder on which port our Bot app will listen. Well, the answer is that bot’s messaging endpoint must use SSL (https endpoint), as required by Bot Framework so that our bot can be registered and published. Azure Web Apps can listen on https:// and will handle all SSL termination on our behalf, plus transferring all traffic to 3978 port on our container.
You can also create a .dockerignore file with the following lines (these files and paths will be ignored when docker daemon builds our image).
node_modules
npm-debug.log
Dockerfile
As mentioned, all files described above must reside in the same directory. You could use sub-directories but this would probably complicate our demo.
Creating a docker image of our bot and pushing it to Docker Hub
In order to “dockerize” our bot, we can run the following command in the folder that Dockerfile exists
docker build -t dgkanatsios/testbotnodejs .
This will create an image with name dgkanatsios/testbotnodejs, you can see that it was created it by running “docker images” on your CLI. This has to be pushed it into a container registry, so that App Service on Linux can pull it. I’ve opted to push it into Docker Hub but you could use a container registry of your choice (like Azure Container Service). To push it into Docker Hub, you simply type on your favorite CLI
docker push dgkanatsios/testbotnodejs
Creating App Service on Linux and pulling the docker image
We need to create a new App Service on Linux instance. We can accomplish that by visiting the Azure portal and searching for “app service on linux”.

As soon as we select to create it, we have to choose a new service plan, a resource group, a DNS name (I named it tr24) and, of course, the docker image we want to pull when we create the app service.
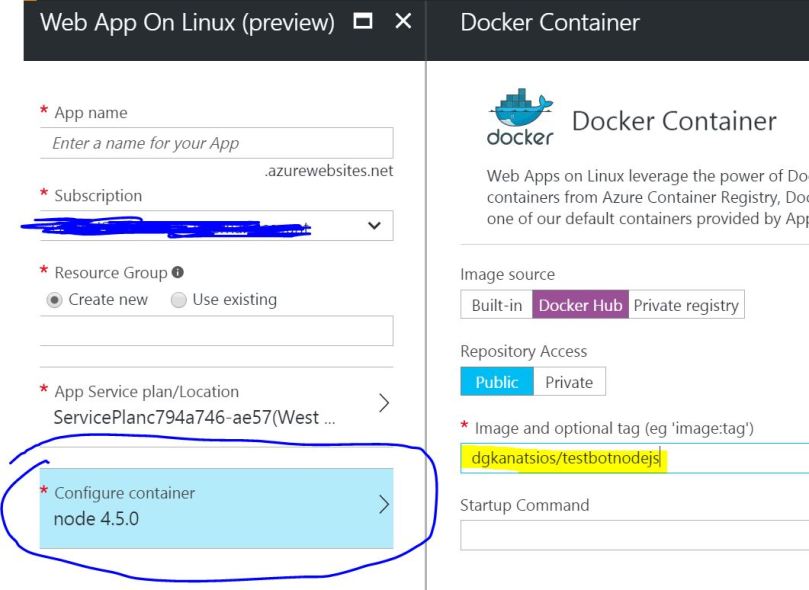
If we click on “Configure container”, we can select the image we want to pull. We can either use one of the built-in images, pull an image from Docker Hub or connect to a private registry. We have uploaded our image on Docker Hub, so we’ll go for this option, specifying the image name dgkanatsios/testbotnodejs.
After a few minuted, our new App Service on Linux instance that contains our Docker container will be created. But we’re not done yet! We also need to specify our environmental variables that are used by our bot’s code. To do that, we need to visit the “application settings” blade in App Service settings blade.
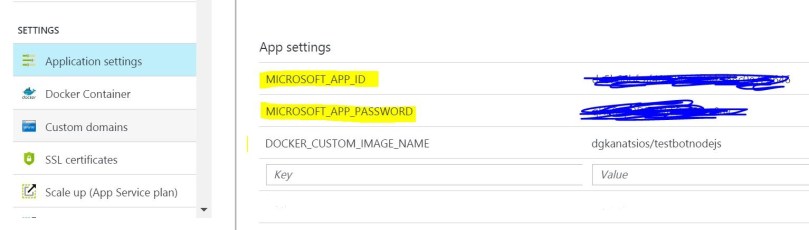
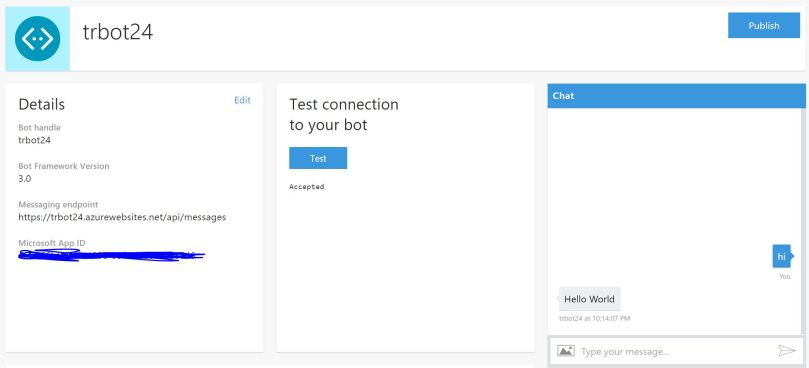
The DOCKER_CUSTOM_IMAGE_NAME is already set, we just need to set the other three required variables. AppId and Password are the ones that we got when we register our bot on Bot Directory. Once we click save, we’re almost done. We visit the overview blade and we copy the app service url. In my case, it is http://trbot24.azurewebsites.net. Consequently, our bot’s https endpoint will be https://trbot24.azurewebsites.net/api/messages. We proceed and declare this on the Bot Directory page, so that we can do a quick test of our bot to see if it works. Click “Test” and they try typing on the Chat window. Nice, huh?
We can also use Bot Framework emulator to test our publicly running bot.

Hope this helps,
Dimitris
PS. People have asked me whether this guide can be used to deploy a “normal” Node.js app on Azure App Service on Linux. Answer is, of course!
