Raspberry Pi, Sense Hat, Azure IoT Hub, oh my!

In this blog post, we’ll post a very simple tutorial about gathering some simple data from a Sense Hat on a Raspberry Pi, post this data to Azure IoT Hub, parse them though Azure Stream Analytics and insert them into a simple Azure SQL Database table. This blog post helps as a tutorial for Azure IoT Hackathon we organized in Athens, on 18/3/2016.

  • On the hardware side, we’ll use a Raspberry Pi 2 and a Sense Hat
  • Creating a new Universal Windows Platform application
  • Write some code to get the temperature reading from the Sense Hat
  • Post the temperature/pressure/humidity reading from Sense Hat to Azure IoT Hub
  • A Stream Analytics job will store the temperatures on an Azure SQL Database

We’ll start by creating a new Azure IoT Hub, so we can connect our Raspberry to it.

Read More »

Can a Raspberry Pi 2 with Windows 10 IoT Core run a game made in Unity?

Today, something somewhat weird occured to me. If you build a game in Unity engine, you can easily publish it for Windows Phone, even in old and very low-end devices like the Lumia 520. This phone has a Qualcomm Snapdragon S4 MSM8227 with ISA ARMv7 supported. The Raspberry Pi 2 Model B device also has an ARM v7 processor and can be loaded with Windows 10, that support the Universal Windows Plarform, which Unity supports. You can imagine the question, can a game built with Unity be published into a Raspberry Pi 2?

Read More »

Snake and Tetris-like games with Sense HAT on a Raspberry Pi 2 loaded with Windows 10

tl;dr – me n33dz the codez => check here on the SenseHatGames folder

The Sense HAT is a small and inexpensive board  for Raspberry Pi. It sits on top of it and offers a variety of sensors and (most importantly), a 8×8 RGB LED matrix and a 5-direction joystick. More specifically, it offers access to these sensors

  • Gyroscope
  • Accelerometer
  • Magnetometer
  • Temperature
  • Barometric pressure
  • Humidity

IMG_20160125_234729929_TOP.jpg
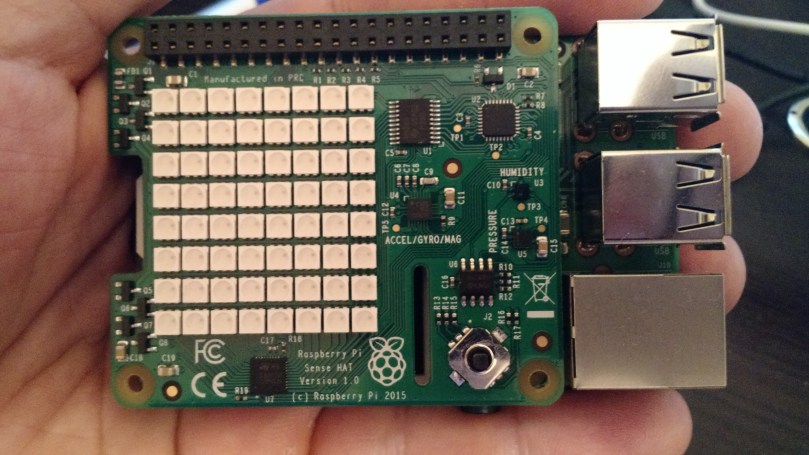
Sense HAT on top of a Raspberry Pi 2. You can clearly see the 8×8 RGB LED matrix whereas the joystick is on the bottom right of the HAT.

Absolutely worth mentioning, this board has also gone to space in the Astro Pi mission as part of a competition in the UK! I recently purchased one and, apart from the fun I had interacting with the sensors, I really liked the LED matrix and the joystick. So, I thought, why don’t I try and create a couple of games on it?

Read More »

Raspberry, Weather Shield, Azure IoT Hub, Streaming Analytics and more!

Intro

Recently I became the happy owner of a brand new Raspberry Pi 2. In case you don’t know about it, Raspberry is a pretty powerful computing device in a form factor of a credit card. You can install Windows 10 IoT Core on the Raspberry and code against it using the Universal Windows Platform (UWP_, aka write programs for this small device using C# and XAML. So, I embarked on a new self-education journey and, after some reading, I had to pick a pre-made hands-on sample and replicate it. I picked this one, since the only extra hardware it requires is a shield (Sparkfun Weather Shield) and some cables to connect it with the Raspberry. The sample instructions on hackster.io are pretty straight forward and the source code provided for the Weather Shield + UWP integration is pretty self-explanatory. Only modification I made was to add a timer to pull humidity and temperature from the shield at a fixed time interval.

12374739_10153447116073742_392889873121113510_o

12369049_10153441934143742_8606620306222203016_n

However, I wanted to take this project one step further. Connect the device to Azure IoT Hub, send data to it, pass the data via a simple Azure Stream Analytics job and store it to Azure Table Storage, expose it via a Web API web service and consume it from an ASP.NET MVC web application. Well, it’s not as difficult as it sounds! I’ll briefly describe the steps I used

Azure IoT Hub

The Azure IoT Hub (in preview, at the time of writing) is a service in which millions of devices can connect and exchange messages. The IoT Hub enables bidirectional communication to and from each device, can manage each device separately and provides a high level of security. To create a new IoT Hub, login into the new Azure management portal and create it. There is also a free tier to support app development, which you can use. If you do not have an active Azure subscription, you can easily create a trial account. Even though it requires a credit card, you will not be charged at all, provided you stay within your spending limits.

image

Read More »

Universal Helpers library for the Universal Windows Platform

It’s been some time since I posted something about my Universal Helpers library. The biggest news is that the library has been updated to support the Universal Windows Platform, allowing its usage on projects for Windows desktops, laptops, tablets, mobile devices and more! Apart from that, I’ve updated the library to include some additional behaviors and helpful classes. Let’s take a walkthrough. All this was made possible due to the release (open source!) of XAML Behaviors for UWP.

Behaviors

DragElementBehavior

Allows you to make a UIElement draggable, either by mouse or touch. It has options for

– allow the user to rotate, via multitouch

– allow the user to scale, via multitouch. User can select the maximum scale and the minimum scale.

– you can assign a container so that the draggable element can never leave the container’s bounds

– option whether the draggable element has inertia (i.e. will continue movement by decelerating when the user drags it and lets it go)

image

TapStoryboardBehavior

The TapStoryboardbehavior is useful for scenarios where we want to tap an element, start a storyboard and execute a method when the storyboard finishes running. It also has an option to specify whether the method is on the code-behind file or in the VM (i.e. in the DataContext of the page, for MVVM scenarios).

image

FeedbackBehavior

The FeedbackBehavior allows the user to implement a feedback functionality when an element is tapped and “pointer over”, specifically a scale animation on pointer over and an opacity change when tapped. This is used to notify the end user that she has indeed tapped the specified element.

SelectAllTextOnFocusBehavior

This simple behavior makes all text on a TextBox selected when the user taps on the TextBox.

Validation Behaviors

Read More »

Introducing Universal Helpers for Windows Store apps

I’ve been using various small XAML storyboard utilities and behaviors in my latest Window Phone and Windows Store apps. I’ve just packaged them all and released them into GitHub. Universal Helpers may not be that good of a name since the library is pretty small (yet) but I hope to enhance it in the future with more utilities and behaviors. So, let’s jump right in and see what’s under the hood!

First of all, there are some Blend Behaviors. I love behaviors! Easy just as a Drag’n’Drop, yet so powerful! What’s even more great is that Windows 8.1 SDK has a Behaviors SDK, which, to no one’s surprise, works with Windows Phone 8.1 Store apps. A limitation right now is that you can’t (at least easily) write Behaviors in a portable class library, that’s why I’ve implemented them in the Shared project. Let’s see them, one by one.

DragElementBehavior

This behavior allows any element with a CompositeTransform to be dragged. It has options for inertia plus a container, in order to never be out of bounds (either by dragging or inertia movement). Plus, it has Boolean options for rotation and multitouch scaling.

FeedbackBehavior

This behavior allows for simple feedback (opacity change) when an element is pressed. Moreover, with the flexibility the Pointer API provides us it increases the scale when the mouse is over the element.

TapStoryboardBehavior

This behavior executes an animation when the user taps an element. Optionally, when it’s completed, it can fire up a custom method (this one’s using Reflection, if you know a better way let me know!).Read More »

Animating a SpriteSheet in a Windows Store app using XAML and C#

[well, it’s been sometime since I wrote a technical blog post, hope you like it]

Today I tried to find out how to animate a spritesheet in a Windows Store app. Turns out that it was much easier than expected! I used the spritesheet found here http://stackoverflow.com/questions/5812752/spritesheet-in-silverlight and some ObjectAnimationUsingKeyFrames code and it worked like a charm.

Some explaining regarding the attached code

1. We’re using a Rectangle and an ImageBrush to display the spritesheet’s data

2. Each “frame” in the spritesheet has a width of 240 pixels and a height of 296 pixels

3. Remember that Storyboards in XAML act as threads that modify a value in a specific amount of time

4. We’re using CompositeTransform (and TranslateX, TranslateY) to “move” the image and “crop” the portion we wish to display. Practically, we’re animating the ((Rectangle.Fill as ImageBrush).Transform as CompositeTransform).TranslateX and TranslateY properties

5. Each value alteration is happening in a DiscreteObjectKeyFrame

6. Iterations of DiscreteObjectKeyFrames take place each 100ms (yes, it can run faster of course)

7. App was tested on ARM device with awesome performance

8. It’s better to include a single image with all the “frames” than each image separately

Feel free to download and play with the source code, don’t hesitate to shoot your questions!