In this blog post, we’ll post a very simple tutorial about gathering some simple data from a Sense Hat on a Raspberry Pi, post this data to Azure IoT Hub, parse them though Azure Stream Analytics and insert them into a simple Azure SQL Database table. This blog post helps as a tutorial for Azure IoT Hackathon we organized in Athens, on 18/3/2016.
- On the hardware side, we’ll use a Raspberry Pi 2 and a Sense Hat
- Creating a new Universal Windows Platform application
- Write some code to get the temperature reading from the Sense Hat
- Post the temperature/pressure/humidity reading from Sense Hat to Azure IoT Hub
- A Stream Analytics job will store the temperatures on an Azure SQL Database
We’ll start by creating a new Azure IoT Hub, so we can connect our Raspberry to it.
Create a new Azure IoT Hub
- Connect to the new Azure portal: http://portal.azure.com
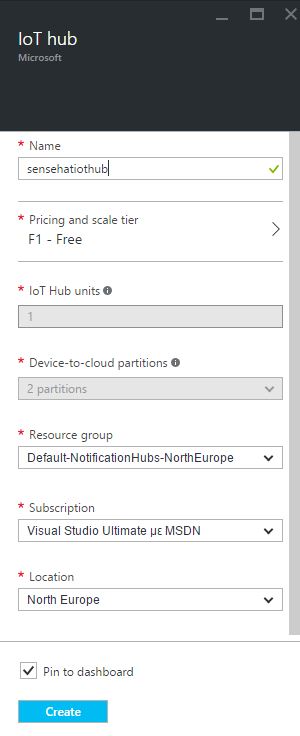
- Click on New -> Internet Of Things -> Azure IoT Hub
- Name your IoT Hub, select a pricing tier, a Resource Group and a Azure datacenter location
- Finally, click “Create”
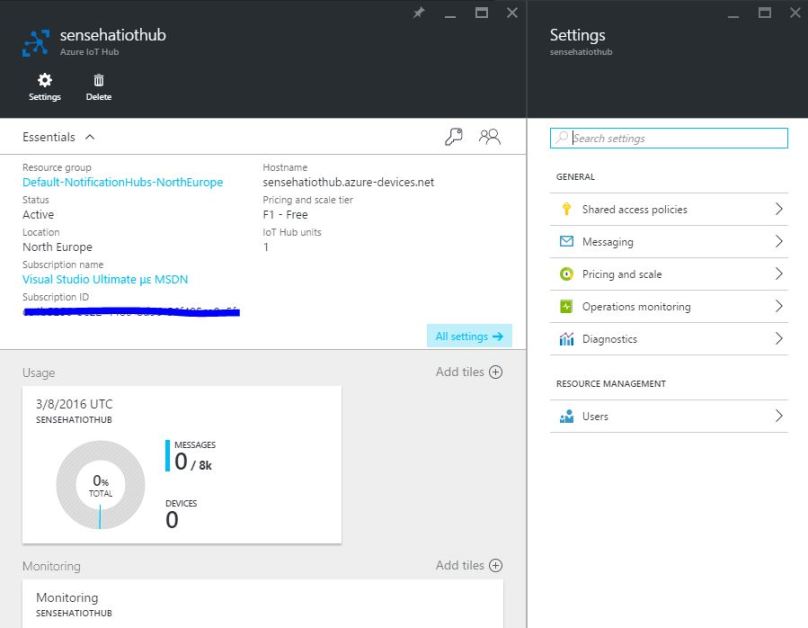
Your Azure IoT Hub is ready!
Create the Visual Studio solution for the Universal WIndows Platform app
- Before we start writing code, we’ll need a handy extension called Connected Service for Azure IoT Hub which you’ll need to install. This will make it easier for our small device to connect to Azure IoT Hub.
- Create a new Universal Windows Platform project, I call mine “SenseHatIoTHub”.
- We need some additional libraries to communicate with the Sense Hat. There’s a nice and open source library here which we’ll use. Luckily, the author has supplied a Nuget package for us to use. So, right click on the project, select “Manage Nuget packages” and search for “sensehat”. You’ll find the package called “Emmellsoft.IoT.RPi.SenseHat”.
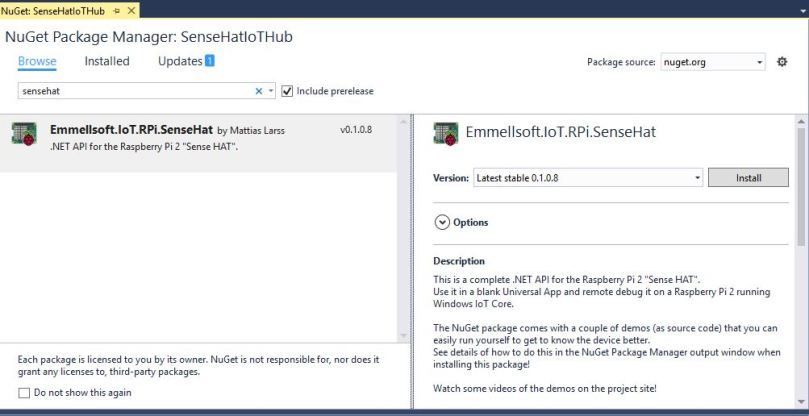
- Click “Install” and this will be installed in your project
- We’ll proceed by adding a reference to the Azure IoT Hub. This will generate some code for our device to connect.
- Right click on the project, select “Add” -> “Connected Service”
- Select “Azure IoT Hub” and press “Configure”
- Enter your Azure account credentials
- Select the account that contains the Azure IoT Hub that you previously created and press “Add”
- It will prompt you to select a device or create a new one. Let’s create a new one, I’ll call mine “myraspberry”. Enter the name and press “Add”.
- You’ll see a new file added to the project, called “AzureIoTHub.cs”. This file contains some useful code to send and receive messages from Azure IoT Hub.
- We’ll need a class to store the messages we’ll send to Azure IoT Hub. Create a new class, call it “SenseHatData” and paste the following code
namespace SenseHatIoTHub { public class SenseHatData { public double? Humidity { get; set; } public double? Pressure { get; set; } public double? Temperature { get; set; } public string Location { get; set; } } } - Go to the AzureIoTHub.cs file and add the following method
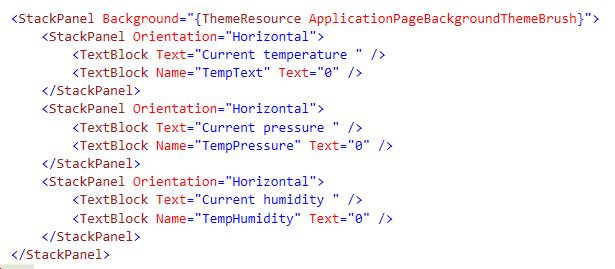
public static async Task SendSenseHatDataToCloudAsync(SenseHatData data) { var deviceClient = DeviceClient.CreateFromConnectionString(deviceConnectionString, TransportType.Http1); var messageInJson = JsonConvert.SerializeObject(data); var message = new Message(Encoding.UTF8.GetBytes(messageInJson)); await deviceClient.SendEventAsync(message); } - Let’s add the code to see the SenseHat sensor readings on the screen. Remember to connect the Raspberry Pi to an HDMI capable device. Go to MainPage.xaml and add two textblocks, to display the current temperature. Modify the parent Grid to a StackPanel, for an easy layout. Your code should be like this
- Now, go to MainPage.xaml.cs and write the following code
    public sealed partial class MainPage : Page
    {
        public MainPage()
        {
            this.InitializeComponent();
            this.Loaded += MainPage_Loaded;
        }

        private async void MainPage_Loaded(object sender, RoutedEventArgs e)
        {
            //get a reference to SenseHat
            senseHat = await SenseHatFactory.GetSenseHat();
            //initialize the timer
            DispatcherTimer timer = new DispatcherTimer();
            timer.Tick += Timer_Tick;
            timer.Interval = TimeSpan.FromSeconds(1);
            timer.Start();
        }

        private async void Timer_Tick(object sender, object e)
        {
            senseHat.Sensors.HumiditySensor.Update();
            senseHat.Sensors.PressureSensor.Update();

            //gather data
            SenseHatData data = new SenseHatData();
            data.Temperature = senseHat.Sensors.Temperature;
            data.Humidity = senseHat.Sensors.Humidity;
            data.Pressure = senseHat.Sensors.Pressure;

            //send them to the cloud
            await AzureIoTHub.SendSenseHatDataToCloudAsync(data);

            //notify UI
            TempText.Text = data.Temperature.ToString();
            TempHumidity.Text = data.Humidity.ToString();
            TempPressure.Text = data.Pressure.ToString();
        }

        ISenseHat senseHat;

    }
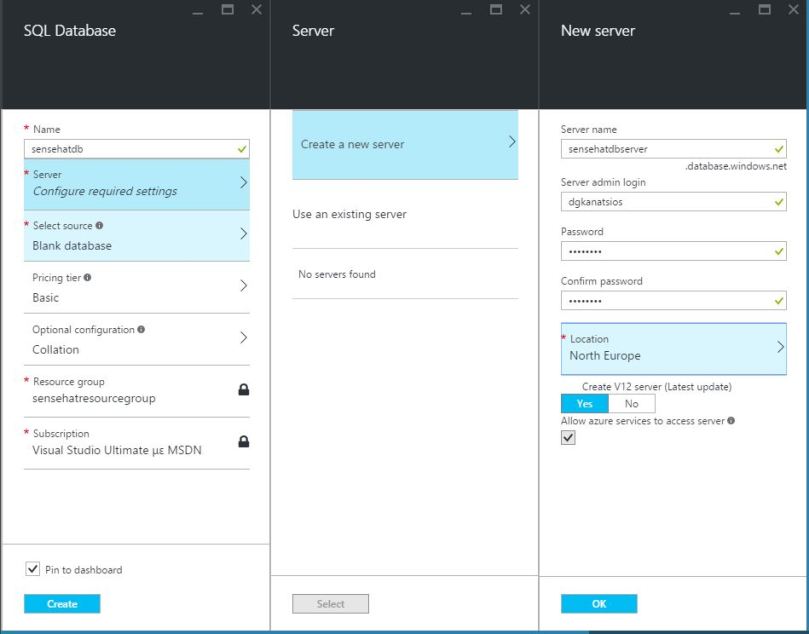
Create a new Azure SQL Database
- Select “New” and search for “SQL Database”
- Write the name of the database, select the pricing tier. You may need to configure a new SQL Server instance to host the database, if you haven’t already created one.
- After you create the database, you need to select it, press “Tools” and then “Open in Visual Studio”. You will see a small text on the right blade in the portal that prompts you to allow access in the Azure firewall for your DB. Do it!
- Create a new table in the database. Here is the SQL script I used to create mine
CREATE TABLE [dbo].StatusPerLocation ( [Temperature] FLOAT NOT NULL, [Humidity] FLOAT NOT NULL, [Pressure] FLOAT NOT NULL, [Location] NVARCHAR(50) NOT NULL ) - When you finish, click update. The script will run on SQL Azure and your table will be created.
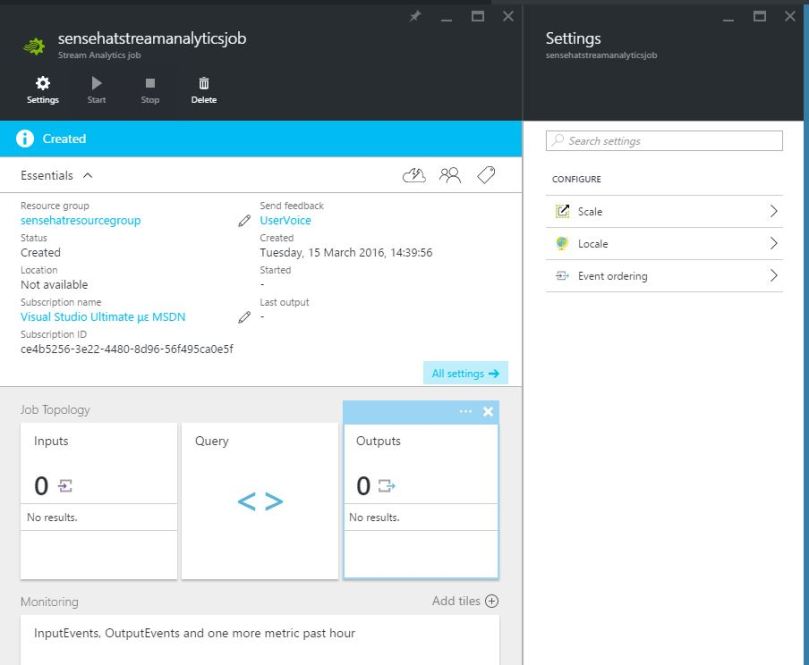
Create a new Stream Analytics job
- On the Azure portal, select to create a new “Stream Analytics job”
- Enter a name, select a Resource group (preferably the same as the Azure IoT Hub) and click “Create”
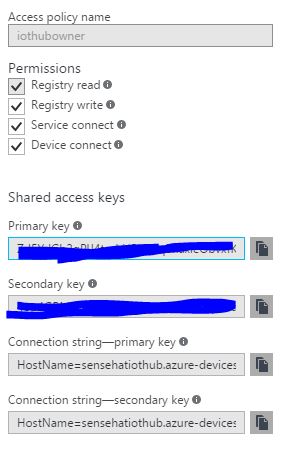
- Before setting the input, we need to get some data from the Azure IoT Hub. Go to the IoT Hub blade, select “Shared Access Policies” and copy the Primary Key for the iothubowner role. We’ll need it to configure the input for the Stream Analytics job.
- Let’s return to the Stream Analytics job. Once there, click on the “Inputs”, this will allow us to set the input of the Stream Analytics job. Click to add a new input and fill in the requested fields.
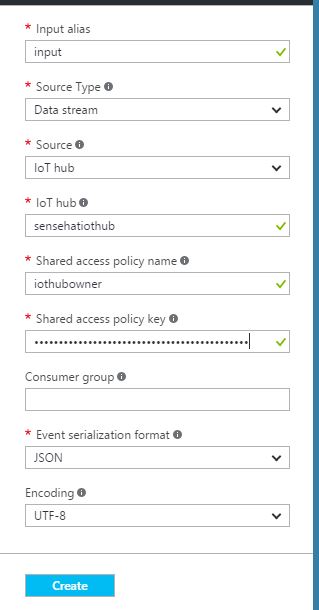
- Click “Create”, your input is ready!
- Now, let’s create a new output. We’ll configure it to use the SQL Server table we previously created
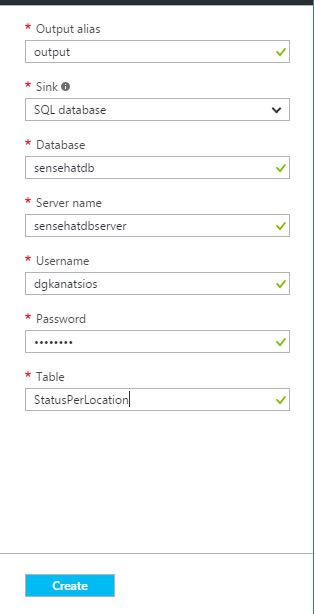
- Finally, we’ll create the query. We’ll use a simple query pass all data to SQL Server
SELECT Temperature, Humidity, Pressure, Location INTO output FROM input - Click on “Save” to save your changes. Your Stream Analytics service is ready, you can click “Start” to initiate it.
- By the way, there are lots of interesting things to do with Stream Analytics query language, check the documentation here
Monitoring events
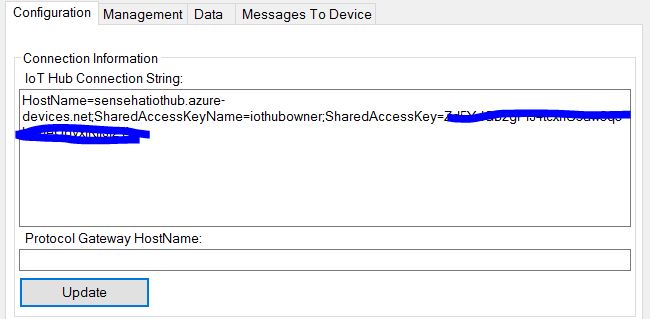
Wee need something to monitor events that our sensor is sending to Azure IoT Hub. Visit the website https://github.com/Azure/azure-iot-sdks/blob/master/tools/DeviceExplorer/doc/how_to_use_device_explorer.md#download and download the Device Explorer application. You need an Azure IoT Hub connection string for it to work. To get this
- Open the Azure IoT Hub in the Azure portal
- Open the Shared Access Policies settings blade
- Select the iothubowner
- Copy the primary connection string
After you get that, paste it in the Device Explorer app and click Update.
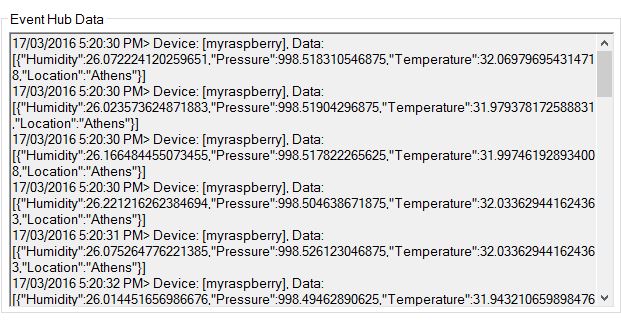
Then, select the data tab. Select your device (“myraspberry”, in our case) and click “Monitor”. The application starts to monitor events coming from the “myraspberry” device.
Return to Visual Studio and debug the UWP Sense Hat app. You’ll see that the Device Explorer app captures the events coming from “myraspberry”.
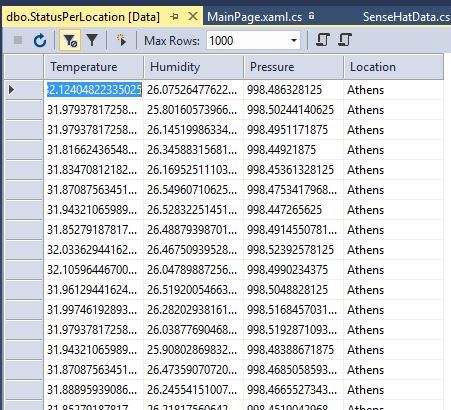
If you connect to SQL Server from within Visual Studio (using Cloud Explorer and SQL Server Explorer), you’ll see that the table contains the data output of the Azure Stream Analytics job.
That’s all! If you’ve made it so far, congratulations :) As always, you can check the source code here on GitHub, on the SenseHatIoTHub folder.

I get an error on the line. senseHat = await SenseHatFactory.Singleton.GetSenseHat();
Error:
‘SenseHatFactory’ does not contain a definition for ‘Singleton’ SenseHatIoTHub
Any help would be approciated.
LikeLike
Did you successfully restore the SenseHat nuget package? If you try and navigate to the SenseHatFactory class, what does it happen?
LikeLike
I was able to install the NuGet package. If I leave off the Singleton portion the program compiles, but will not run. I was looking at the SenseHatFactory class on GitHub and did not find a singleton reference there. Am I missing a using? These are the what is currently in my MainPagexaml.cs
using Emmellsoft.IoT.Rpi.SenseHat;
using System;
using Windows.UI.Xaml;
using Windows.UI.Xaml.Controls;
LikeLike
Turns out I needed to downgrade the NuGet package to 1.0.08. The implementation of that calss was changed in 1.0.09. Program is running now.
LikeLike
You’re right, package author probably changed the class. Nevertheless, it seems weird that when you downloaded the project, it didn’t restore the 1.0.08 version. Anyway, happy it’s working for you, let me know if you need anything else.
LikeLike
I used your complete solution. Everything is setup on Azure. There is an error message “AzureIoTHub does not contain a definition for ‘SendSenseHatDataToCloudAsync’. I have the reference to Emmellsoft.IoT.RPi.SenseHat.
Unlike the previous commenter the nuget package version I have is 0.1.0.8
Any pointers you can give me to get past this challenge?
I am a noob (beginner).
LikeLike
I’ve just pushed a new project.json file with latest versions of Nuget package dependencies. Can you check again?
LikeLike
Got your new project.json and did an update on the SenseHatFactory:
SenseHatFactory does not contain a definition for singleton
AzureIoTHub does not contain a definition for SendSenseHatDataToCloudAsync
LikeLike
Remove the Singleton property, it is not used on new SenseHat library. For your other error, you probably did something wrong with the code. Can you download again from GutHub and try?
LikeLike
As per the developer SenseHatFactory:
Yes, I did change the creation of the SenseHat class in version 0.1.0.9.
In version 0.1.0.8 you had to call:
ISenseHat senseHat = await SenseHatFactory.Singleton.GetSenseHat();
In version 0.1.0.9 (and up) you have to call:
ISenseHat senseHat = await SenseHatFactory.GetSenseHat();
So the only change you need to do is remove the part “Singleton” from the call chain.
(The old code had some potential problems with race conditions which could occur if you called the GetSenseHat-method simultaneously from two threads at the same time. That was fixed in version 0.1.0.9.)
LikeLike
Yup, that’s fixed in my latest commit.
LikeLike
Well thank you!
Won’t have time try it out until later.
Thanks again!
LikeLike
Made it all the way to the congratulations with the data coming through in the device explorer (and blowing through my monthly allotment of messages in minutes. No data yet in the the table. Not sure how to diagnose that further.
Thanks.
LikeLike
First you should check if data is arriving at IoTHub. You can use the Device Explorer for this purpose.
LikeLike
Device explorer shows the data, just like in your example. It works up until there. Just nothing in the table.
LikeLike
You should debug/log your Stream Analytics job, check here for details: https://azure.microsoft.com/en-gb/documentation/articles/stream-analytics-operation-logs/
LikeLike
Apparently a streaming job gets dirty. No matter what I tried I could not get it to work. After deleting it and making a new one (with the same settings), it started working.
Thanks for your help!
LikeLike
i want to do this project and show temperature value in the led matrix can u tell me what i am doing wrong with this code
public void Timer_Tick(object sender, object e)
{
var tinyFont = new TinyFont();
senseHat.Sensors.HumiditySensor.Update();
senseHat.Sensors.PressureSensor.Update();
ISenseHatDisplay display = senseHat.Display;
//gather data
SenseHatData data = new SenseHatData();
data.Temperature = senseHat.Sensors.Temperature;
data.Humidity = senseHat.Sensors.Humidity;
data.Pressure = senseHat.Sensors.Pressure;
data.Location = “Athens”;
double tempvalue = data.temperature;
int temperature = (int)Math.Round(tempvalue);
var s = Convert.ToString(temperature);
//notify UI
TempText.Text = data.Temperature.ToString();
TempHumidity.Text = data.Humidity.ToString();
TempPressure.Text = data.Pressure.ToString();
LightProgress.Value = (int)data.Humidity;
display.Clear();
tinyFont.Write(display,s , Colors.Yellow);
display.Update();
}
LikeLike
What is the error that occurs when you are running it?
LikeLike
It does not give me any error just always show 0 to led matrix (I am new to c#)
LikeLike
Made it to the congratulations :-) I noticed the Location value was returning null, which was blocking the output to the SQL table, which was quickly fixed by changing the table to allow nulls.
However, where exactly should the Location value come from? I notice in your screenshot you have Athens, but I couldn’t see any setting in the Pi itself. Does the Pi know its location from its network?
LikeLike
Congratulations for reaching congratulations!
No, Location is something set on the code, just for demo purposes. You could get a Location value either by a reverse IP geocoding or (even better) with a GPS module on the Raspberry.
LikeLiked by 1 person
[…] most importantly, you need to have followed Dimitris Gkanatsios’s fantastic blog article in order to create the Windows 10 app on the Raspberry Pi. If you’ve successfully got to […]
LikeLike
[…] most importantly, you need to have followed Dimitris Gkanatsios’s fantastic blog article in order to create the Windows 10 app on the Raspberry Pi. If you’ve successfully got […]
LikeLike
Nice example. However, is creating a stream analytics job, the most cost effective way of transferring iot data to sql? How about using a hub trigger? Any other options? Thanks.
LikeLike