This is the second part of an infinite 3D runner game tutorial. If you haven’t read the first part, you’re highly encouraged to do it by clicking here. As always, you can find the source code here on GitHub and play the game here on a WebGL enabled browser.
The levels
In the second and last part of the tutorial, we’ll see how the two game levels were built. We’ll begin with the “straight paths” level.
Straight Paths Level
Let’s take a look at the objects contained in our game hierarchy.
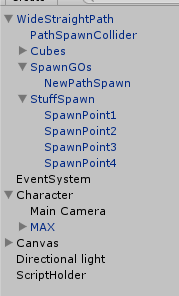
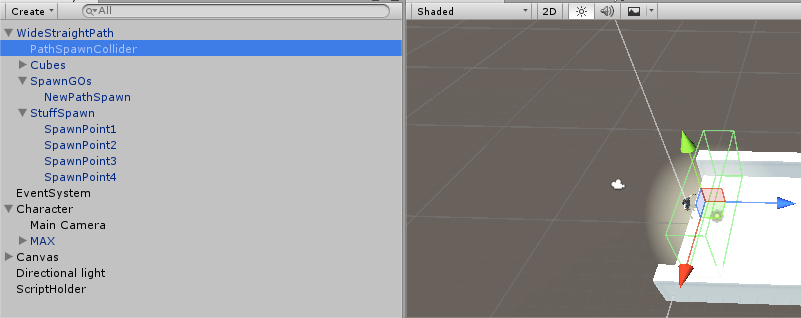
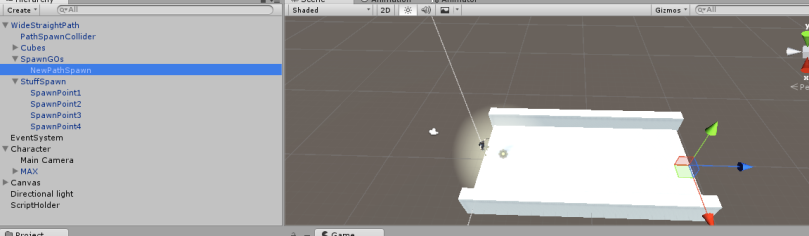
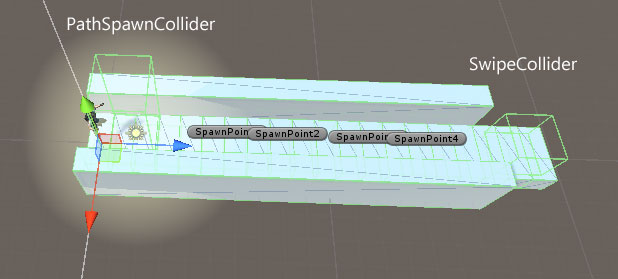
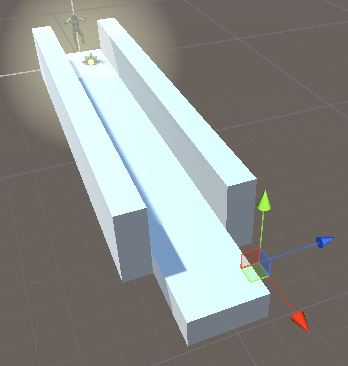
First, there is the straight path game object which, by nature, is wider than the one in the “rotated paths” level. The path is a prefab (as designated by its blue color) and all subsequent paths will be clones of this one. Scene also contains some cubical shaped 3D objects (named Cubes), which act as floor of our path. It also contains the NewPathSpawn game object (a simple location in the 3D space), and some other locations called SpawnPoints. The SpawnPoints are positions in which new stuff will be generated. This stuff can be either a candy, or obstacle, or nothing at all.
Recall that Max runs from path to path. As we are not generating all paths at the beginning of the game (because we want to save on memory and mainly because we do not know how far in the game the player will proceed, i.e. how many paths to generate), we need a mechanism to generate the N+1 path, where N is the path that Max currently steps on. We’ve used a simple trigger BoxCollider to implement this. When Max collides with it, a new path is generated via the PathSpawnCollider script (described in a while). In the straight paths level, the new path is instantiated in the “NewPathSpawn” position, which conveniently happens to be positioned at the far end of the current path.
The Character game object holds our Camera and the Max model. It also has a Character Controller component (which allows us to easily move our object) and a CharacterSidewaysMovement script (described below). Making the Character game object move will move both Camera and Max (since they are child game objects). This is the classic way of making 3rd person games, since in this way, camera will always be at the same position during the game, behind and a bit higher than Max.
The Canvas game object holds our simple UI (two Text objects) whereas the Directional Light is a simple light and the ScriptHolder game object holds our GameManager singleton script, which was described in the first part of the tutorial.
PathSpawnColliderScript
This script is used on both levels in order to generate the next path, following the one Max is currently running on.
public class PathSpawnCollider : MonoBehaviour {

    public float positionY = 0.81f;
    public Transform[] PathSpawnPoints;
    public GameObject Path;
    public GameObject DangerousBorder;
Script begins by declaring some public variables, to be set outside the script in the Unity editor.
– PositionY is used to properly place the redBorder on the Y axis
– The PathSpawnPoints array is used to host the locations that the next path and borders will be instantiated. In the “straight paths” level the array will have only one member (since we’ll only instantiate the next path) whereas in the “rotated paths” level the array will hold three locations, in one of which there will be the new path and in the rest two there will be the red borders that will kill Max upon collision
– The Path object holds the path prefab
– The DangerousBorder array holds the RedBorder prefab in the “rotated paths” level whereas it is null in the “straight path” level (where we do not need it)
  void OnTriggerEnter(Collider hit)
    {
        //player has hit the collider
        if (hit.gameObject.tag == Constants.PlayerTag)
        {
            //find whether the next path will be straight, left or right
            int randomSpawnPoint = Random.Range(0, PathSpawnPoints.Length);
            for (int i = 0; i < PathSpawnPoints.Length; i++)
            {
                //instantiate the path, on the set rotation
                if (i == randomSpawnPoint)
                    Instantiate(Path, PathSpawnPoints[i].position, PathSpawnPoints[i].rotation);
                else
                {
                    //instantiate the border, but rotate it 90 degrees first
                    Vector3 rotation = PathSpawnPoints[i].rotation.eulerAngles;
                    rotation.y += 90;
                    Vector3 position = PathSpawnPoints[i].position;
                    position.y += positionY;
                    Instantiate(SpawnBorder, position, Quaternion.Euler(rotation));
                }
            }

        }
    }
When Max collides with the PathSpawnCollider game object, game engine randomly chooses whether the next path will be straight, left or right. In the case of the “straight paths” level, we have only one entry in the PathSpawnPoints array (which corresponds to the straight location), so randomSpawnPoint will be 0 and the next path will be instatiated at the straight location. In the “rotated paths” level, we instatiate the next path on the chosen location and we also instantiate the RedBorder prefabs on the other two locations, while we are rotating them by 90 degrees to make them fit properly.
Stuff Spawner
Stuff Spawner script is responsible of generating the candy and the obstacles in both levels. It begins by declaring some public variables that the developer can set in the Unity editor.
    //points where stuff will spawn :)
    public Transform[] StuffSpawnPoints;
    //meat gameobjects
    public GameObject[] Bonus;
    //obstacle gameobjects
    public GameObject[] Obstacles;

    public bool RandomX = false;
    public float minX = -2f, maxX = 2f;
– StuffSpawnPoints contains the locations of the stuff (either candy or obstacles) to be instantiated
– Bonus array contains the prefabs for the candy
– Obstacles array contains the prefabs for the obstacles
– RandomX variable is true only at the “straight paths” level. It allows the candy or obstacle prefab to be instantiated on a random X position (in the range of [minX, maxX] in order to have it on a different “lane”.
  void CreateObject(Vector3 position, GameObject prefab)
    {
        if (RandomX) //true on the straight paths level, false on the rotated one
            position += new Vector3(Random.Range(minX, maxX), 0, 0);

        Instantiate(prefab, position, Quaternion.identity);
    }
CreateObject is a simple method that will instantiate a new prefab at the selected position, taking into account whether it will be moved somewhere on the X axis (on the “straight paths” level).
void Start()
{
bool placeObstacle = Random.Range(0, 2) == 0; //50% chances
int obstacleIndex = -1;
if (placeObstacle)
{
//select a random spawn point, apart from the first one
//since we do not want an obstacle there
obstacleIndex = Random.Range(1, StuffSpawnPoints.Length);
CreateObject(StuffSpawnPoints[obstacleIndex].position, Obstacles[Random.Range(0, Obstacles.Length)]);
}
for (int i = 0; i &amp;amp;amp;amp;lt; StuffSpawnPoints.Length; i++)
{
//don't instantiate if there's an obstacle
if (i == obstacleIndex) continue;
if (Random.Range(0, 3) == 0) //33% chances to create candy
{
CreateObject(StuffSpawnPoints[i].position, Bonus[Random.Range(0, Bonus.Length)]);
}
}
}
The Start method
– Decides whether it will create an obstacle on this path (50% chance). If true, it creates one, randomly selecting one of the given prefabs.
– For all the other locations in the StuffSpawnPoints array, it decides whether to create a candy (33% chance). If true, then it creates one, randomly selected out of the Bonus array.
Bear in mind that
CharacterSidewaysMovement
This script is responsible for moving Max onto the “straight paths” level. Remember that Max has a CharacterController component. Reader is encouraged to take a look at Unity’s documentation for some insights on how to move a game object with Character Controller component.
    private Vector3 moveDirection = Vector3.zero;
    public float gravity = 20f;
    private CharacterController controller;
    private Animator anim;

    private bool isChangingLane = false;
    private Vector3 locationAfterChangingLane;
    //distance character will move sideways
    private Vector3 sidewaysMovementDistance = Vector3.right * 2f;

    public float SideWaysSpeed = 5.0f;

    public float JumpSpeed = 8.0f;
    public float Speed = 6.0f;
    //Max gameobject
    public Transform CharacterGO;

    IInputDetector inputDetector = null;
We declare some variables to assist with the script creation, their usage can be easily inferred by their name.
   void Start()
    {
        moveDirection = transform.forward;
        moveDirection = transform.TransformDirection(moveDirection);
        moveDirection *= Speed;

        UIManager.Instance.ResetScore();
        UIManager.Instance.SetStatus(Constants.StatusTapToStart);

        GameManager.Instance.GameState = GameState.Start;

        anim = CharacterGO.GetComponent();
        inputDetector = GetComponent();
        controller = GetComponent();
    }
The Start method sets the moveDirection vector so that Max can move straight ahead for the given Speed. It also sets proper values to the component related variables and modifies the game state to start the game.
    private void CheckHeight()
    {
        if (transform.position.y < -10)
        {
            GameManager.Instance.Die();
        }
    }
Max can jump so you can imagine that it is not that difficult for him to leave the designated paths and fall. CheckHeight method checks if Max has dropped at a certain level, so game is over.
    private void DetectJumpOrSwipeLeftRight()
    {
        var inputDirection = inputDetector.DetectInputDirection();
        if (controller.isGrounded && inputDirection.HasValue && inputDirection == InputDirection.Top && !isChangingLane)
        {
            moveDirection.y = JumpSpeed;
            anim.SetBool(Constants.AnimationJump, true);
        }
        else
        {
            anim.SetBool(Constants.AnimationJump, false);
        }
DetectJumpOrSwipeLeftRight method first checks whether player has swiped left, right or upwards (or has used left, right or up arrow keys). If player has swiped upwards, we have to check whether Max is touching the ground (we disallow double jumping) or is not currently changing lane (i.e. moving left or right). If Max is not already jumping or moving sideways, we set a motion on the Y axis and transition Max to the jump animation.
        if (controller.isGrounded && inputDirection.HasValue && !isChangingLane)
        {
            isChangingLane = true;

            if (inputDirection == InputDirection.Left)
            {
                locationAfterChangingLane = transform.position - sidewaysMovementDistance;
                moveDirection.x = -SideWaysSpeed;
            }
            else if (inputDirection == InputDirection.Right)
            {
                locationAfterChangingLane = transform.position + sidewaysMovementDistance;
                moveDirection.x = SideWaysSpeed;
            }
        }
    }
Next, we see if the player has swiped left or right. If this happens, we move player left or right, provided Max is not currently jumping or already moving sideways. We do this by adding the SideWaysSpeed variable to the x axis of the moveDirection vector. We also save the final position of Max, the one he when the lane changing is finished.
Let’s now check the Update method. This method has a switch statement that handles the three different game states.
void Update()
    {
        switch (GameManager.Instance.GameState)
        {
            case GameState.Start:
                if (Input.GetMouseButtonUp(0))
                {
                    anim.SetBool(Constants.AnimationStarted, true);
                    var instance = GameManager.Instance;
                    instance.GameState = GameState.Playing;

                    UIManager.Instance.SetStatus(string.Empty);
                }
                break;
On the Start state, game checks if player has tapped on screen. When this happens, we transition Max to the run state (by setting the AnimationStarted variable to true) and transition the game state to Playing.
            case GameState.Playing:
                UIManager.Instance.IncreaseScore(0.001f);

                CheckHeight();

                DetectJumpOrSwipeLeftRight();

                //apply gravity
                moveDirection.y -= gravity * Time.deltaTime;

                if (isChangingLane)
                {
                    if (Mathf.Abs(transform.position.x - locationAfterChangingLane.x) < 0.1f)
                    {
                        isChangingLane = false;
                        moveDirection.x = 0;
                    }
                }

                //move the player
                controller.Move(moveDirection * Time.deltaTime);

                break;
On the playing state, we first check Max’s current position in the Y axis. Then, we move Max left or right, or we make him jump, depending on user’s input (via DetectJumpLeftOrRightSwipe method). If Max is changing lane, we check his current X position compared to the final one. If the difference between them is (very) small, this means that Max has finished his movement so we can safely set the isChangingLane variable to false and preventing Max from moving more. Finally, we use the CharacterController’s Move method to move Max.
 case GameState.Dead:
                anim.SetBool(Constants.AnimationStarted, false);
                if (Input.GetMouseButtonUp(0))
                {
                    //restart
                    SceneManager.LoadScene(SceneManager.GetActiveScene().buildIndex);
                }
                break;
            default:
                break;
        }

    }
The last part of Update method runs when Max has dies. There, we transition Max to the idle state by setting the AnimationStarted variable to false and we prompt the player to tap the screen in order to restart the level.
 public void OnControllerColliderHit(ControllerColliderHit hit)
    {
        //if we hit the left or right border
        if(hit.gameObject.tag == Constants.WidePathBorderTag)
        {
            isChangingLane = false;
            moveDirection.x = 0;
        }
    }
The OnControllerHit method is used in the “straight paths” level. The left and right borders of the path are tagged as WidePathBorder and when Max is touching them we consider that lane changing has finished. If we fail to do this, then Max continously tries to move towards the wall, resulting in a nasty bug.
Rotated paths level
Game objects hierarchy in the “rotated paths” level shares some similarities with the “straight paths” level. However, here we have a different path prefab (a narrower path), more NewPathSpawns and we also have a SwipeCollider.
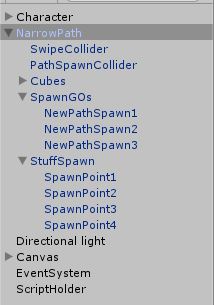
When Max enters the PathSpawnCollider, a new path is instantiated in a random location, chosen from the three points in the NewPathSpawn array.
Out of these three locations, one is randomly chosen for the next path location. In the two remaining locations, the game engine will instantiate RedBorder prefabs.
Stuff Spawner and Path Spawn Collider
These scripts are exactly the ones used in the “straight paths” level, so we will not repeat them here.
Swipe Collider
In the “rotated paths” level, there is a certain space in the path where player is allowed to swipe to move Max. This is because we do not want the player to mistakenly swipe when Max is in the middle of the path, this would create an unnecessary hurdle for our player. So, we have placed an invisible game object with a collider at the point where our player has to swipe for Max to continue on the path that follows after the current one. Hence, player is only allowed to swipe when Max is colliding with the Swipe Collider game object. Let’s see the collider’s code!
public class SwipeCollider : MonoBehaviour
{

    // Use this for initialization
    void OnTriggerEnter(Collider hit)
    {
        if (hit.gameObject.tag == Constants.PlayerTag)
            GameManager.Instance.CanSwipe = true;
    }

    void OnTriggerExit(Collider hit)
    {
        if (hit.gameObject.tag == Constants.PlayerTag)
            GameManager.Instance.CanSwipe = false;
    }
}
The SwipeCollider script basically sets a public variable on the GameManager object, which allows/disallows left/right swipe on Max, as already described. The OnTriggerEnter method is executed when Max enters the collider and the OnTriggerExit method is executed upon Max’s exit.
CharacterRotateMovement script
This script shares a lot of similarities with the CharacterSidewaysMovement script, described in the “straight paths” level. Main difference is in the DetectJumpOrSwipeLeftRight method, where Max needs to turn left or right, if the player has swiped (and is allowed to do so!). We use Quaternion.AngleAxis method to rotate Max.
if (GameManager.Instance.CanSwipe && inputDirection.HasValue &&
         controller.isGrounded && inputDirection == InputDirection.Right)
        {
            transform.Rotate(0, 90, 0);
            moveDirection = Quaternion.AngleAxis(90, Vector3.up) * moveDirection;
            //allow the user to swipe once per swipe location
            GameManager.Instance.CanSwipe = false;
        }
        else if (GameManager.Instance.CanSwipe && inputDirection.HasValue &&
         controller.isGrounded && inputDirection == InputDirection.Left)
        {
            transform.Rotate(0, -90, 0);
            moveDirection = Quaternion.AngleAxis(-90, Vector3.up) * moveDirection;
            GameManager.Instance.CanSwipe = false;
        }
Having seen both movement scripts, you may wonder why we did not use some OOP inheritance to create both classes. Well, we certainly could! However, I prefer it this way since it will be easier for you to pick just the one class you need in your game. If you create a game that features both movement mechanics though, I strongly encourage you to refactor to an inheritance model which will make your code more manageable.
Possible enhancements
Some enhancements that come to mind:
- To save in memory and performance, we could use an Object Pooler class to help us with game object’s creation. We’ve made one in our Tower Defense tutorial, check it out here.
- The “wide paths” level is pretty easy, should be more difficult. Consider increasing the appearance chances of the obstacles on this level.
- Complete the animations on Max. The model has also a “death” animation, try adding it to the game.
Development IDE(s)
This tutorial was developed on Visual Studio/Windows (using the awesome Visual Studio Tools for Unity) and on Mac OSX, on the awesome and free Visual Studio Code editor which can be of great assistance when working with Unity projects.
Conclusion
Hope you enjoyed this tutorial! I tried to implement the logic behind a classic infinite runner game without wasting too much time on unnecessary stuff. Still, there is much room for improvement (like making the game harder!), feel free to improve it. Do not forget to check the source code here on GitHub and play the game here on a WebGL enabled browser.

Hi
I’d firstly like to thank you for creating this blog. I’m a South African teenager and have learnt a lot from these tutorials. I’ve been all over the web but can’t find what I’m looking for. or rather wherever I find it, its not good quality or good enough for the game I made. I’d like to get a tutorial for creating a menu for a game. A good looking attractive eye-catching menu. I’ve found videos that don’t really help much. please help. and thanks again for all the work so far.
LikeLike
Thanks for your comments. I suppose you’re using Unity’s UI system, right? What effect are you trying to accomplish?
LikeLike
yes i am. I would like to get something like what you find on games like bubblewitch saga or Candy Crush. most of the videos I have found all basically give instructions for a menu consisting of a “Play” and “Quit” button. I need more. Stuff like “Settings”, “High Score”, “Help” ,”Connect Facebook”, “Leaderboard” and “Multiplayer”. I’d like to add colour and sound on the menu. That’s basically it.
LikeLike
Have you checked the Unity UI tutorials? Have you found an answer?
LikeLike
Oh and one more thing, inspired by your match-3 game tutorial, it is possible to have a circular grid instead of your usual rectangular/square grid for the candies ? if so, how can it be implemented.
LikeLike
Hi, sorry for the (really) late response. Did you find an answer? From my understanding, you could use a graph data structure to accomplish that
LikeLike
Hey!
First of all thanks for such an awesome tutorial!
Just one request can you plz mail me all the scripts because it is quite difficult for me to understand where to put each scripts and so all.
So please help me out!
LikeLiked by 1 person
Thanks! Did you try downloading from GitHub? https://github.com/dgkanatsios/InfiniteRunner3D
LikeLike
First of all thanks for your immediate reply!
The Scripts are having a lot of errors
is there any way to fix them?
LikeLike
Hi, what kind of errors? Did you download the solution from GitHub?
LikeLike
hi there, I got this errors – the namespace ‘global’:: already contains a definition for ‘constants’ and the namespace ‘global’:: already contains a definition for ‘obstacles
‘
LikeLike
Hi, did you try cleaning/rebuilding the solution? Sounds like an extra reference to a dll
LikeLike
IInputDetector doesn’t seem to work for me. What am I missing?
I also had to change the “inputDetector = GetComponent();” to inputDetector = GetComponent();
not sure if that’s right though.
LikeLike
What’s the issue exactly? I also don’t understand the change you made, seems the same to me.
LikeLike
IInputDetector doesn’t seem to work for me,too.
LikeLike
I Have the same error,did you get it?
LikeLike
Hi and thanks for your comment. Just did a check on the code posted on GitHub with Unity 5.5 and everything works OK. What’s the error message you’re getting?
LikeLike
I figured out how to move left and right in the rotated levels as i only have the one but ive run into an even bigger problem. it’s been ongoing but i figured id cross that bridge when it came time. Anyways the problem im having is that when i spawn a path it spawns from it’s center point (the X,Y,Z axis navigation thing that is on all game objects). As a temporary fix I moved the spawn locations to the needed postions and removed the border prefabs because they’d just spawn out of place anyways and get in the way. But now after I get to the next path it spawns a path on the previous path.
Start on Path_1 -> Hit the spawn box -> Spawn Path_2 -> Hit the spawn box -> Path_3 Spawns where Path_2 spawned.
Im not sure how to fix this at all.
Ive tried a great number of things, one of which was starting from scratch and making separate Right, Left and forward paths but that would have been a nightmare and It made me realize that rotating the One path would be the best option.
Im lost and i could really use your help.
LikeLike
Hi, when you spawn a new GameObject you select where to spawn it. You could create an empty GameObject and save it on your prefabs. That’s what I’m doing to spawn new paths as the game progresses.
LikeLike
Hello thanks for the project. I have a question. I can control my character with arrow keys but i cant swipe at all. I did try to fix it. I use Debug.log in SwipeDetector script. But its not logging on console.
LikeLike
Hi and thanks for the comment. Have you tried to swipe on a touch screen (either a mobile device or a Windows Touch PC)? Debug.Log works in editor, which wouldn’t work on a mobile device
LikeLike
Yes i did build apk file and still it is not working. I tried using debug log with unity remote app. Also tried with mouse swap which is your codes defined mouseclick button
LikeLike
Are you using the components appropriately? You need to remove the ArrowKeysDetector script from the Character GameObject and add the SwipeDetector one there.
LikeLike
I miss to attach swipe detect script :/ I feeld bad for this :D Thank you so much for your time
LikeLike
No worries, maybe I should have made it clearer in the blog post. Happy that it is working for you!
LikeLike
Hello , Thank you so much for this tutorial.
I know it’s been over year but it’s still very helpful and unique for creating endless runner game.
I use the PathSpawnCollider script in my game to generate a new path , but the problem is after two or three new Paths , there are no new paths generated and the console says ” Index out of range exception ” . I know this’s because [i] is no longer less than (PathSpawnPoints.length) . So I increased the speed of my player and I found it worked but the new paths gradually delayed in appearin until it no longer generated and the same error appeared again.
I tried many fixes with no luck. Can you give me any advice or hint about this please ?
Thanks in advance
LikeLike
Just a quick thought, if you add more PathSpawnPoints, maybe this will help?
LikeLiked by 1 person
Hey thanks for the quick reply . I tried this but didn’t work. You meant more PathSpawnPoints in the scene right ?
LikeLike
More SpawnPoints in each path. In my project I have 4 SpawnPoints in each path, check them out.
In which line of code does the exception occur?
LikeLike
Sorry , I downloaded the source from Github and there’s only one SpawnPoint in each path. The Exception occur in :
LikeLike
Check here https://dgkanatsios.com/2016/03/09/creating-an-infinite-3d-runner-game-in-unity-like-temple-run-subway-surfers-part-2/ you will see 4 SpawnPoint game objects in the screenshot.
LikeLike
Yes I saw them. But what SpawnPoints have to do with the Path ? Aren’t these for candy and obstacles ? . At first , I thought you meant multiple ( NewPathSystem ) .
LikeLike
They are children of the path, each path has 4 SpawnPoints for items to pop up (either obstacle, candy or nothing)
LikeLiked by 1 person
It’s been 2 days on this issue and I’m frustrated because it works just fine on your project but never works on mine although it is all the same. I tried many fixes. Could you please write the PathSpawnCollider code for only straight path ?
LikeLike
OK, so I got a bit confused with the question. To clear any confusion, in the straight path level, there are 4 spawn points for items (as described in my previous comment) and only 1 spawn point for a new path. Maybe you are using more and that’s why your script crashes?
LikeLike
No , I’m using ONE spwn points for new path. I’m using a straight path only ( no rotated path ) . I don’t use SpawnPoints or the StuffSpawner script for now. I just want to make endless straight path for now.
I was confused when you said “if you add more PathSpawnPoints, maybe this will help? “.
LikeLike
No, ignore that comment, missed that you want a straight path. For an endless straight path, you need one and only one path spawn point, just like on my project.
LikeLiked by 1 person
I found out the cause of my problem. The reason was that the Character Controller lags behind the player too much , so the player would reach the end of the current path while the character controller still far away and didn’t hit the ” PathSpawnCollider” yet. The cause of this lag was in my animation clip. Fixing the animation sloved the problem.
Anyway, Unity Character Controller is not so good so I switched to Super Character Controller by Erik Ross.
Thank you @dgkanatsios for your help
LikeLiked by 1 person
Thanks Dgkanatsios for the post. The knowledge and examples you provide are perfectly suited for the game being mentioned about here: Temple run. Definitely, We can apply this knowledge to 3D simulation games like Run 3. Run 3 is a game with the same mathematical logic.
LikeLike
Very good tutorials easy to follow really does answer a lot of questions that have had me stuck but if you could help me with 2 more please. First the player moves too slow and i want to speed him up. Changing lanes i have speed him up but i cant seem to get him moving forward faster. The only place i can see where you would change this is in the charactersidewaysmovement.cs public float speed but that does nothing if you could point me in the right direction that would be very helpful as i cant seem to find where to change that myself and i think i’ve gone through all the scripts. Plus i want to save my highscore. following another tutorial i was using the code using System.Collections;
using System.Collections.Generic;
using UnityEngine;
using UnityEngine.UI;
public class Score : MonoBehaviour {
private float score = 0.0f;
private int difficultyLevel = 1;
private int maxDifficultyLevel = 4;
private int scoreToNextLevel = 60;
private bool isDead = false;
public Text scoreText;
public DeathMenu deathMenu;
// Update is called once per frame
void Update () {
if (isDead)
return;
if (score >= scoreToNextLevel)
LevelUp ();
score += Time.deltaTime * 20.0f;
scoreText.text = ((int)score).ToString ();
}
void LevelUp()
{
if (difficultyLevel == maxDifficultyLevel)
return;
scoreToNextLevel *= 8;
difficultyLevel++;
GetComponent().SetSpeed (difficultyLevel);
Debug.Log (difficultyLevel);
}
public void OnDeath()
{
isDead = true;
if(PlayerPrefs.GetFloat(“Highscore”) < score)
PlayerPrefs.SetFloat ("Highscore", score);
deathMenu.ToggleEndMenu (score);
}
}
what would be the best way to implement this into my my game or would you recommend another approach.
Once again thanks so much for the tutorials and thanks in advance for any more help you can give this unity amateur.
Regards
Seanore
LikeLike
There is a Speed variable on the CharacterSidewaysMovement.cs file, have you tried modifying it?
Regarding the Score saving, PlayerPrefs is a simple but effective solution for saving it locally.
LikeLike
Thanks for getting back so quick @dgkanatsios I found the speed variable it was the CharacterGo public transform. Still trying to figure out the score saving I’ll do some research into PlayerPrefs I just wasn’t sure if the script i had above could be implemented into this game. Also if i may add to my list ? lol is there any way to have 3 or maybe 5 path tiles in front of the player on the screen at the same time to give the impression of length ? Its just when playing the game every path is seen spawning in and I’m afraid that would take away from the effect I’m trying to do. I’m building a horror endless runner and I’m trying to make it as creepy as i can so continuity is very important. Thanks again fro all you help. I really don’t mean to be a pain.
Seanore
LikeLike
Hi, you could modify either the NarrowPath or the WideStraightPath prefabs and make them as bigger, or spawn more path prefabs. With the second way, you need to pay special attention to not have the PathSpawnCollider in every path but only in the ones that you want to trigger the creation of the new path prefab. Good luck!
LikeLike
hii, your blog is so helpful but in your part 2,In Strainght path level there is an error in IInputDetector that “the type or namespace “iinputDetector” could not found. i tried so many times to fix this but everytime i get failed. so can you give me the solution.
LikeLike
Did you clone the entire repository from GitHub? What version of Unity are you using?
LikeLike
unity 5.3.5 any solution pls?
LikeLike
i getting error on this line IInputDetector inputDetector = null (error: the type or namespaces “IInputDetector could not be found(are you missing using a directive or assembly refrence))
LikeLike
There should be a folder Input with a file IInputDetector.cs
This folder/file exists on the GitHub project, should exist when you fork/download the project.
LikeLike
thanx
LikeLike
hello sir,
i removed all the errors and game is ready to play but when i hit play button player,background nothing moves. can you tell where i done wrong.
LikeLike
Are you opening the introLevel scene?
LikeLike
no
LikeLike
Try it, then :)
LikeLike
for movement of game animation is necessary?
LikeLike
It’s necessary if you want to see the game running in the Unity editor.
LikeLike
hello player is moving,everything done right, but dont knw, why background scene is not moving
LikeLike
Only the player and the paths are supposed to move.
LikeLike
Player is moving but paths dont moving.Is any animation is required for moving paths or something else?
LikeLike
Played is moving onto the paths, this should work. Did you modify the code in any way?
LikeLike
No i didn’t modify. Any additional component required to add in unity on path?
LikeLike
It should work as is. What version of Unity are you using? Does the WebGl version on the website work for you?
LikeLike
Yes it works
LikeLike
Can you tell me what we should do on path.i will reconfirm in my project
LikeLike
You just download the project from GutHub and run it, nothing more
LikeLike
Hello sir, As you said download the project and run it.i done the same thing but whenever i run my project an ERROR shows “MissingComponentException: There is no ‘Animator’ attached to the “Bip001 L Finger1” game object, but a script is trying to access it.
You probably need to add a Animator to the game object “Bip001 L Finger1″. Or your script needs to check if the component is attached before using it”. i dont know now how to fix this problem.please give me solution.
LikeLike
I can’t find such a gameobject in my assets, maybe it’s in the MAX model? Strange, I also can’t find any code referencing a gameobject with this name. Can you try downloading again in an empty project?
LikeLike
i made an clone project but 3 errors occurs everytime. ERRORS are:- “NullReferenceException: Object reference not set to an instance of an object
CharacterGameObject.Update () (at Assets/scripts/CharacterGameObject.cs:49)
”
AND NullReferenceException: Object reference not set to an instance of an object
UIManager.UpdateScoreText () (at Assets/scripts/UIManager.cs:61)
UIManager.ResetScore () (at Assets/scripts/UIManager.cs:44)
CharacterGameObject.Start () (at Assets/scripts/CharacterGameObject.cs:31)
AND
You are trying to create a MonoBehaviour using the ‘new’ keyword. This is not allowed. MonoBehaviours can only be added using AddComponent(). Alternatively, your script can inherit from ScriptableObject or no base class at all
UnityEngine.MonoBehaviour:.ctor()
UIManager:.ctor() (at Assets/scripts/UIManager.cs:34)
UIManager:get_Instance() (at Assets/scripts/UIManager.cs:28)
CharacterGameObject:Start() (at Assets/scripts/CharacterGameObject.cs:31)
Any solution for these errors?
LikeLike
Just downloaded it and run it with Unity 2017.1, everything working good. So I can’t figure out what your problem is, did you modify code/gameobjects in any way?
LikeLike
I am little bit confused in character rotate movement script. In this script what to add in character go column.
LikeLike
Hello sir,
Thanks for your all advices. Now my project is in running state but now the problem is path is not instatiating,only red border is instantiating. Can you tell me solution of it.
LikeLike
Hello thanks for the project. I have a question. I can control my character with arrow keys but its not working in my mobile. no change postion and jump.
LikeLike
You need to select the correct IInputDetector component for your Gameobject. You can select either ArrowKeysDetector or SwipeDetector, depending on the MonoBehavior you have attached.
LikeLike
i used SwipeDetector but still not working. only tap input is working swipe left-right not working. please provide solution for that.
LikeLike
Hi sir.
Im encountering a problem with the ‘characterSidewaysMovement’ in regards with line ‘UIManager.Instance.ResetScore’.
Instance does not contain a definition and extension method. I’m familiar with extension methods but I’m having trouble tailoring one specifically for this instance error.
Any sort of guidance would be much appreciated.
THANK YOU for this blog btw.
LikeLike
Can you please download the source code again and retry? Is the class UIManager included in the code you downloaded? What version of Unity are you using?
LikeLike
I’m using Unity 4.0
LikeLike
Last test I did was on 2017 and 5.6. Can you download a newer version and try again?
LikeLike
I’m on it. Thank you sir
LikeLike
Okay so I’ve updated unity and visual studio to the latest versions but the error still occurs. Any new ideas?
LikeLike
So, this is the class UIManager that contains the ResetScore method. Does it exist in your project? https://github.com/dgkanatsios/InfiniteRunner3D/blob/master/Assets/Scripts/UIManager.cs
LikeLike
Hello thanks for this tuto, i have a question about the repeatition of road, is exist other solution to release it ? i found another solution like using pattern system manager that we set up in window menu, but i do no understand any thing.
LikeLike
Well, the pattern to add a new path is pretty straightforward and predictable right now. What do you want to accomplish? You could create a more ‘complicated’ path by adding more Path prefabs and randomly choosing one of them.
LikeLike
Hello, im trying to implement a highscore as well in your game but when I do so, the charachter starts running in the air and does not go forward when i start the game, could you help?
LikeLike