This tutorial is meant for educational purposes only to showcase how to build certain types of games. Please respect the copyrights/trademarks of others!
If you are in a hurry, you can try the game here and check the source code here.
Last time I posted something around Angry Birds was 3 years ago, when I blogged about a 5’ creation of Angry Birds with 0 lines of code using XAML, Behaviors and Expression Blend. Well, it wasn’t exactly a clone, but it simulated on how to implement some basic dragging/collision/particles functionality with the Farseer Physics Engine. This blog post serves as an attempt to create a single level (with reusable components, long live the prefab!) of Angry Birds using Unity 3D platform. The game features a single level, 3 birds for the user to throw, 3 pigs that the user has to destroy, parallax backgrounds, a maximum strength for the bird (we cannot drag the bird more than a predefined distance), animations with the help of the excellent GoKit library, a projection of the trajectory of the bird (so we can more or less predict where it’ll land), the user’s ability to drag the screen to see the entire scene, pinch to zoom ability (for multitouch devices) and a small trail that is left by the bird when it’s thrown.
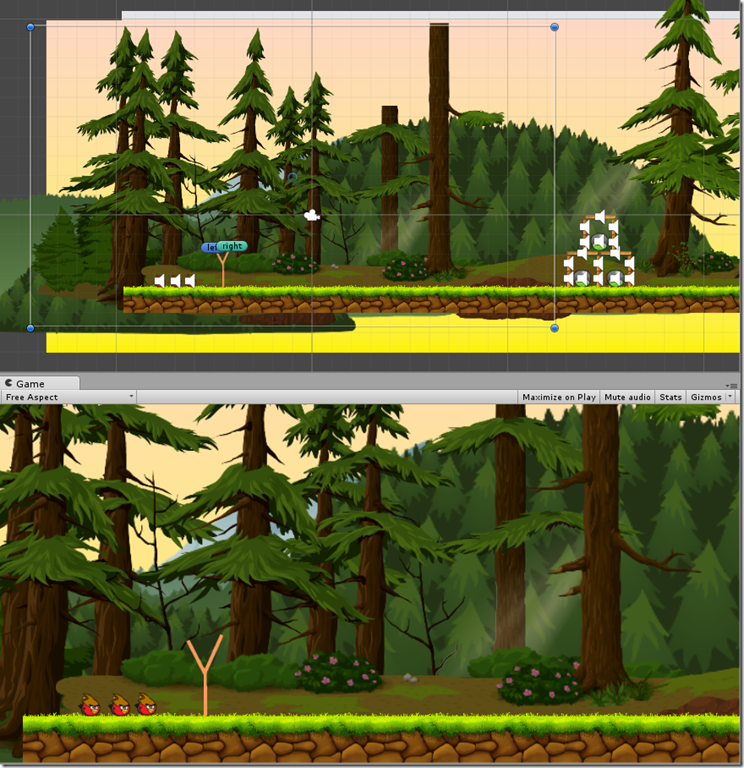
Game scene in the Unity editor
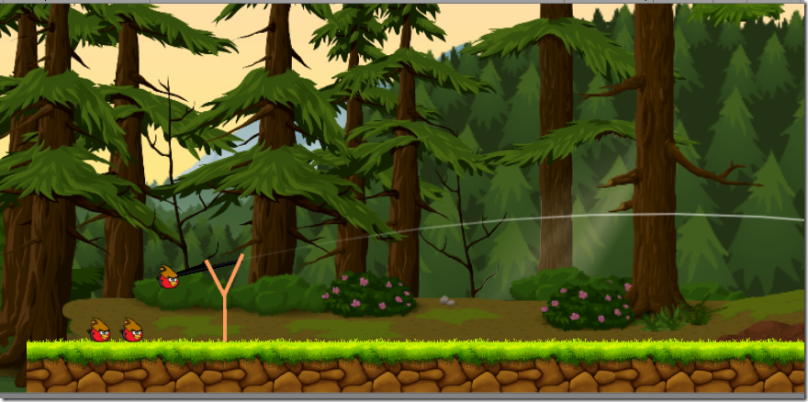
The projected trajectory
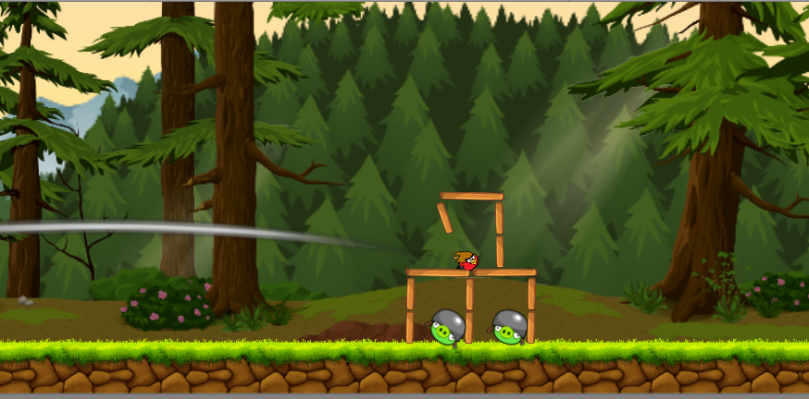
The trail left by the bird
Before we begin, let’s mention the necessary stuff! Angry Birds, the red birds and the pigs are all registered assets trademarks of Rovio and this blog post serves no other than education purposes.
Game code was written in Visual Studio (check the free Community edition here). For debugging purposes, don’t forget to check the Visual Studio tools for Unity here.
Onto the game! It’s a pretty big game, we’ll attempt to cover most of the stuff. We’ll begin with examining our scene in the editor. As always, it would be better if you opened the game in Unity and examined all relevant parts as the post walks you through them.
Scene objects
On our scene, we have
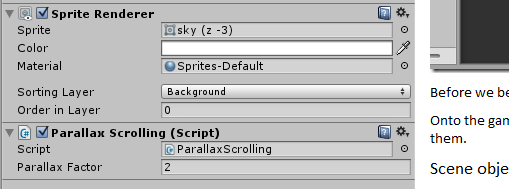
- 3 background sprites. All have “Background” as their sorting layer and the ParallaxScrolling script attached. This script will make for a nice parallax effect when the camera is moved.
- 3 Destroyers. Some simple quads, triggers, have the Destroyer script. They are placed at the left, top and right edges of the screen and they will be used to deactivate/destroy objects that go out of the scene. Destroyer object is a prefab, so we can easily use it in other scenes, if we like.

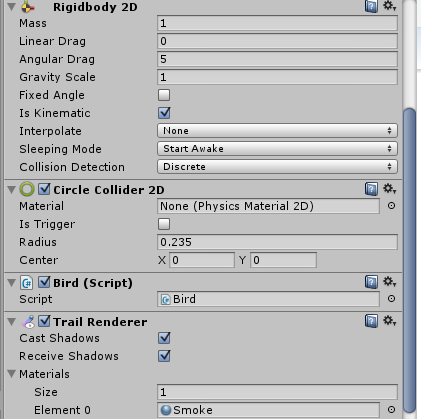
- Our 3 birds! They are rigidbodies, kinematic (initially – before user throws them), have a circle collider, a trail renderer (to leave a trail when they get thrown) and a “whoosh” sound when they take off. They also have the Bird script. The Smoke material in the Trail Renderer comes from Unity Standard Assets, specifically the Particles one.

- The GameManager is an empty GameObject that has the GameManager script (we could attach it to the Main Camera, though).
- The Enemy Building is a GameObject that has all the building blocks and the Pigs as children.
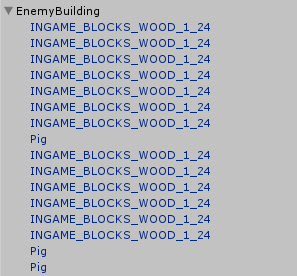
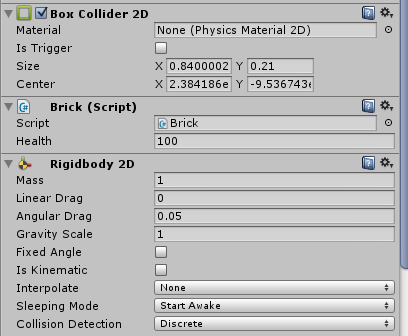
- The bricks (that’s also how they’re tagged) have a BoxCollider2D, are rigidbodies and have the Brick script. Each brick is a prefab, enhancing reusability.
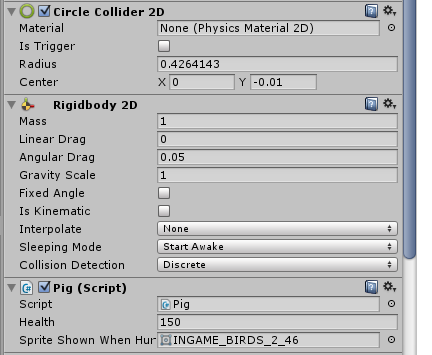
- Each Pig is a Rigidbody, has a CircleCollider2D, a funny sound and the Pig Script.
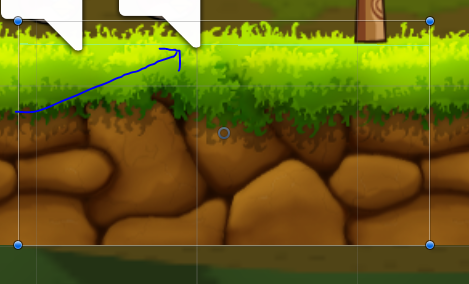
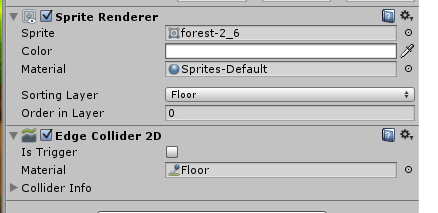
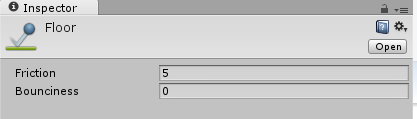
- The Floor object has some sprites that represent the ground of our scene.
- Each piece of the ground has an edge collider with the Floor Physics material and is a prefab. The Physics material makes it difficult for rigidbodies to roll onto it whereas the bounciness is zero. The edge collider is pointed by the blue arrow in our screenshot.
- The Slingshot object contains the slingshot sprites plus some useful transforms and the necessary line renderers (two for the slingshot “strings” and one for the projected trajectory when the bird is thrown).

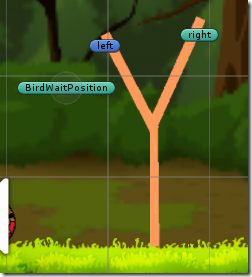
- The two slingshot line renderers are used for the strings connecting the slingshot and the bird (that’s waiting to be thrown), the trajectory line renderer (that shows the estimated trajectory of the bird), the left and right gameobjects are used as the line renderer starting points and the birdwaitposition is the idle position for the bird.
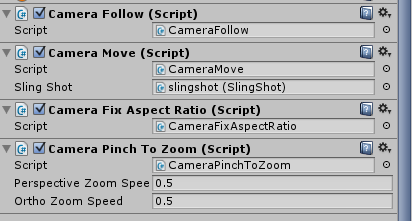
- The camera is an orthographic one and has 4 scripts, which will be analyzed later in this blog post.
We should mention that the ground graphics for the game were found here http://opengameart.org/content/forest-themed-sprites (opengameart is an awesome place!), the birds and the pigs were found here http://jared33.deviantart.com/art/Angry-Birds-OCs-Sprites-Update-340030555 and http://chinzapep.deviantart.com/art/Small-Helmet-Pig-Sprites-315726760, slingshot was self-drawn, the wooden pieces were found here http://angrybirds.wikia.com/wiki/File:INGAME_BLOCKS_WOOD_1.png, the forest backgrounds were found here http://opengameart.org/content/hd-multi-layer-parallex-background-samples-of-glitch-game-assets and the sounds come from www.freesound.org. Both assets from wikia.com were spritesheets, so we used Unity’s sprite editor to automatically slice them.


Let’s analyze the scripts. We’ll start with the easier ones and continue with the most complicated!
Brick script
The brick script checks for collisions. It has a “health” variable which is decreased proportionally to the collision object’s velocity. If health drops below zero, then the brick is destroyed.
public class Brick : MonoBehaviour
{


    void OnCollisionEnter2D(Collision2D col)
    {
        if (col.gameObject.GetComponent<Rigidbody2D>() == null) return;

        float damage = col.gameObject.GetComponent<Rigidbody2D>().velocity.magnitude * 10;
        //don't play audio for small damages
        if (damage >= 10)
            GetComponent<AudioSource>().Play();
        //decrease health according to magnitude of the object that hit us
        Health -= damage;
        //if health is 0, destroy the block
        if (Health <= 0) Destroy(this.gameObject);
    }

    public float Health = 70f;


    //wood sound found in
    //https://www.freesound.org/people/Srehpog/sounds/31623/
}
Bird script
The Bird script starts by disabling the bird’s trail renderer since we do not want it to show before the bird gets thrown, then it makes the bird kinematic (no gravity before departure!), it increases the radius of the collider and sets the initial state for the bird.
[RequireComponent(typeof(Rigidbody2D))]
public class Bird : MonoBehaviour
{

    // Use this for initialization
    void Start()
    {
        //trailrenderer is not visible until we throw the bird
        GetComponent<TrailRenderer>().enabled = false;
        GetComponent<TrailRenderer>().sortingLayerName = "Foreground";
        //no gravity at first
        GetComponent<Rigidbody2D>().isKinematic = true;
        //make the collider bigger to allow for easy touching
        GetComponent<CircleCollider2D>().radius = Constants.BirdColliderRadiusBig;
        State = BirdState.BeforeThrown;
    }
On the FixedUpdate (since we don’t want this every frame) we check if bird’s speed is very small and the bird has been thrown from the slingshot. This means that is has completed its fall and stays idle. We proceed in destroying the bird after 2 seconds.
    void FixedUpdate()
    {
        //if we've thrown the bird
        //and its speed is very small
        if (State == BirdState.Thrown &&
            GetComponent<Rigidbody2D>().velocity.sqrMagnitude <= Constants.MinVelocity)
        {
            //destroy the bird after 2 seconds
            StartCoroutine(DestroyAfter(2));
        }
    }

    IEnumerator DestroyAfter(float seconds)
    {
        yield return new WaitForSeconds(seconds);
        Destroy(gameObject);
    }
We also have an OnThrow method (that is called by the slingshot script) that makes the bird non-kinematic, decreases the collider’s radius and enables the trail renderer.
    public void OnThrow()
    {
        //play the sound
        GetComponent<AudioSource>().Play();
        //show the trail renderer
        GetComponent<TrailRenderer>().enabled = true;
        //allow for gravity forces
        GetComponent<Rigidbody2D>().isKinematic = false;
        //make the collider normal size
        GetComponent<CircleCollider2D>().radius = Constants.BirdColliderRadiusNormal;
        State = BirdState.Thrown;
    }
CameraFollow script
The camera follow script moves the camera along the thrown bird’s movement. It clamps the position so that camera’s X position is never out of scene bounds.
public class CameraFollow : MonoBehaviour
{

    // Use this for initialization
    void Start()
    {
        StartingPosition = transform.position;
    }

    // Update is called once per frame
    void Update()
    {
        if (IsFollowing)
        {
            if (BirdToFollow != null) //bird will be destroyed if it goes out of the scene
            {
                var birdPosition = BirdToFollow.transform.position;
                float x = Mathf.Clamp(birdPosition.x, minCameraX, maxCameraX);
                //camera follows bird's x position
                transform.position = new Vector3(x, StartingPosition.y, StartingPosition.z);
            }
            else
                IsFollowing = false;
        }
    }

    [HideInInspector]
    public Vector3 StartingPosition;


    private const float minCameraX = 0;
    private const float maxCameraX = 13;
    [HideInInspector]
    public bool IsFollowing;
    [HideInInspector]
    public Transform BirdToFollow;
}
CameraMove script
The camera move script allows the user to drag the sceen via touch or mouse when the bird is idle and waiting to be thrown, so that she can see the entire scene and estimate where to hit. The script compares mouse coordinates frame by frame and moves the camera accordingly. We also use a timer so that a single tap will not modify camera’s transform and we’re adding some dragSpeed every frame to simulate an accelerated drag by the user. X and Y camera values are clamped so that the user doesn’t drag the camera out of scene bounds.
public class CameraMove : MonoBehaviour
{


    // Update is called once per frame
    void Update()
    {
        if (SlingShot.slingshotState == SlingshotState.Idle && GameManager.CurrentGameState == GameState.Playing)
        {
            //drag start
            if (Input.GetMouseButtonDown(0))
            {
                timeDragStarted = Time.time;
                dragSpeed = 0f;
                previousPosition = Input.mousePosition;
            }
            //we calculate time difference in order for the following code
            //NOT to run on single taps ;)
            else if (Input.GetMouseButton(0) && Time.time - timeDragStarted > 0.05f)
            {
                //find the delta of this point with the previous frame
                Vector3 input = Input.mousePosition;
                float deltaX = (previousPosition.x - input.x)  * dragSpeed;
                float deltaY = (previousPosition.y - input.y) * dragSpeed;
                //clamp the values so that we drag within limits
                float newX = Mathf.Clamp(transform.position.x + deltaX, 0, 13.36336f);
                float newY = Mathf.Clamp(transform.position.y + deltaY, 0, 2.715f);
                //move camera
                transform.position = new Vector3(
                    newX,
                    newY,
                    transform.position.z);

                previousPosition = input;
                //some small acceleration ;)
                if(dragSpeed < 0.1f) dragSpeed += 0.002f;
            }
        }
    }

    private float dragSpeed = 0.01f;
    private float timeDragStarted;
    private Vector3 previousPosition = Vector3.zero;

    public SlingShot SlingShot;
}
CameraPinchToZoom script
This script was found here http://unity3d.com/pt/learn/tutorials/modules/beginner/platform-specific/pinch-zoom (Unity site has some awesome resources). It basically does a frame by frame touch coordinates comparison and modifies the size of the camera to simulate zoom in/zoom out. Again, values are clamped.
Destroyer script
Destroyer script checks for trigger collisions (remember that destroyer has a trigger collider!) and will destroy any bird, pig or bricks that it collides with. You may wonder “Why do you use Pig or Brick, only bird will hit it!”. Answer is “yes”, but, nevertheless, you don’t know what will happen when the game is played by millions of users so why not code it and be on the safe side? :)
public class Destroyer : MonoBehaviour {


    void OnTriggerEnter2D(Collider2D col)
    {
        //destroyers are located in the borders of the screen
        //if something collides with them, the'll destroy it
        string tag = col.gameObject.tag;
        if(tag == "Bird" || tag == "Pig" || tag == "Brick")
        {
            Destroy(col.gameObject);
        }
    }
}
Pig script
The Pig script checks for collisions. If the pig is hit by a bird, the pig is immediately destroyed. If it is hit by something else (such as another pig or brick) then we calculate the damage. If it is below a threshold, then we change the pig’s sprite (we show the one with the black eyes). Again, if health drops below zero, the pig is destroyed.
public class Pig : MonoBehaviour
{

    public float Health = 150f;
    public Sprite SpriteShownWhenHurt;
    private float ChangeSpriteHealth;
    // Use this for initialization
    void Start()
    {
        ChangeSpriteHealth = Health - 30f;
    }

    void OnCollisionEnter2D(Collision2D col)
    {
        if (col.gameObject.GetComponent<Rigidbody2D>() == null) return;

        //if we are hit by a bird
        if (col.gameObject.tag == "Bird")
        {
            GetComponent<AudioSource>().Play();
            Destroy(gameObject);
        }
        else //we're hit by something else
        {
            //calculate the damage via the hit object velocity
            float damage = col.gameObject.GetComponent<Rigidbody2D>().velocity.magnitude * 10;
            Health -= damage;
            //don't play sound for small damage
            if (damage >= 10)
                GetComponent<AudioSource>().Play();

            if (Health < ChangeSpriteHealth)
            {//change the shown sprite
                GetComponent<SpriteRenderer>().sprite = SpriteShownWhenHurt;
            }
            if (Health <= 0) Destroy(this.gameObject);
        }
    }

    //sound found in
    //https://www.freesound.org/people/yottasounds/sounds/176731/
}
ParallaxScrolling script
The parallax scrolling script is applied to each of the 3 background images we have in our scene. It gets a reference to the camera and moves the respective background proportionally to the camera’s movement (delta), with the proportion being determined by a ParallaxFactor variable (we obviously need to set this in a different value for each of our backgrounds to achieve the parallax effect).
public class ParallaxScrolling : MonoBehaviour {

	// Use this for initialization
	void Start () {
        camera = Camera.main;
        previousCameraTransform = camera.transform.position;
	}

    Camera camera;

	/// <summary>
	/// similar tactics just like the "CameraMove" script
	/// </summary>
	void Update () {
        Vector3 delta = camera.transform.position - previousCameraTransform;
        delta.y = 0; delta.z = 0;
        transform.position += delta / ParallaxFactor;


        previousCameraTransform = camera.transform.position;
	}

    public float ParallaxFactor;

    Vector3 previousCameraTransform;

    ///background graphics found here:
    ///http://opengameart.org/content/hd-multi-layer-parallex-background-samples-of-glitch-game-assets
}
GameManager script
The game manager script does the following things to get the game started
- disables the slingshot
- finds all gameobjects in the game that are tagged as Bricks, Pigs and Birds
- adds an event handler for the BirdThrown event of the slingshot (this gets raised when the bird leaves the slingshot)
public class GameManager : MonoBehaviour
{

    public CameraFollow cameraFollow;
    int currentBirdIndex;
    public SlingShot slingshot;
    [HideInInspector]
    public static GameState CurrentGameState = GameState.Start;
    private List<GameObject> Bricks;
    private List<GameObject> Birds;
    private List<GameObject> Pigs;

    // Use this for initialization
    void Start()
    {
        CurrentGameState = GameState.Start;
        slingshot.enabled = false;
        //find all relevant game objects
        Bricks = new List<GameObject>(GameObject.FindGameObjectsWithTag("Brick"));
        Birds = new List<GameObject>(GameObject.FindGameObjectsWithTag("Bird"));
        Pigs = new List<GameObject>(GameObject.FindGameObjectsWithTag("Pig"));
        //unsubscribe and resubscribe from the event
        //this ensures that we subscribe only once
        slingshot.BirdThrown -= Slingshot_BirdThrown; slingshot.BirdThrown += Slingshot_BirdThrown;
    }
The update method checks for the gamestate enum value
- If we’re just about to start, just check if the user has tapped on the screen
- If we’re in the playing state (this is when the user has thrown the bird) we’re checking if everything on screen has stopped moving or time passed since the user threw the bird is over 5 seconds. If this is the case, we disable the slingshot and the next bird gets prepared to be thrown
- If the user has won or lost, then a subsequent tap will restart the level. On a normal game, this would advance to the next level (in case of winning, of course!).
    // Update is called once per frame
    void Update()
    {
        switch (CurrentGameState)
        {
            case GameState.Start:
                //if player taps, begin animating the bird
                //to the slingshot
                if (Input.GetMouseButtonUp(0))
                {
                    AnimateBirdToSlingshot();
                }
                break;
            case GameState.BirdMovingToSlingshot:
                //do nothing
                break;
            case GameState.Playing:
                //if we have thrown a bird
                //and either everything has stopped moving
                //or there has been 5 seconds since we threw the bird
                //animate the camera to the start position
                if (slingshot.slingshotState == SlingshotState.BirdFlying &&
                    (BricksBirdsPigsStoppedMoving() || Time.time - slingshot.TimeSinceThrown > 5f))
                {
                    slingshot.enabled = false;
                    AnimateCameraToStartPosition();
                    CurrentGameState = GameState.BirdMovingToSlingshot;
                }
                break;
            //if we have won or lost, we will restart the level
            //in a normal game, we would show the "Won" screen
            //and on tap the user would go to the next level
            case GameState.Won:
            case GameState.Lost:
                if (Input.GetMouseButtonUp(0))
                {
                    Application.LoadLevel(Application.loadedLevel);
                }
                break;
            default:
                break;
        }
    }
The AllPigsDestroyed method checks if all the pigs are null, i.e. they have been destroyed.
    /// <summary>
    /// A check whether all Pigs are null
    /// i.e. they have been destroyed
    /// </summary>
    /// <returns></returns>
    private bool AllPigsDestroyed()
    {
        return Pigs.All(x => x == null);
    }
The AnimateCameraToStartPosition method animates the camera to the starting position. This occurs after we’ve thrown the bird and everything has stopped moving. When the camera’s movement has been completed, we run a check to determine the state of the game. If all pigs have been destroyed, then the user has won. If she hasn’t won, the game uses the next bird for throwing, if available. If no more birds are available, then the user has lost.
    private void AnimateCameraToStartPosition()
    {
        float duration = Vector2.Distance(Camera.main.transform.position, cameraFollow.StartingPosition) / 10f;
        if (duration == 0.0f) duration = 0.1f;
        //animate the camera to start
        Camera.main.transform.positionTo
            (duration,
            cameraFollow.StartingPosition). //end position
            setOnCompleteHandler((x) =>
                        {
                            cameraFollow.IsFollowing = false;
                            if (AllPigsDestroyed())
                            {
                                CurrentGameState = GameState.Won;
                            }
                            //animate the next bird, if available
                            else if (currentBirdIndex == Birds.Count - 1)
                            {
                                //no more birds, go to finished
                                CurrentGameState = GameState.Lost;
                            }
                            else
                            {
                                slingshot.slingshotState = SlingshotState.Idle;
                                //bird to throw is the next on the list
                                currentBirdIndex++;
                                AnimateBirdToSlingshot();
                            }
                        });
    }
The AnimateBirdToSlingshot method takes the next bird for throwing and places it in the correct position. When completed, slingshot is enabled and the bird is ready to be thrown.
    void AnimateBirdToSlingshot()
    {
        CurrentGameState = GameState.BirdMovingToSlingshot;
        Birds[currentBirdIndex].transform.positionTo
            (Vector2.Distance(Birds[currentBirdIndex].transform.position / 10,
            slingshot.BirdWaitPosition.transform.position) / 10, //duration
            slingshot.BirdWaitPosition.transform.position). //final position
                setOnCompleteHandler((x) =>
                        {
                            x.complete();
                            x.destroy(); //destroy the animation
                            CurrentGameState = GameState.Playing;
                            slingshot.enabled = true; //enable slingshot
                            //current bird is the current in the list
                            slingshot.BirdToThrow = Birds[currentBirdIndex];
                        });
    }
The BirdThrown event handler lets the camera follow script that the current bird is the one to follow. Camera will move depending on the bird’s position.
    /// <summary>
    /// Event handler, when the bird is thrown, camera starts following it
    /// </summary>
    /// <param name="sender"></param>
    /// <param name="e"></param>
    private void Slingshot_BirdThrown(object sender, System.EventArgs e)
    {
        cameraFollow.BirdToFollow = Birds[currentBirdIndex].transform;
        cameraFollow.IsFollowing = true;
    }
The AutoResize method scales the GUI whereas the OnGUI method shows some simple labels depending on the game state.
    /// <summary>
    /// Found here
    /// http://www.bensilvis.com/?p=500
    /// </summary>
    /// <param name="screenWidth"></param>
    /// <param name="screenHeight"></param>
    public static void AutoResize(int screenWidth, int screenHeight)
    {
        Vector2 resizeRatio = new Vector2((float)Screen.width / screenWidth, (float)Screen.height / screenHeight);
        GUI.matrix = Matrix4x4.TRS(Vector3.zero, Quaternion.identity, new Vector3(resizeRatio.x, resizeRatio.y, 1.0f));
    }

    /// <summary>
    /// Shows relevant GUI depending on the current game state
    /// </summary>
    void OnGUI()
    {
        AutoResize(800, 480);
        switch (CurrentGameState)
        {
            case GameState.Start:
                GUI.Label(new Rect(0, 150, 200, 100), "Tap the screen to start");
                break;
            case GameState.Won:
                GUI.Label(new Rect(0, 150, 200, 100), "You won! Tap the screen to restart");
                break;
            case GameState.Lost:
                GUI.Label(new Rect(0, 150, 200, 100), "You lost! Tap the screen to restart");
                break;
            default:
                break;
        }
    }
Slingshot script
The slingshot script handles all the interactions made when the bird is tied to the slingshot. It begins by initiating some variables.
public class SlingShot : MonoBehaviour
{

    //a vector that points in the middle between left and right parts of the slingshot
    private Vector3 SlingshotMiddleVector;

    [HideInInspector]
    public SlingshotState slingshotState;

    //the left and right parts of the slingshot
    public Transform LeftSlingshotOrigin, RightSlingshotOrigin;

    //two line renderers to simulate the "strings" of the slingshot
    public LineRenderer SlingshotLineRenderer1;
    public LineRenderer SlingshotLineRenderer2;

    //this linerenderer will draw the projected trajectory of the thrown bird
    public LineRenderer TrajectoryLineRenderer;

    [HideInInspector]
    //the bird to throw
    public GameObject BirdToThrow;

    //the position of the bird tied to the slingshot
    public Transform BirdWaitPosition;

    public float ThrowSpeed;

    [HideInInspector]
    public float TimeSinceThrown;
On the Start method, it sets the sorting layer for our line renderers (since you currently cannot do it in the editor) and calculates the middle point of the slingshot, that is the point that has an equal distance with the two parts of the slingshot.
    void Start()
    {
        //set the sorting layer name for the line renderers
        //for the slingshot renderers this did not work so I
        //set the z on the background sprites to 10
        //hope there's a better way around that!
        SlingshotLineRenderer1.sortingLayerName = "Foreground";
        SlingshotLineRenderer2.sortingLayerName = "Foreground";
        TrajectoryLineRenderer.sortingLayerName = "Foreground";

        slingshotState = SlingshotState.Idle;
        SlingshotLineRenderer1.SetPosition(0, LeftSlingshotOrigin.position);
        SlingshotLineRenderer2.SetPosition(0, RightSlingshotOrigin.position);

        //pointing at the middle position of the two vectors
        SlingshotMiddleVector = new Vector3((LeftSlingshotOrigin.position.x + RightSlingshotOrigin.position.x) / 2,
            (LeftSlingshotOrigin.position.y + RightSlingshotOrigin.position.y) / 2, 0);
    }
The Update method is somewhat big, so we’ll analyze it case by case. When the slingshot is on the idle state it transfers the bird to the correct position, displays the slingshot slings line renderers. If the user taps and the tap is inside the bird’s collider (remember that the bird’s collider is bigger before it’s thrown!) we change the state.
   void Update()
    {
        switch (slingshotState)
        {
            case SlingshotState.Idle:
                //fix bird's position
                InitializeBird();
                //display the slingshot "strings"
                DisplaySlingshotLineRenderers();
                if (Input.GetMouseButtonDown(0))
                {
                    //get the point on screen user has tapped
                    Vector3 location = Camera.main.ScreenToWorldPoint(Input.mousePosition);
                    //if user has tapped onto the bird
                    if (BirdToThrow.GetComponent<CircleCollider2D>() == Physics2D.OverlapPoint(location))
                    {
                        slingshotState = SlingshotState.UserPulling;
                    }
                }
                break;
On the user pulling state, we have the user keep dragging the bird. We calculate the distance between the bird and the slingshot’s middle point. If it’s large enough, we do not let the user pull it more. If it’s in the “1.5” range, it’s OK so we move the bird to the desired position. Finally, we display the projected bird trajectory when thrown.
            case SlingshotState.UserPulling:
                DisplaySlingshotLineRenderers();

                if (Input.GetMouseButton(0))
                {
                    //get where user is tapping
                    Vector3 location = Camera.main.ScreenToWorldPoint(Input.mousePosition);
                    location.z = 0;
                    //we will let the user pull the bird up to a maximum distance
                    if (Vector3.Distance(location, SlingshotMiddleVector) > 1.5f)
                    {
                        //basic vector maths :)
                        var maxPosition = (location - SlingshotMiddleVector).normalized * 1.5f + SlingshotMiddleVector;
                        BirdToThrow.transform.position = maxPosition;
                    }
                    else
                    {
                        BirdToThrow.transform.position = location;
                    }
                    float distance = Vector3.Distance(SlingshotMiddleVector, BirdToThrow.transform.position);
                    //display projected trajectory based on the distance
                    DisplayTrajectoryLineRenderer2(distance);
                }
How does this “max distance” thing work? Take a look at the following sketch. B is the middle point of the slingshot, C is the position where the user is dragging the bird (more than 1.5f distance) and A is the (unknown) position where we want to place the bird.
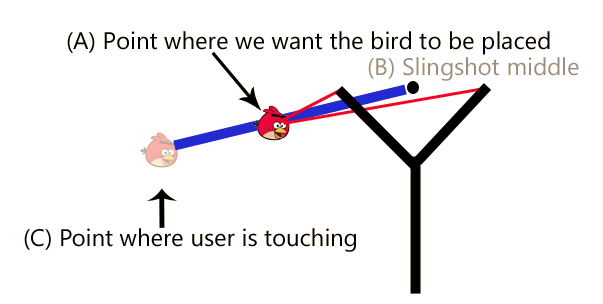
If we were to replace the above sketch with a cartesian level, this would be like this
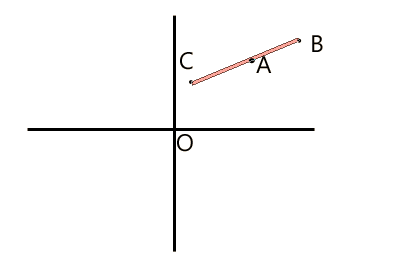
So, we’re looking for the OA vector. We know OC and OB and we know that BC is BA normalized multiplied by 1.5f (that’s the max distance we set). Some vector maths are on the way!
BA = BC.normalized * 1.5f (since BA + OB = OA)
OA – OB = BC.normalized * 1.5f (since BC = OC – OB)
OA = (OC – OB).normalized * 1.5f + OB
Since we know OC as the location that the user is tapping and OB is the slingshot middle vector, we can replace them and find the max drag location
var maxPosition = (location - SlingshotMiddleVector).normalized * 1.5f + SlingshotMiddleVector;
When the user leaves the bird, we check if she has pulled long enough. If she has, we throw the bird. If not, we animate it back to the starting/idle position.
 else//user has removed the tap
                {
                    SetTrajectoryLineRenderesActive(false);
                    //throw the bird!!!
                    TimeSinceThrown = Time.time;
                    float distance = Vector3.Distance(SlingshotMiddleVector, BirdToThrow.transform.position);
                    if (distance > 1)
                    {
                        SetSlingshotLineRenderersActive(false);
                        slingshotState = SlingshotState.BirdFlying;
                        ThrowBird(distance);
                    }
                    else//not pulled long enough, so reinitiate it
                    {
                        //distance/10 was found with trial and error :)
                        //animate the bird to the wait position
                        BirdToThrow.transform.positionTo(distance / 10, //duration
                            BirdWaitPosition.transform.position). //final position
                            setOnCompleteHandler((x) =>
                        {
                            x.complete();
                            x.destroy();
                            InitializeBird();
                        });

                    }
The ThrowBird method calculates the velocity of the thrown bird (which is proportional to the amount of drag that bird has endured) and throws the bird by modifying its ridigdbody velocity property. An alternative way would be to add a force to it. In the end, we raise the BirdThrown event so that the game manager takes notice of bird’s throw.
 private void ThrowBird(float distance)
    {
        //get velocity
        Vector3 velocity = SlingshotMiddleVector - BirdToThrow.transform.position;
        BirdToThrow.GetComponent<Bird>().OnThrow(); //make the bird aware of it
        //old and alternative way
        //BirdToThrow.GetComponent<Rigidbody2D>().AddForce
        //    (new Vector2(v2.x, v2.y) * ThrowSpeed * distance * 300 * Time.deltaTime);
        //set the velocity
        BirdToThrow.GetComponent<Rigidbody2D>().velocity = new Vector2(velocity.x, velocity.y) * ThrowSpeed * distance;


        //notify interested parties that the bird was thrown
        if (BirdThrown != null)
            BirdThrown(this, EventArgs.Empty);
    }
The DisplaySlingshotLineRenderers method sets the correct position for the slingshot “strings” that the bird is attached to whereas the SetSlingshotLineRenderersActive and SetTrajectoryLineRenderers methods simply enable/disable the respective renderers.
 void DisplaySlingshotLineRenderers()
    {
        SlingshotLineRenderer1.SetPosition(1, BirdToThrow.transform.position);
        SlingshotLineRenderer2.SetPosition(1, BirdToThrow.transform.position);
    }

    void SetSlingshotLineRenderersActive(bool active)
    {
        SlingshotLineRenderer1.enabled = active;
        SlingshotLineRenderer2.enabled = active;
    }

    void SetTrajectoryLineRenderesActive(bool active)
    {
        TrajectoryLineRenderer.enabled = active;
    }
The DisplayTrajectoryLineRenderer is used to display the trajectory of the bird when thrown. As we remember from our physics class for throws
– the horizontal space is calculated like spaceFinalX = spaceInitialX + velocityX * time (no acceleration in the X axis)
– the vertical space is calculated like spaceFinalY = spaceInitialY + velocityY * time + 0.5 * accelerationY * timeSquared
However, accelerationY is equal to gravity! Consequently, in vector math this would be space = spaceInitial + velocity * time + 0.5 * gravity * timeSquared. Which leads us to the below formula. We use 15 segments which are more than enough for the projected trajectory.
    void DisplayTrajectoryLineRenderer2(float distance)
    {
        SetTrajectoryLineRenderesActive(true);
        Vector3 v2 = SlingshotMiddleVector - BirdToThrow.transform.position;
        int segmentCount = 15;
        float segmentScale = 2;
        Vector2[] segments = new Vector2[segmentCount];

        // The first line point is wherever the player's cannon, etc is
        segments[0] = BirdToThrow.transform.position;

        // The initial velocity
        Vector2 segVelocity = new Vector2(v2.x, v2.y) * ThrowSpeed * distance;

        float angle = Vector2.Angle(segVelocity, new Vector2(1, 0));
        float time = segmentScale / segVelocity.magnitude;
        for (int i = 1; i < segmentCount; i++)
        {
            //x axis: spaceX = initialSpaceX + velocityX * time
            //y axis: spaceY = initialSpaceY + velocityY * time + 1/2 * accelerationY * time ^ 2
            //both (vector) space = initialSpace + velocity * time + 1/2 * acceleration * time ^ 2
            float time2 = i * Time.fixedDeltaTime * 5;
            segments[i] = segments[0] + segVelocity * time2 + 0.5f * Physics2D.gravity * Mathf.Pow(time2, 2);
        }

        TrajectoryLineRenderer.SetVertexCount(segmentCount);
        for (int i = 0; i < segmentCount; i++)
            TrajectoryLineRenderer.SetPosition(i, segments[i]);
    }
If you’ve made it this far, you certainly deserve a break! Feel free to take one, then
– download or browse the source code here on GitHub https://github.com/dgkanatsios/AngryBirdsClone
– play the game via Unity’s web player here http://unitysamples.azurewebsites.net/angrybirdsclone
If you are new to Unity, check out a cool intro video series here. For instructions on how to deploy your existing game onto Windows Store/Phone, check out the Microsoft Virtual Academy video here: http://www.microsoftvirtualacademy.com/training-courses/porting-unity-games-to-windows-store-and-windows-phone

[…] Angry Birds style game in Unity 3D (source code included) […]
LikeLike
The code Is MIT license, free to modify or distribute or resale ?
LikeLike
Sure, check license on GitHub for details
LikeLike
Download source code in github but can not play in Unity game mode or build game for PC ?? Found a lot of errors in console. Is Unity 2017 version is not compatible with this source code ?
LikeLike
I haven’t tested it in latest versions of Unity to be honest, but I suppose that C# scripts should be working. Did you download all the files from the repository? What kind of errors are you seeing?
LikeLiked by 1 person
Does not works for unity 5.0 and 4.3 version also ?
LikeLike
Yes it does
LikeLike
Sir there are only two States for the bird… Before throw and after throw…..the collider 2d before throw is big and after throw is normal…but when I release the bird after pulling the collider of both bird get collided…..i want the collider 2d to be big only when the bird is on the slingshot…on the rest position the collider 2d should be normal… 0plz answer me
LikeLike
[…] code as well as a detailed tutorial is provided for educational […]
LikeLike